Setting up your DataMart
In CONNECT, we recommend a data first approach to email marketing. Thinking about your data before you think about the content provides a unique perspective into what will drive your email campaigns and create a target experience for your customers.
In this chapter, we will review how to set-up the DataMart and upload your existing customer list into CONNECT so that you can begin to craft your first email message.
Subscriptions
The driving force behind any email program is the Opt-in/Opt-out process that has been put into place. This will allow customers to start receiving your email campaigns or stop receiving them.
In CONNECT, Subscriptions helps you manage this process and track which contacts with your DataMart have explicitly opted-in or out of your email program.
Depending on your unique set-up, you might require a single subscription or multiple. This is highly dependent on your email program and the options or preferences you provide to your contacts. Before creating subscriptions, you want to take a moment to think about the different categories of emails that you will be sending to your contacts and if you want to provide them with the option of opting in or opting out of those categories.
Emma wants to send out two different categories of email messages to her contacts. She plans to send out a monthly newsletter and she wants to send out occasional promotional emails that provide offers to her customers. Emma has 2 options for her email program and how contacts opt-in and out of it.
Option A - Emma has 2 subscriptions, Newsletter and Promotions. She creates a subscribe form that allows new subscribers to opt-in to one or both of these subscriptions. When the subscribers wish to unsubscribe from her email program, they have the option to stop receiving one or both of the categories/subscriptions.
Option B - Emma has 1 subscription, General. She has a simple subscribe and unsubscribe form that opts each contact in and out of all emails she sends.
The most crucial part of subscriptions is how the data is imported into CONNECT for the process to be managed properly. Whether you leverage the Web Form and Landing Page tools within the platform or build your pages outside the tool and provide the data through our API, you must ensure each Subscription has a defined opt-in and opt-out process.
Fields
This section helps you set-up and manage all of the data points you wish to collect on each of your contacts. This is one of the first things you will want to setup before using CONNECT as it provides the structure for uploading contacts and is the focal point for all dynamic content you will be setting up your messages.
Please read the following carefully before using this screen.
When selecting an "Identifier", you will want to consider the source of your contact list. If you are managing the list within CONNECT, the email address field is a great choice. If you are managing your list in another system (e.g. CRM) you might want to consider using the unique identifier that is being created within that system.
Currently, CONNECT supports only 1 email field in your database. If you have any other email address fields, they will need to be entered as text fields and cannot be used for deployment.
Once a field is created and data is uploaded to the field, it cannot be removed from your DataMart.
If you have created a field you no longer need and have not uploaded data to it, please contact CONNECT Support to have it removed.
If you have a field you no longer need and data has been uploaded to it, we recommend either renaming it with "DONOTUSE" in front of it or if you have a need for a new field, rename it to the new field name and upload a list of data to overwrite all contact values for it.
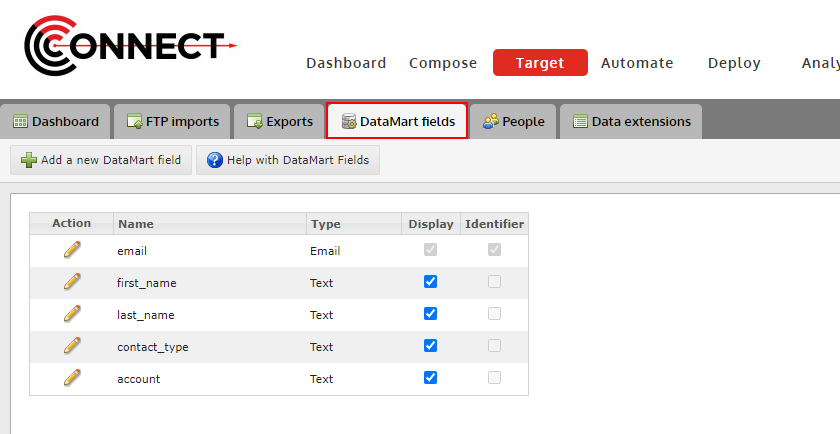
To get started, navigate to the "DataMart fields" tab
Adding a New Field
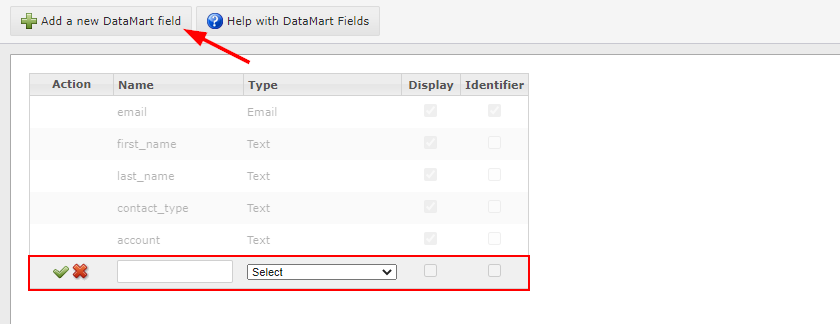
Steps:
- Click on the "Add a new DataMart field" button
- Type in the field name you wish to add
- Select the data type that will be collected in this field.
- Click the check mark to finish
OPTIONAL: Check "Display" if you would like this field to appear in "People".
Editing an Existing Field

- Click on the edit icon located next to the Field Name you would like to edit.
- Currently, you can only edit the name of a field.
Uploading your contact list
Lists are a great way to bulk upload your original contact lists, to make manual, bulk updates along the way and create static lists of contacts that you plan to use for deployment.
As this feature is able to update/overwrite sensitive contact data, it is important to use a small list first to test this feature. We recommend using yourself and a few other internal people to test with and get a full understanding of the impact of uploading data into CONNECT.
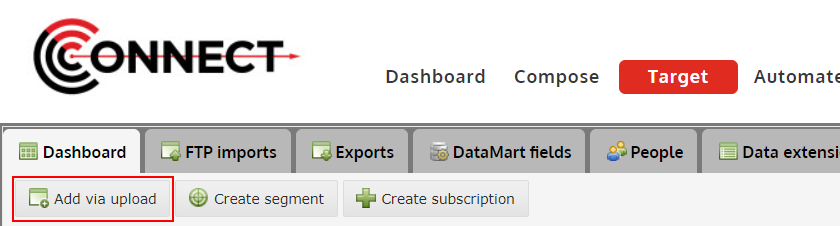
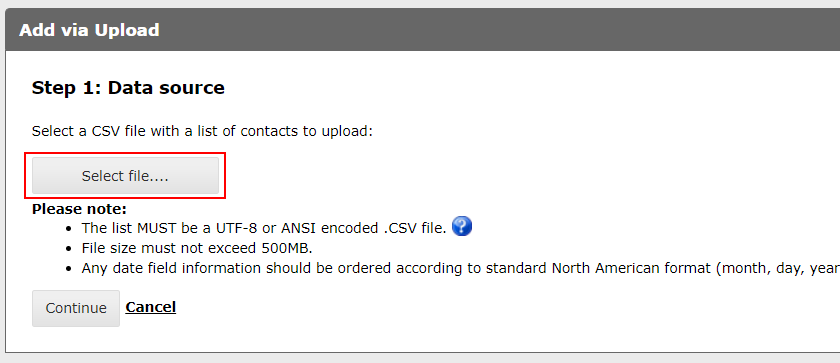
Click "Add via upload" to begin
Select the file you would like to upload
Make note of the file requirements stated below the "Select file..." button
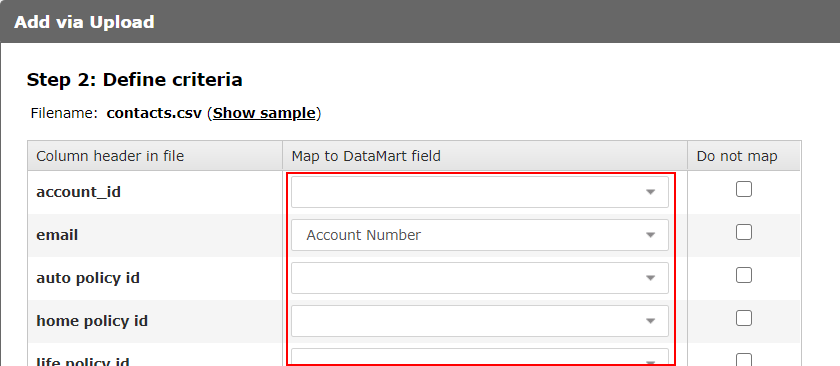
Map each column header from your file to a DataMart field
CONNECT might automatically do this for you if you have mapped the header in your file before. It is still a good practice to check it over however to ensure accuracy
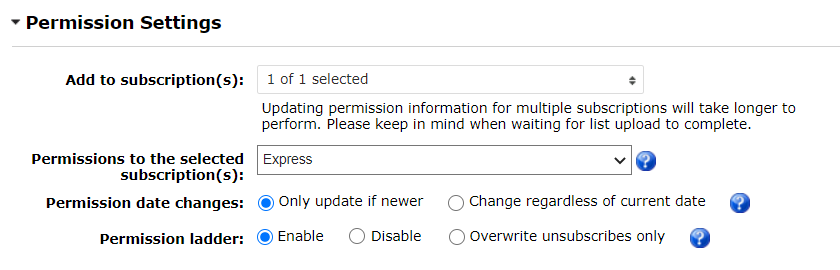
OPTIONAL: Adjust the permission settings
It's important to read this step carefully and thoroughly before continuing. The settings you choose here will directly impact the permission status of your contacts and if done incorrectly, could put you in violation of anti-spam legislation.
The permission settings feature provides you with the capability to bulk update a contact's permission status with your subscriptions. This comes in handy when you are first uploading your contacts into CONNECT or you might receive a list of opt-ins or opt-outs from another source and you need to manually upload those into CONNECT.
There are 2 scenarios you are going to run into as a new user:
Scenario 1
You are importing your contacts for the first time and have existing subscription information. For this scenario, you will want to reach out to your CONNECT support team to help you with the right approach depending on your number of subscriptions and the permission data you have.
Scenario 2
You manage your contact list outside of CONNECT and do not need CONNECT to manage your opt-in/opt-out process. Since CONNECT requires each contact be "subscribed" to at least one subscription for email sending to occur, you will simply upload every list with an "express" permission to your one subscription and you are done.
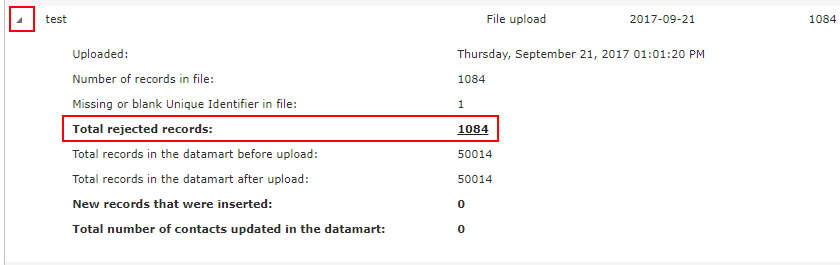
View the progress of your upload on the Dashboard
Once you click "Upload" and return to the Target Dashboard, you will be able to view the progress of your list upload.

After your upload is finished, we HIGHLY recommend review the results of your upload to ensure all records were uploaded successfully. To do this, click on the arrow icon next to the filename and the results will expand. Pay particular attention to the "Total rejected records" count. If there are any records that were rejected, you can click, that count and download them to see why they were rejected.