Beginner's Guide
This guide will help introduce you to all of the features you need to know about to set-up and deploy your first email campaign from CONNECT. It focuses on a primary use case but if your specific email campaign has advanced pieces, it will provide additional links along the way to learn more about the features you will need to know about to build your specific campaign.
- Getting to know CONNECT
- Setting up your DataMart
- Setting up your first template
- Setting up your first message
- Introduction to the Message Builder
- Envelope Information
- Updating the content
- Generating the text version
- Tracking opens and clicks
- Testing your email
- Deploying your first email
- Analyzing the results
Getting to know CONNECT
In this chapter, we will walk you through how to navigate around CONNECT and get acquainted with the user interface.
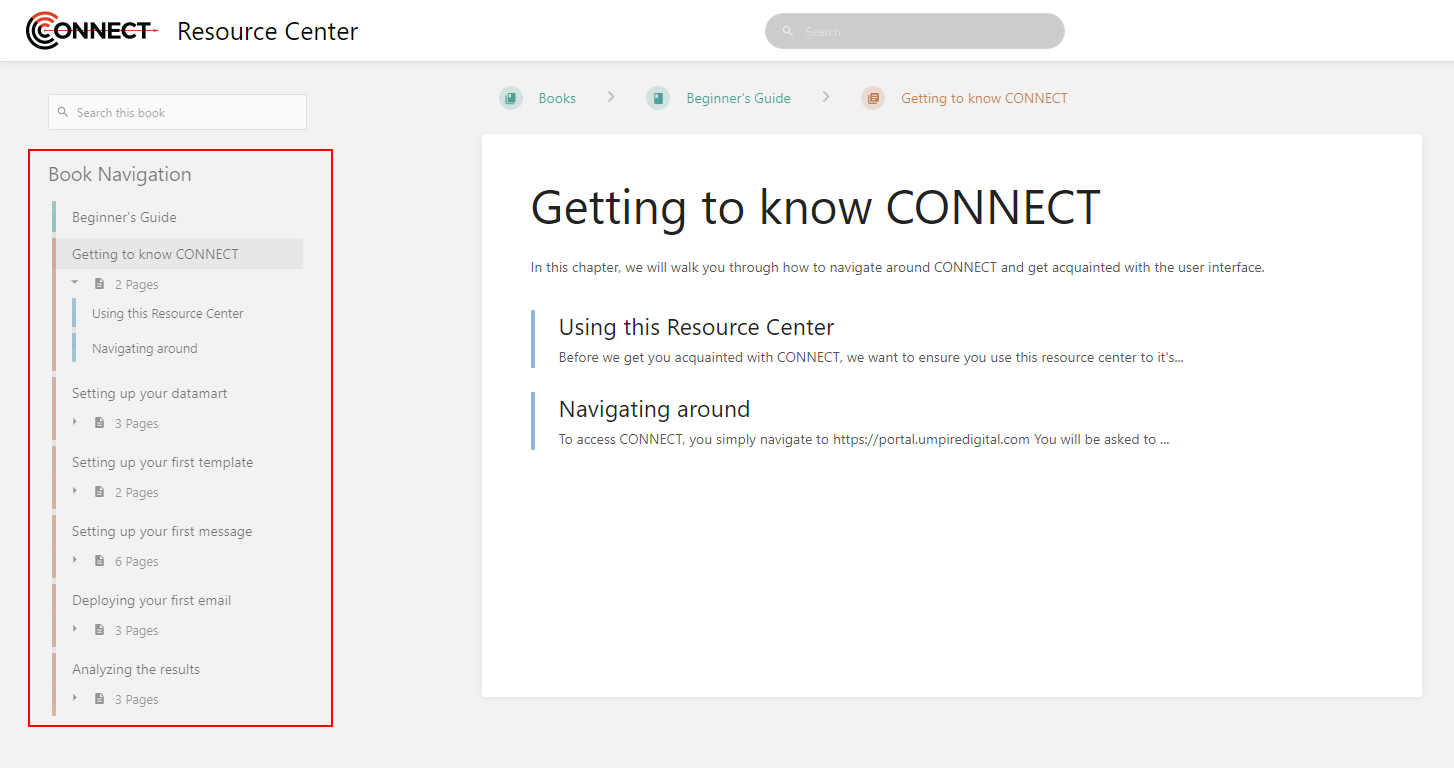
Using this Resource Center
Before we get you acquainted with CONNECT, we want to ensure you use this resource center to it's full potential. As you might have noticed already, our resource center is based around books that you can browse, search and read through to find the content you need.
When viewing a book, we recommend using the left navigation to jump to the sections you need or to simply continue reading the next page.
Other books you might find useful or interesting after the beginner's guide:
<<BOOK?>>
<<LINK TO TIPS AND TRICKS>>
<<LINK TO GLOSSARY>>
Navigating around
To access CONNECT, you simply navigate to https://portal.umpiredigital.com
You will be asked to sign into our Single Sign On system first. The credentials you use will have been provided by our support staff. If you have forgotten/lost your credentials and need a replacement, please reach out to support@tekside.io.
Once you have signed in, you will be directed to your community or asked to select a community (depending on your set-up).
The CONNECT platform is broken up into 5 main sections:
COMPOSE - Create emails, landing pages, web forms and manage your images
TARGET - Upload and manage your contact list, segment your data and build FTP import jobs for continuous data updates.
AUTOMATE - Build automated email programs based on a variety of criteria
DEPLOY - Manage, schedule and deliver your email campaigns in bulk, AB testing or triggers
ANALYZE - Review the results of your email campaigns and identify key metrics to help illustrate the success of your campaigns
Setting up your DataMart
In CONNECT, we recommend a data first approach to email marketing. Thinking about your data before you think about the content provides a unique perspective into what will drive your email campaigns and create a target experience for your customers.
In this chapter, we will review how to set-up the DataMart and upload your existing customer list into CONNECT so that you can begin to craft your first email message.
Subscriptions
The driving force behind any email program is the Opt-in/Opt-out process that has been put into place. This will allow customers to start receiving your email campaigns or stop receiving them.
In CONNECT, Subscriptions helps you manage this process and track which contacts with your DataMart have explicitly opted-in or out of your email program.
Depending on your unique set-up, you might require a single subscription or multiple. This is highly dependent on your email program and the options or preferences you provide to your contacts. Before creating subscriptions, you want to take a moment to think about the different categories of emails that you will be sending to your contacts and if you want to provide them with the option of opting in or opting out of those categories.
Emma wants to send out two different categories of email messages to her contacts. She plans to send out a monthly newsletter and she wants to send out occasional promotional emails that provide offers to her customers. Emma has 2 options for her email program and how contacts opt-in and out of it.
Option A - Emma has 2 subscriptions, Newsletter and Promotions. She creates a subscribe form that allows new subscribers to opt-in to one or both of these subscriptions. When the subscribers wish to unsubscribe from her email program, they have the option to stop receiving one or both of the categories/subscriptions.
Option B - Emma has 1 subscription, General. She has a simple subscribe and unsubscribe form that opts each contact in and out of all emails she sends.
The most crucial part of subscriptions is how the data is imported into CONNECT for the process to be managed properly. Whether you leverage the Web Form and Landing Page tools within the platform or build your pages outside the tool and provide the data through our API, you must ensure each Subscription has a defined opt-in and opt-out process.
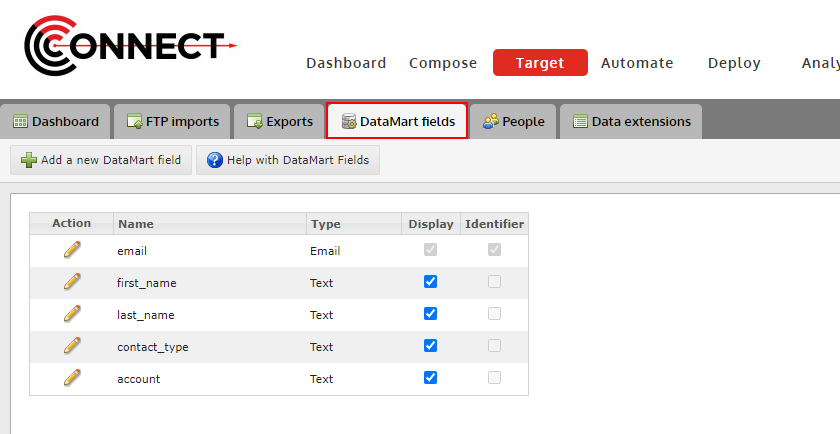
Fields
This section helps you set-up and manage all of the data points you wish to collect on each of your contacts. This is one of the first things you will want to setup before using CONNECT as it provides the structure for uploading contacts and is the focal point for all dynamic content you will be setting up your messages.
Please read the following carefully before using this screen.
When selecting an "Identifier", you will want to consider the source of your contact list. If you are managing the list within CONNECT, the email address field is a great choice. If you are managing your list in another system (e.g. CRM) you might want to consider using the unique identifier that is being created within that system.
Currently, CONNECT supports only 1 email field in your database. If you have any other email address fields, they will need to be entered as text fields and cannot be used for deployment.
Once a field is created and data is uploaded to the field, it cannot be removed from your DataMart.
If you have created a field you no longer need and have not uploaded data to it, please contact CONNECT Support to have it removed.
If you have a field you no longer need and data has been uploaded to it, we recommend either renaming it with "DONOTUSE" in front of it or if you have a need for a new field, rename it to the new field name and upload a list of data to overwrite all contact values for it.
To get started, navigate to the "DataMart fields" tab
Adding a New Field
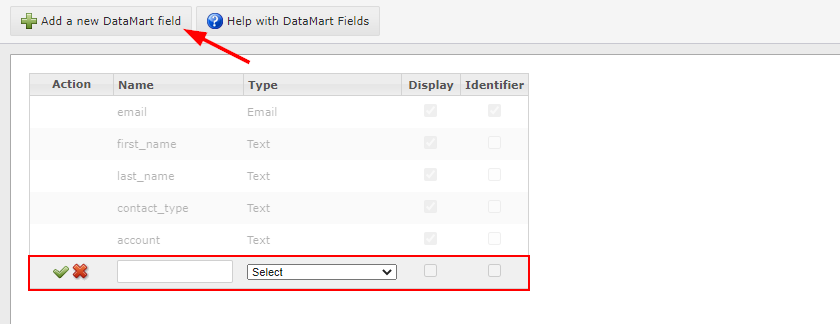
Steps:
- Click on the "Add a new DataMart field" button
- Type in the field name you wish to add
- Select the data type that will be collected in this field.
- Click the check mark to finish
OPTIONAL: Check "Display" if you would like this field to appear in "People".
Editing an Existing Field

- Click on the edit icon located next to the Field Name you would like to edit.
- Currently, you can only edit the name of a field.
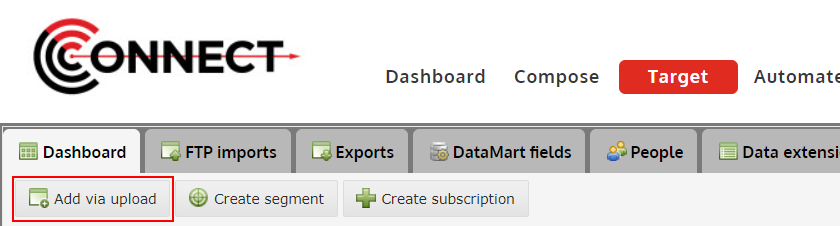
Uploading your contact list
Lists are a great way to bulk upload your original contact lists, to make manual, bulk updates along the way and create static lists of contacts that you plan to use for deployment.
As this feature is able to update/overwrite sensitive contact data, it is important to use a small list first to test this feature. We recommend using yourself and a few other internal people to test with and get a full understanding of the impact of uploading data into CONNECT.
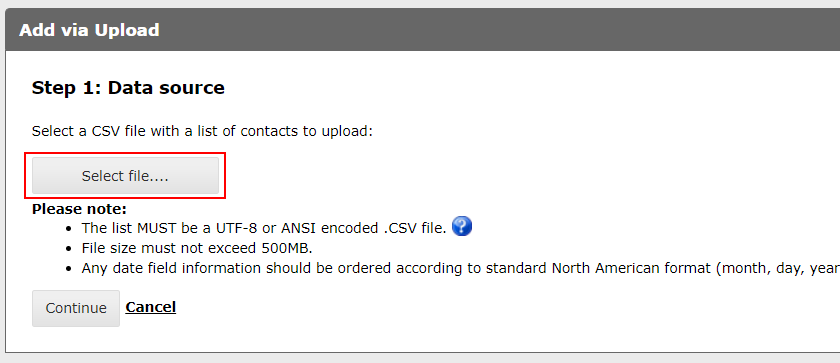
Click "Add via upload" to begin
Select the file you would like to upload
Make note of the file requirements stated below the "Select file..." button
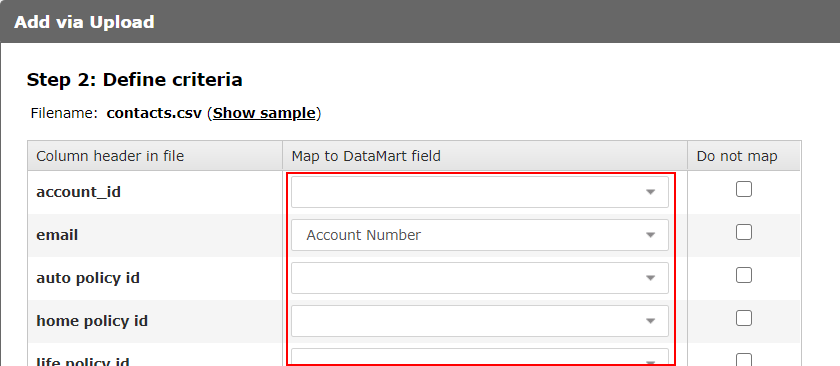
Map each column header from your file to a DataMart field
CONNECT might automatically do this for you if you have mapped the header in your file before. It is still a good practice to check it over however to ensure accuracy
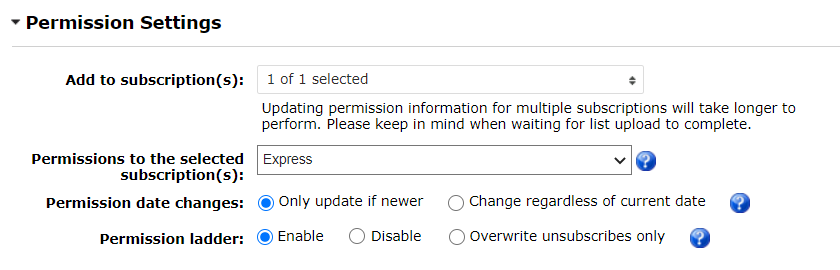
OPTIONAL: Adjust the permission settings
It's important to read this step carefully and thoroughly before continuing. The settings you choose here will directly impact the permission status of your contacts and if done incorrectly, could put you in violation of anti-spam legislation.
The permission settings feature provides you with the capability to bulk update a contact's permission status with your subscriptions. This comes in handy when you are first uploading your contacts into CONNECT or you might receive a list of opt-ins or opt-outs from another source and you need to manually upload those into CONNECT.
There are 2 scenarios you are going to run into as a new user:
Scenario 1
You are importing your contacts for the first time and have existing subscription information. For this scenario, you will want to reach out to your CONNECT support team to help you with the right approach depending on your number of subscriptions and the permission data you have.
Scenario 2
You manage your contact list outside of CONNECT and do not need CONNECT to manage your opt-in/opt-out process. Since CONNECT requires each contact be "subscribed" to at least one subscription for email sending to occur, you will simply upload every list with an "express" permission to your one subscription and you are done.
View the progress of your upload on the Dashboard
Once you click "Upload" and return to the Target Dashboard, you will be able to view the progress of your list upload.

After your upload is finished, we HIGHLY recommend review the results of your upload to ensure all records were uploaded successfully. To do this, click on the arrow icon next to the filename and the results will expand. Pay particular attention to the "Total rejected records" count. If there are any records that were rejected, you can click, that count and download them to see why they were rejected.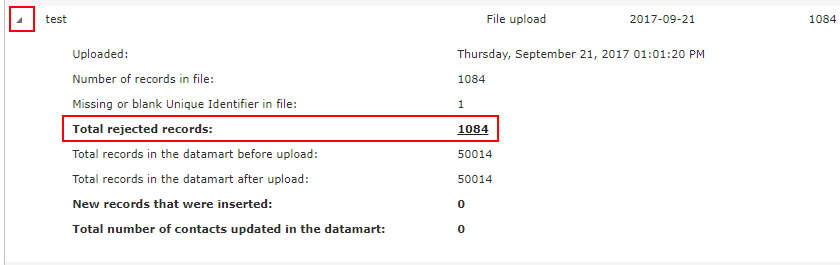
Setting up your first template
Templates are a great way to keep your branding and messaging consistent while also keeping your campaign set-up time to a minimum. This chapter will focus on walking you through setting up a re-usable template that you can use as a starting point for all your future email campaigns.
Creating a new template
Templates provide a great way to make re-usable content to keep your branding and messaging consistent across various email campaigns. They also help cut down on the set-up time of each email message within CONNECT.
Tutorial
Please note: To try out the feature, click the full screen icon  in the tutorial.
Email design best practices
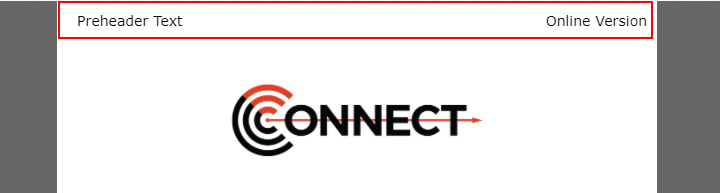
Preheader
The preheader of an email is the text the appears before the main header of the email. We recommend including one in your email template as it provides a great way to introduce the email and is usually the first piece of text shown to the user in their email client in the "preview" area.
The left text is where you put the key message of your template. This can be an offer or the main article headline of your newsletter. It should grab their attention so they want to open your email and continue reading.
The right is where we recommend adding in an online version (web version) link. This is a link the user can use to read your email in their web browser instead of the email client. See "Web Version" below on how to create this link in CONNECT.
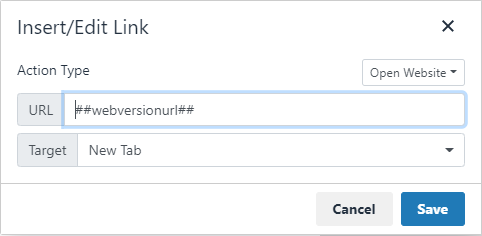
Web Version
When adding a web version link to your template, you might want to use common phrases such as "Online Version" or "View this in your browser". This text is then linked using the editor and where you put the URL, you put a special dynamic variable tag that CONNECT will recognize "##webversionurl##". This tells CONNECT to generate a unique URL for that recipient and place that URL in place of the tag.
Setting up your first message
In this chapter, you will bring together all of your content into an email message. A message will contain your envelope information, content and provide testing features for you to ensure you are providing a well crafted email.
Introduction to the Message Builder
The CONNECT Message Builder allows you to craft and test the email content you plan to send to your recipients. It takes you through a 6 step process with a wide variety of options, editors and testing tools to make your email campaign successful.
Details - This is the overall settings for your message. You can adjust the name, campaign, content editor, template and additional dynamic settings on this step.
Envelope - Create and set your From/Reply-To addresses as well as your subject line from this step.
Content - Using your editor of choice, craft the HTML version of your email message.
Text - Generate and edit the alternate text version of your email message.
Preview - Preview your content to ensure it meets your requirements.
Click Tracking - Review the links being tracked and update the friendly names being used for reporting/segmentation.
Test - Send test versions of your email message to yourself and other recipients.
Envelope Information
From Address/Reply-To Address
The From Address is one of the most important parts of your email campaign. It identifies who you are to not only your customers but the ISP's (Gmail, Hotmail, etc.) as well. And with any identity, it also indicates your reputation in the space as well. If your a proper email sender who follows all the rules, or a spammer who they should block.
Below we will discuss specific parts of the from address that might help you decide what to use.
The Sending Domain

- The Sending Domain holds your identity. Consider it your passport to the email space, it holds where you've been and you need it to get where you want to go.
- You can also configure this domain to use special records that, if used properly, will confirm to ISP's that you are a legitimate email sender.
- The domain is the last half of your email address, that piece after the "@" symbol.
- For example, if your email address is "support@umpiredigital.com", then your domain would be "umpiredigital.com".
The Local Part

- The Local Part of your from address is more for show and can be used to identify the type of email that they will be receiving or what to expect from that address.
- In most cases, email senders use things like "email@" or "newsletter@". One thing to stay away from is "info@".
- This type of address is commonly flagged as Junk in a lot Junk Filters in products like Hotmail or Outlook.
- You can also use something more personal if your email calls for it, like "Jennifer@" and so forth.
- The great thing about the Local Part in email sending in CONNECT is that the Local Part can be whatever you want it to be, even if it's not a valid email address.
- The important piece for you to able to send is the Sending Domain and this must be set up by CONNECT Support in order for your emails to be deployed.
Subject Line
The subject line of your email should entice recipients to open your email. It's the first thing they see in their inbox and can make or break your readership.
Use the personalization options available to you next the subject line input to add a personal and target touch to your subject line and entice the user to open your email.
Updating the content
The Content step is where you will spend most of your time when building your message. It is where you provide the HTML content that will be sent to your contact list. While we also offer a WYSIWYG editor or Code editor, we will be covering the Drag and Drop editor in this tutorial.
Tutorial
Please note: To try out the feature, click the full screen icon in the tutorial.
Generating the text version
Why do I need a text version?
The text version provides a non-HTML code version of your email to the end-recipient. This version is used by some screen readers for the hearing impaired as well as any recipients who do not allowed HTML emails to be viewed.
Finally, spammers tend to not worry about the text version so it's absence can be a red flag to email providers like Gmail so we make it a mandatory step in CONNECT to ensure you get the best results for your email campaigns.
Instructions
We've made it super simple to generate the content for your text version. We recommend doing this after you have finished the HTML version of your email.
Click the "Generate text version" button and edit as necessary

Tracking opens and clicks
One of the many benefits of email marketing is it's ability to easily track the user's engagement and interest in the content you send them. Two very common things to track in email is if the recipient opened the email and if they clicked a link in your email.
CONNECT makes setting up this tracking extremely easy and uses that tracking to provide some great reports on your email's success as well as the capability to segment your contact list based on their engagement.
Open Tracking
CONNECT automatically applies open tracking to your email content so no additional step required here. When open tracking is applied, an invisible 1 pixel image will be placed at the bottom of your HTML code that when loaded, will tell CONNECT that the recipient has opened the email.
This brings up one caveat with open tracking. To log an open, the user must display images in their email. Some email clients do not automatically display images, so if the user does not opt-in to display images, an open won't register.
With that said, CONNECT combats this by assuming an open when a click occurs, ensuring your open rate is accurate.
Click Tracking
CONNECT also scopes out each link in your HTML content and applies tracking automatically. When click tracking is applied, the URL in your link is replaced with a unique redirect link generated by CONNECT. When the recipient clicks on the link, the click is recorded for that specific link and then the user is redirect to the intended page.
There is however, one extra (optional) step you may want to consider when setting up your message. CONNECT offers you the ability to provide friendly names for your links. Names are automatically generated based on the text of the link or the ALT text of the image you have link but sometimes you might have 10 links with "click here" as the text. This will make it challenging to determine which "click here" the recipient clicked on without looking at the full URL. CONNECT solves this by allowing you to name the link uniquely.
Follow the instructions below to name your links.
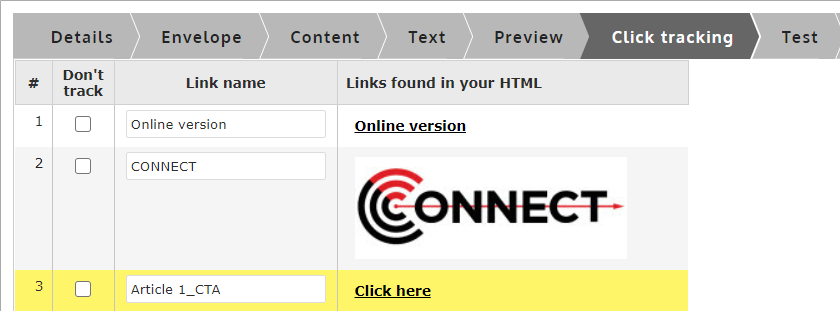
Update the Link Names to reflect what they are naming
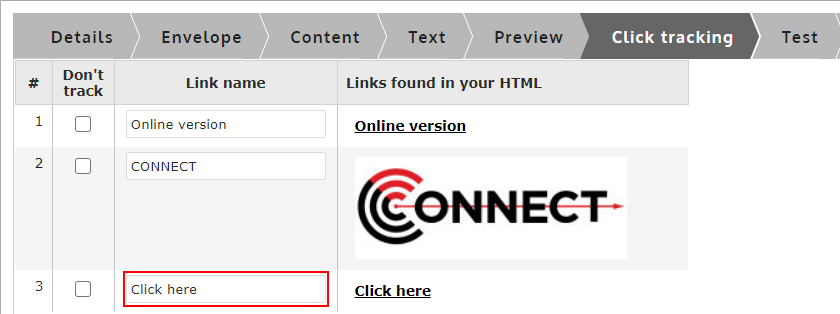
- Tip: Use a name that describes not only what the link is but where the link is in the message.
- This works effectively when you have the same link text or image (ie. Click Here) in multiple locations in your message and need to separate them out in reporting.
Save your work once finished
Changed link names will be highlighted in yellow
Testing your email
Preview
Previewing a message is a great way to verify the message you are about to use is correct and to instantly see the changes you have made to the message without the editor in the way.
This step is especially useful if you are using personalization/dynamic content as it provides a great way to verify that the logic and variables you used will work with the data you have collected for your contacts.
You can also view your envelope information by clicking on the "Envelope" expanding area above the preview pane.
If you do not have any personalization/dynamic content in your first email, simply use this step to proofread your content and move on to "Send Test Emails" below.
If you do have personalization/dynamic content, trying the following options:
Enter test values manually
We recommend trying to type in a few different values, some in ALL CAPS, some in all lowercase, to see how your content reacts to the data.
Click "Refresh Preview" to apply the data to the template.
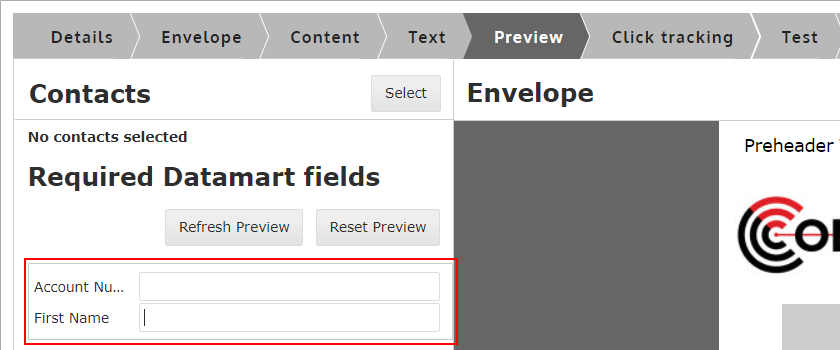
Try selecting a contact you have to use real data

When selecting contacts, you have access to the following options:
DataMart fields - Add/remove different DataMart fields from the contact grid on the right side of the screen to see additional data and use filtering/sorting to find the contacts you need.
Select contacts - Click the checkbox next to the contacts you want to use for previewing.
Click "Done" when you have selected the contacts you want. Then click the contact you want to use for previewing and it will load their data into the fields.
Click "Refresh Preview" to update the template.
Send Test Emails
Testing your messages is a very important process in quality assurance. We recommend thoroughly testing every message that you set up. Below are the steps necessary to send out test messages.
Selecting your recipients
By default, CONNECT allows you to send a copy of your email to the email address associated to your user account. You can also add in additional recipients to receive the test message.
We recommend starting with "Test recipients" as you can set them up right within the message instead of navigating to the Target screen (Stakeholders/Test Accounts)
Managing test recipients
To get started, we'll add one test recipient for you to test with.
- Click the "Manage test recipients" button
- In the pop-up window, click "Add recipient"
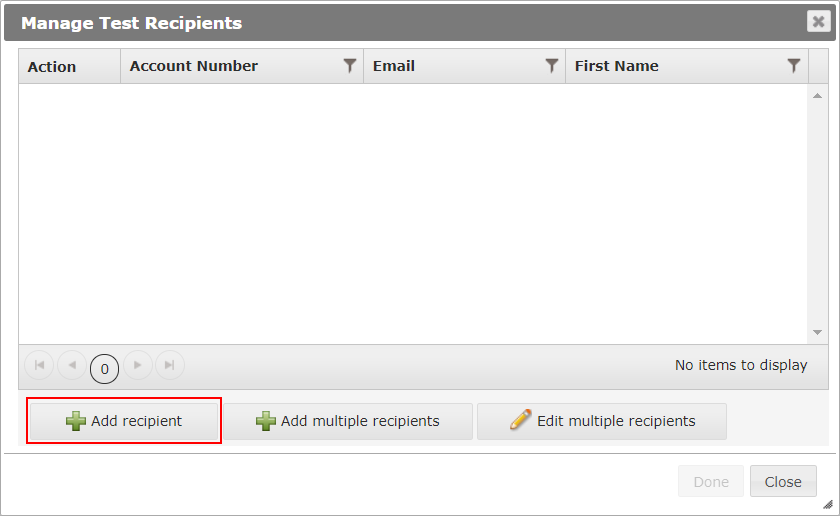
- Fill in the fields provided (Some fields can be left blank if required. The email field is required.)
- Click "Finish" (Or feel free to keep adding more if needed)
- Click "Done"
- Select the recipient(s) you added to receive the test message
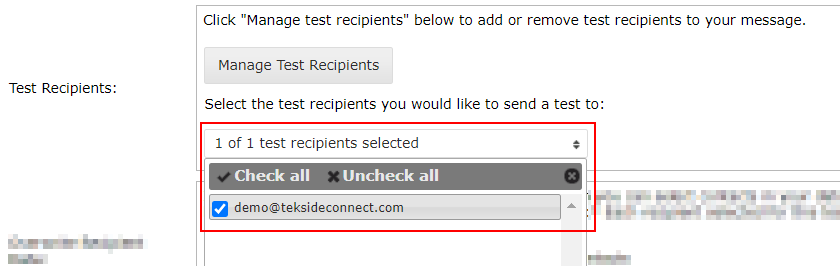
Ignore the other settings for now. They will be covered in greater detail later.
Type in a Prefix for the Subject Line to Track Versions
Although this step is technically optional, it's a step we recommend you get in the habit of using, especially if you are sending test messages to multiple people and expecting feedback.

- This option allows you to save a value in the Test step so that if you make changes later, you can change the version and that version will appear in the subject line.
- Example: Test - V1 - Subject line goes here
Finish by clicking Send

Deploying your first email
In this chapter, we'll get you acquainted and comfortable with the features that allow you to take the content you have created and the contact list you have collected into what we call an "email deployment".
Deployment setup
The moment you have been waiting for. It's time to set-up your first deployment. This step combines the content you have created in Messages with the contacts you have uploaded into your DataMart.
Selecting your message
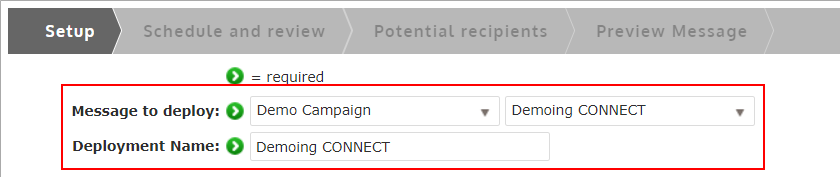
- Select the Campaign name and Message name
- Confirm/Update your Deployment name
The Deployment name must be unique. If you have used the message before, update the auto-filled deployment name to include a date at the end or something else that makes it unique.
Select recipients
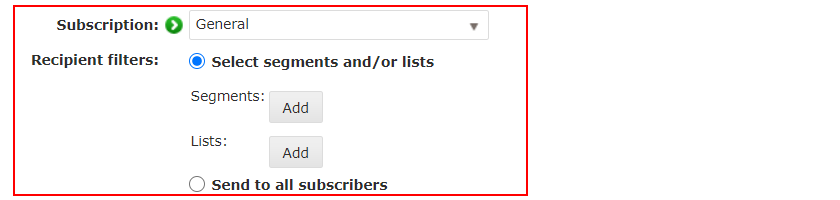
- Select the Subscription that the recipients must be subscribed to, to be included in the deployment
- Select either a segment/list you have created to target a specific group of contacts or select "Send to all subscribes" to target everyone that's subscribed to the subscription.
Click Save
There are more options available on this screen that will be covered later on.
Review, review and review some more
We cannot say it enough. This step is the most important when deploying emails. CONNECT has a fantastic view for you to ensure success in your email campaigns.
The "Schedule and review" step will provide you with all the information you need when setting up your deployment to ensure your content and contact list is correct.
To help you with what to look for, we have put together some checklists for you to go through with each deployment to help ensure your success.
Use these checklists for every deployment, even if it seems redundant. If you catch one mistake for every 10 emails without mistakes, then they are worth it.
Content
Envelope and Message Details
| � | Have you selected the right From Address, From Name and Reply-To address? |
| � | Does your subject line have any spelling mistakes or is it the correct one? |
| � | Is your campaign name and message name correct? |
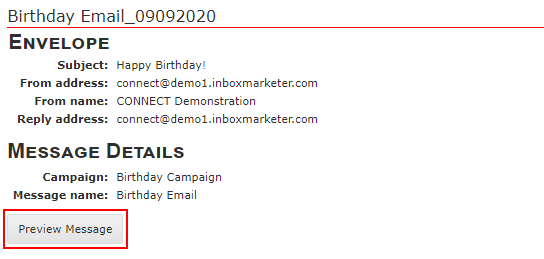
Preview
To preview your message, click on the "Preview Message" tab at the top or button under "Message Details"
| � | Are there any spelling mistakes, grammar mistakes, or incorrect information in the content? |
| � | Do all of the images render correctly, show the correct information and are void of spelling/grammar mistakes (if applicable)? |
| � |
Do all the links work and go to the correct URLs? |
| � |
Do you have an unsubscribe link (if applicable)? |
| � |
Does your email render properly on smaller screens widths? |
| � |
Do all of the dynamic areas of your email render properly with different types of data? |
Example
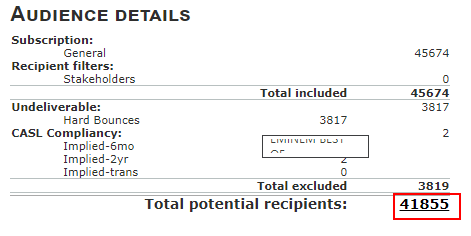
Audience Details
Counts
| � | Have you selected the correct subscription for the email you are sending? |
| � | Have you selected the correct recipient filters? |
| � |
Do the counts next to each recipient filter look correct? |
| � |
Does the final "Total included" count make sense to you? (Total recipients selected minus unsubscribes/not subscribes) |
| � |
Have you reviewed the undeliverable/CASL compliancy (if applicable) counts? Do they make sense? |
| � |
Does the final "Total potential recipient" count make sense to you? (Total included minus Total excluded) |
Contacts
To view your contact list, click the "Total potential recipients" count or click the "Potential recipients" tab at the top
| � | Does the first few contacts look correct to you? |
| � | Does the required fields look correct and match your dynamic content (if applicable)? |
Example
Scheduling and controlling your deployment
Once you have reviewed your email and are satisfied, you can decide to send the email immediately or schedule it for a future date and time. We always recommend the latter.
Select the date, time and time zone you would like your email to go out at.

Even if you want it to go out immediately, you can always schedule it 5-10 minutes in the future, just to give yourself that extra bit of time to breath and review.
Once you click Schedule, you will be taken back to the deploy dashboard where you can review and control your deployment
Controlling your deployment
On the Deploy dashboard, you will see both finished and active deployments.

Active deployments have a few different statuses but these are the 2 that provide controls:
Scheduled
A scheduled deployment will switch to "In Progress" at the set date/time. You have 2 options when controlling a scheduled deployment.
- Delay- This puts the deployment into a limbo state. It is useful for when you are not sure if the deployment should go out at the time you designated or not. When the scheduled date/time is reached, it will not deploy if it's in this state.
- Cancel - If you cancel a scheduled deployment, it will return to having the status "Created" and you can go back into the deployment to make changes from the "Final Deployments" tab.
In Progress
An "In Progress" deployment is currently deploying to your list and you will have 2 options to control it:
- Pause - Pausing a deployment will allow you to review and restart or cancel the deployment if needed. It is recommended you do this first instead of cancelling right away so you have the option to restart.
- Cancel - This is the "Kill switch" of your deployments. Once you click this, the deployment will stop and can't be restarted again.
Analyzing the results
Before moving on to your next campaign, we'll walk you through the how to analyze the results of your email campaign and increase the engagement of that email even more.
Introducing CONNECT Analyze
Access
The current "Analyze" section is getting an overhaul and we are excited to invite our users to the new CONNECT Analyze application.
Your CONNECT onboarding specialist should have already provided access but if you are still unable to access, please reach out.
Click here or click the "CONNECT Analyze" button in the "Analyze" section of CONNECT to get started.
Deployment Report

Filtering
There are a number of filtering options available when using the deployment report. You can search for a deployment by name, change the date range of deployments you are looking at or add more complex filter to find deployments that performed well, didn't perform well, etc.

Grouping
The grouping feature allows you to pivot the deployments based on specific fields. This is a great way to see how your campaigns are performing or how your deployments are performing month over month.

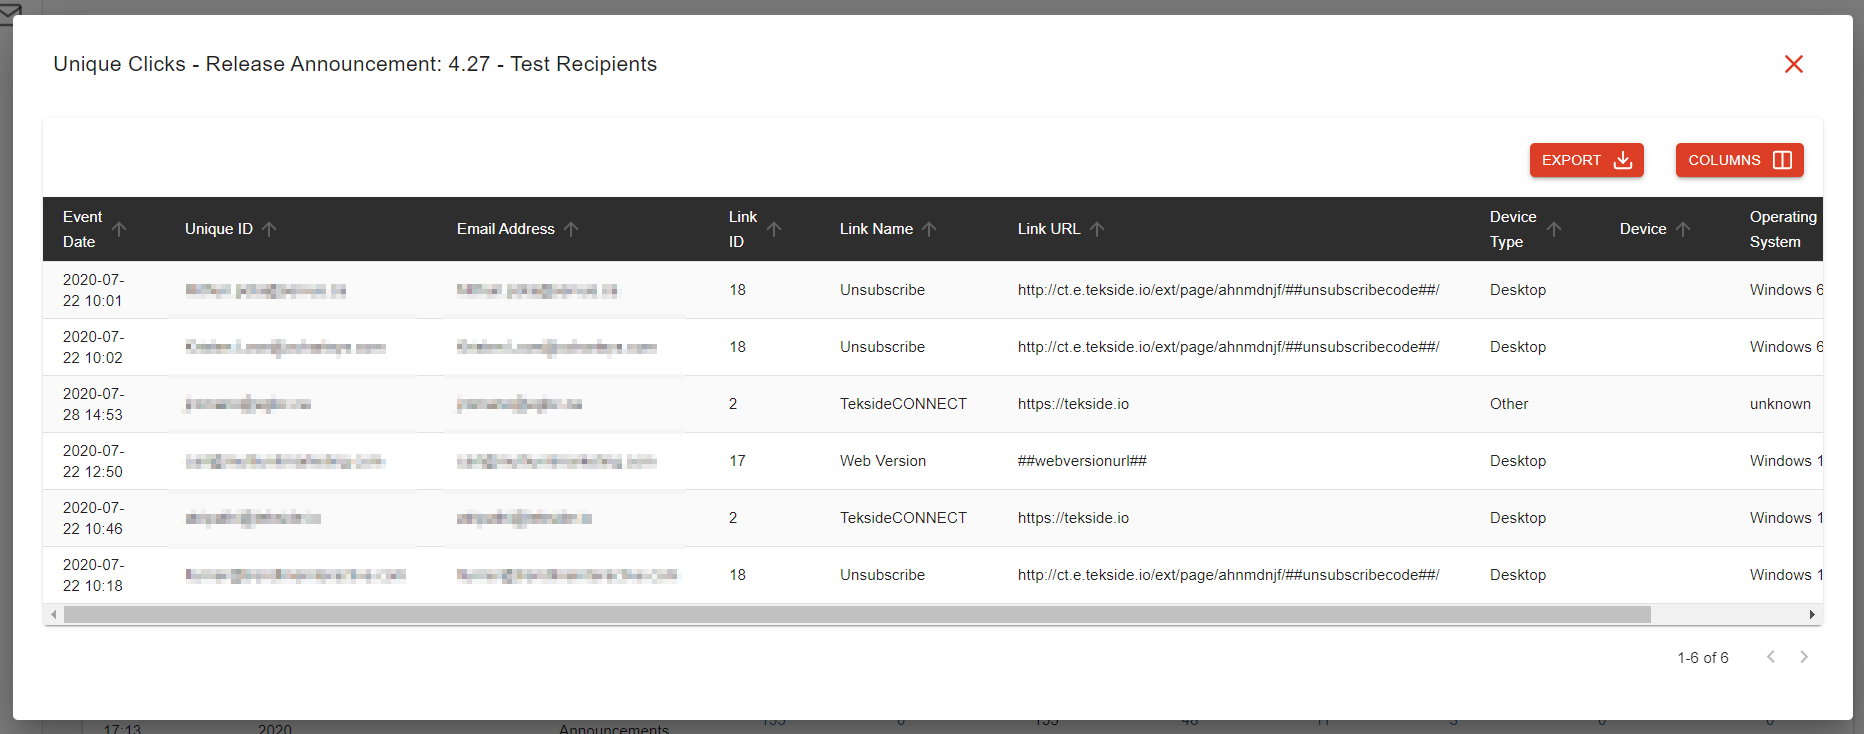
View Drill Down
When viewing the deployment report, you can click on any count in the deployment and view the records that make up that count. This allows you to see who might have clicked on your email, what they clicked on, why they bounced, etc.
Measuring performance
When viewing your deployment metrics and determining success, there are a few things you want to consider:
- What is the primary goal of my email?
- How well do my emails normally perform?
- Was there something unique about the content in my email that would incite a "natural" increase/decrease in my metrics?
Primary Goal
When viewing the performance of your deployments, the metrics that you focus on should be highly dependent on what the primary goal of your email is. If you focus on the wrong metrics, you might come to the conclusion that your email performed better or worse than it actually did.
Here are some common goals and what metrics you should be looking at:
| Goal | Metric |
| Readership - There isn't an action I want them to take, I just need them to read the content within the email. (e.g. Privacy policy change, Product release notes, etc.) | Open Rate |
| Action Driven - I am trying to drive the recipients of my email to perform a specific action. (Coupon, Sign up, Confirm information, etc.) | Click Rate |
| Engagement - I am trying to get recipients to read and action on the content in my email and want to determine how well the content performed |
CTR%O (Click through rate as a percent of opens) |
Benchmarking
When looking at the performance of your deployments, you want to consider how well your email campaigns usually perform. This will better help identify if the email performed well or poorly in comparison.
The best way to do this is to view your monthly or yearly (if you have been sending long enough) averages and use them as a "benchmark" against your recent deployments. Use the "Grouping" feature in the Deployments Report to determine your yearly/monthly averages.
Content Impact
Another thing to consider when viewing your metrics is the content of the email (both subject line and body). Depending on the content, there might be a "natural" increase or decrease in your metrics.
Examples:
- I have sent out an email with an offer to get 50% an item that normally doesn't go on sale. It is natural that the open/click rate of this email will be greater due to the "enticement" of my offer.
- I have sent out an email containing updates to my privacy policy. While important information, most consumers do not care to pay close attention to this information and will most likely ignore the email. This would naturally cause a much lower open rate.
Using open/click stream segmentation to engage non-responders
There are certain email campaigns that you want to ensure you get the highest engagement possible. This might be a time-sensitive offer, sign-up for an event or it might be critical information that all recipients should see.
The most effective way to ensure you increase the engagement of your email is to send a follow-up email. This means sending the same content (sometimes slightly altered) to the same list but only recipients that didn't engage (i.e. non-responders).
CONNECT provides a great way to do this using it's segmentation tool:
Update the content if necessary
When sending to non-responders, it's best practice to tell them why they are receiving the same email again. This might be a slight change to the wording of your subject line, preheader and/or main tagline in your email.
Example
- An email is sent out with the subject line "We have a great deal on X"
- The follow-up email subject line might be altered to say "Don't miss the great deal on X"
To do this, we recommend cloning the message you originally sent (Open it and click "Save As" at the top). Then alter the content of the cloned message.
Create a segment targeting responders
Determine what metric you will use to determine non-responders. The more common one is the "opens". This allows you to target recipients that wouldn't have read your email. Generally, if they read it and didn't respond, then they don't want the content. Sending to them again might annoy them and they will respond with a negative action like marking it as spam or unsubscribing.
- Name the segment "DeploymentX - Responders"
- Under the "Behaviour" menu on the left, drag over "Opens" into the criteria builder area
- Leave the first option as "Opened"
- Change the second option to the Campaign you used when deploying
- Finally, select the Deployment that you wish to target
Ignore the last step (5) if you plan to send multiple deployments and want your segment to include any one that opened "Any deployment" in this campaign. This makes the segment re-usable for each deployment in that campaign.
Deployment set-up
The final step to sending to non-responders is setting up the deployment. You want to follow these instructions:
- Select the same message (or new message if you changed the content)
- Select the same Subscription and Recipient filters you did the first time
- Under "Suppressions" select the segment you created
- All of the other settings should be the same
If you were successful in your set-up, you should see the segment show up under the "Excludes" section in "Audience Details" on the review screen.
Once you have reviewed the rest of the deployment, you are ready to send to the non-responders of your email campaign.