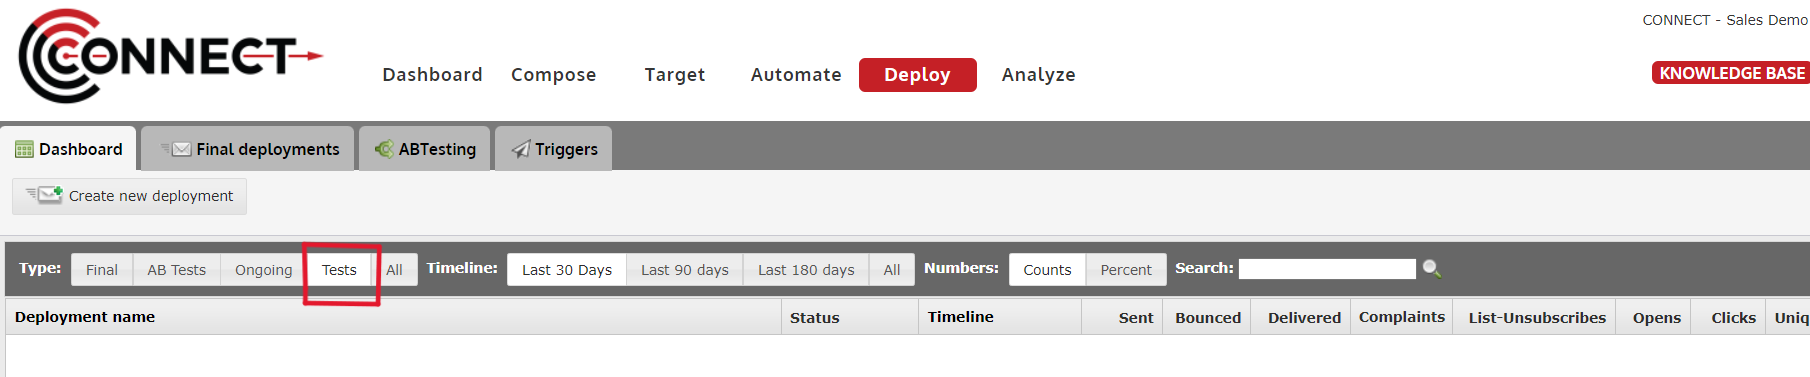
The Compose Screen
- How to create a standard message
- Getting to know Messages
- How to create a message with the Drag & Drop builder
- The From Address
- How to Set Up Effective Click Tracking
- How to Preview a Message
- How to Test a Message
- Using your data to provide Dynamic Content
- How to Use Fields for Dynamic Content
- How to Create a Dynamic Subject Line
- How to Provide Targeted Information using Dynamic Content
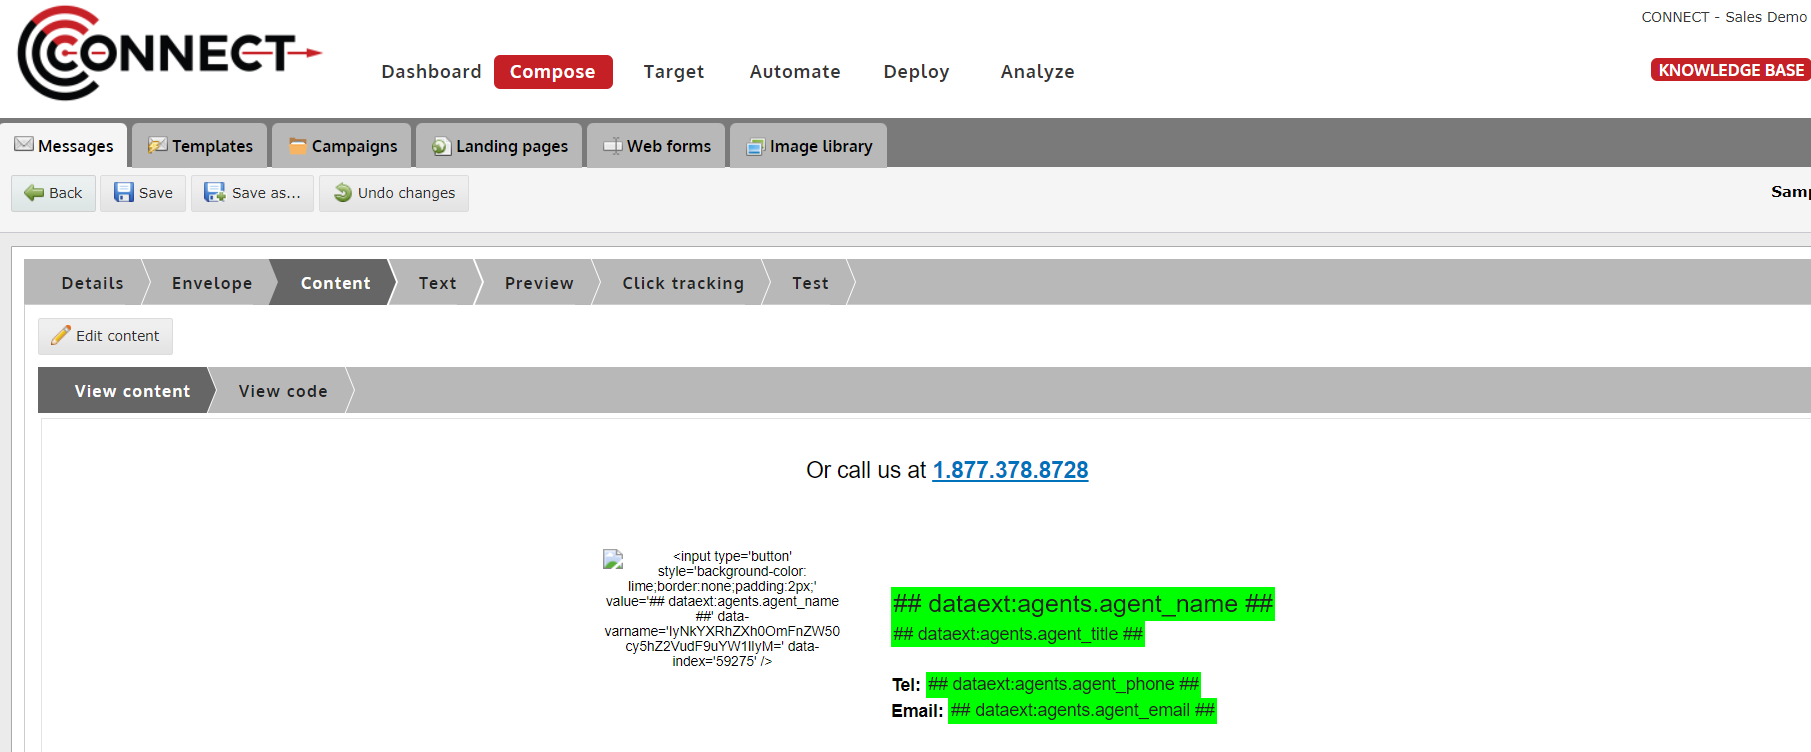
- Leveraging Data Extensions in your email content
- Dynamic Content Syntax
- Tips And Tricks
- How to Disable/Enable a Message
- How to use the Template Editor
- How to Upload and Insert an Image
- How to Duplicate a Message/Template
- How to Change Background Colors of a Message or Template
- How to Insert an Anchor Tag on IE8
- Automatic Web Versions
- Templates
- Landing Pages and Web Forms
How to create a standard message
Messages contain all of the content you will be using to deploy to your contacts. When creating a message, you provide the sender information, subject line and template you wish to send. Messages can be re-used over and over again in your deployments to allow you to send the same content to multiple contact segments.
Tutorial
Please note: To try out the feature, click the full screen icon  in the tutorial.
Getting to know Messages
How to create a message with the Drag & Drop builder
Personalize your emails even further by inserting the information in your Data extension. This can be used for displaying preferred location information or the customer's assigned customer rep. This can create a more one-to-one experience - the type that converts.
Tutorial
Please note: To try out the feature, click the full screen icon  in the tutorial.
The From Address
The From Address is one of the most important parts of your email campaign.
It identifies who you are to not only your customers but the ISP's (Gmail, Hotmail, etc.) as well.
And with any identity, it also indicates your reputation in the space as well. If your a proper email sender who follows all the rules, or a spammer who they should block.
Below we will discuss specific parts of the from address that might help you decide what to use.
1. The Sending Domain

- The Sending Domain holds your identity. Consider it your passport to the email space, it holds where you've been and you need it to get where you want to go.
- You can also configure this domain to use special records that, if used properly, will confirm to ISP's that you are a legitimate email sender.
- The domain is the last half of your email address, that piece after the "@" symbol.
- For example, if your email address is "support@umpiredigital.com", then your domain would be "umpiredigital.com".
2. The Local Part

- The Local Part of your from address is more for show and can be used to identify the type of email that they will be receiving or what to expect from that address.
- In most cases, email senders use things like "email@" or "newsletter@". One thing to stay away from is "info@".
- This type of address is commonly flagged as Junk in a lot Junk Filters in products like Hotmail or Outlook.
- You can also use something more personal if your email calls for it, like "Jennifer@" and so forth.
- The great thing about the Local Part in email sending in CONNECT is that the Local Part can be whatever you want it to be, even if it's not a valid email address.
- The important piece for you to able to send is the Sending Domain and this must be set up by CONNECT Support in order for your emails to be deployed.
For more information on dynamic creation of From and Reply-To addresses: Click Here
How to Set Up Effective Click Tracking
Follow this tutorial to setup your message's click tracking in a way that will make your reports easier to read.
1. Change the Link Names to reflect what they are naming
- Tip: Use a name that describes not only what the link is but where the link is in the message.
- This works effectively when you have the same link text or image (ie. Click Here) in multiple locations in your message and need to separate them out in reporting.
2. All changes are highlighted in Yellow
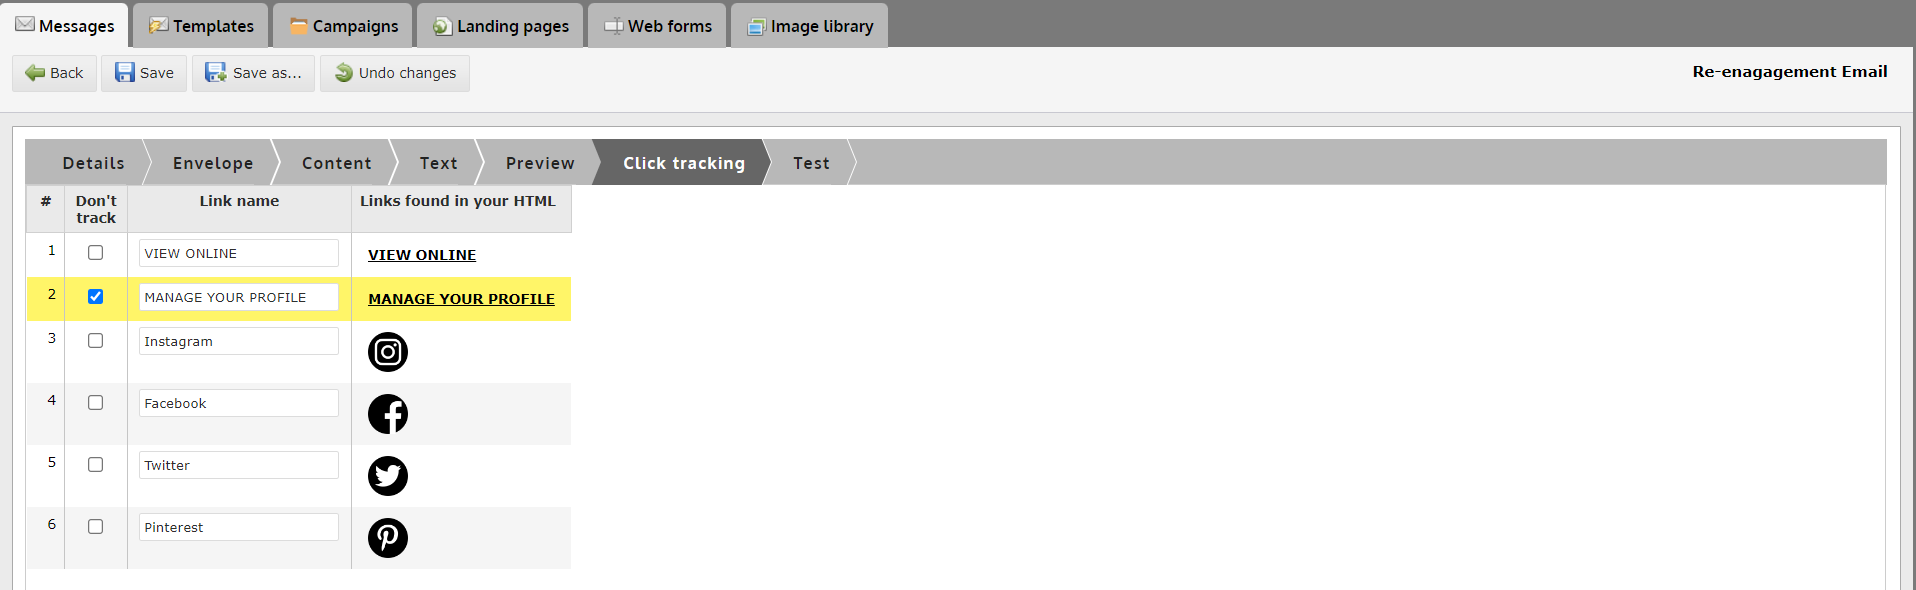
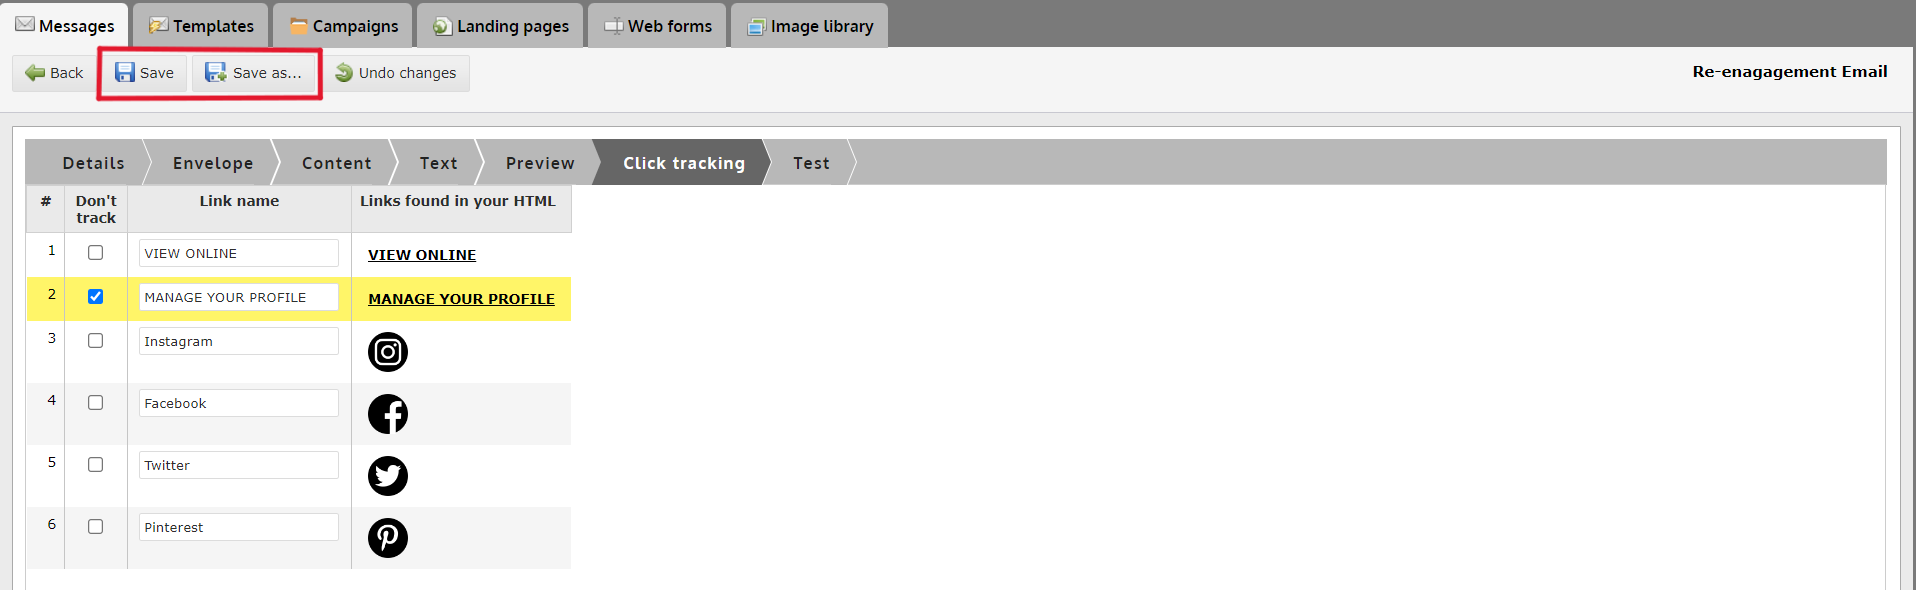
3. Save your work once finished
How to Preview a Message
Previewing a message is a great way to verify the message you are about to use is correct and to instantly see the changes you have made to the message.
If you are using dynamic variables or content, it is a great way to verify that the logic and variables you used will work with the data you have collected for your contacts.
Below are multiple options throughout the system for previewing your message.
1. The Preview Step

At any time while setting up a message, you can switch to the "Preview" step and review what your message looks like in different situations. Below are some of the options you have access to.
- Contacts - This feature allows you to select contacts that are in your DataMart and see how the message would look to them with their dynamic information.
- Required DataMart Fields - This feature allows you to type in values for the DataMart fields that have been used in the dynamic content and preview what the template looks like when a contact has those values.
- Combination - This feature allows you to easily cycle through the different combinations of content that are available in the template.
- Note: This does not take into account the logic used.
- Screen Width - This feature allows you to simulate different screen widths and how your template reacts to them. Note: This does not simulate device specific behaviour.
If you would like a more in depth look at the Preview step and its feature, click here.
2. Selecting Contacts for Previewing
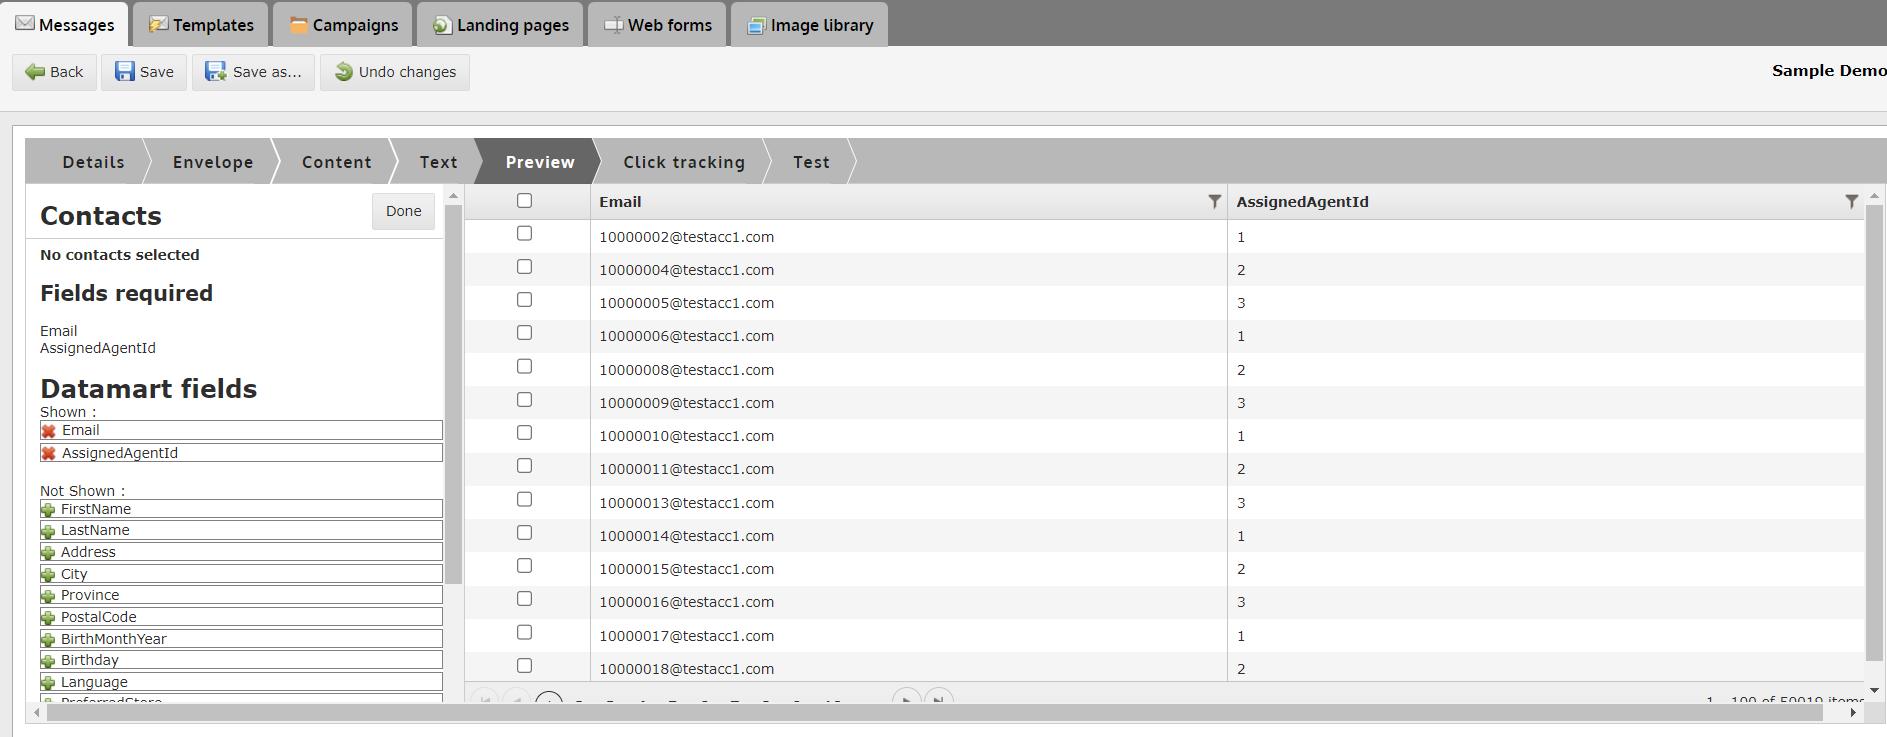
If you would like to view what your message will look like to other contacts in your DataMart, you can select contacts and load their data into the message to see how it will render with their information.
When selecting contacts, you have access to the following options:
- Fields required - This section lists the fields used in your message as both Dynamic Variables and in dynamic content logic. This will help you determine which fields are important to your message.
- DataMart fields - This section allows you to add/remove different DataMart fields from the contact grid on the right side of the screen.
- Each field is filterable and ca be sorted, so if you would like to find a specific group of contacts, you can do that using any field.
- Select contacts - At any point, you can select contacts to add to the left on the left panel. These will be the contacts you will carry back to the preview screen. Once back at the preview screen, you will be able to select them and see what the message will look like to them when they receive it.
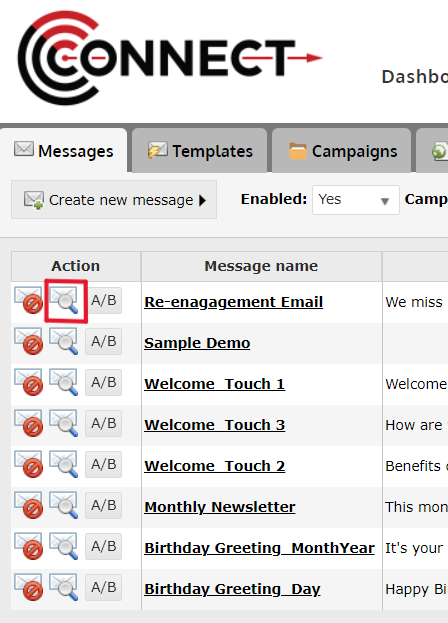
3. For a quick preview, you can click on the icon located next to the Message Name on the Email Messages tab under Compose.
How to Test a Message
Testing your messages is a very important process in quality assurance. We recommend thoroughly testing every message that you set up. Below are the steps necessary to send out test messages.
1. Click on the "Test" step

2. If required, select your Stakeholders

- Note: Do not have any Stakeholders set up? Click Here.
3. If required, select your Test Accounts

- Note: Do not have any Test Accounts set up? Click Here.
4. If required, select contacts for Dynamic Testing

- Click "Select Contacts"
5. OPTIONAL: Type in a Prefix for the Subject Line to Track Versions

- This option allows you to save a value in the Test step so that if you make changes later, you can change the version and that version will appear in the subject line.
- Example: Test - V1 - Subject line goes here
6. OPTIONAL: Select Creative Type to Send

- Tips:
- Email clients such as Microsoft Outlook, make it very difficult for email marketers to preview the text version when they are testing their email.
- By sending yourself just the Text Version, it now becomes easy. Subject prefix for testing: This field allows you to place a value in your subject line for testing purposes.
- For example, if I place "Version1" in this field, my subject line will look like "Test - Version 1 - Subject line text goes here".
- This comes in handy when you are working with similar looking messages.
7. Click Either "Send" or "Send 250ok Test Deployment"

- Send Test - the "Send" button will send a copy of the current message to the user's email address.
- 250ok - the "Send 250ok Test Deployment" button will verify if email addresses are legitimate.
- Note: If you selected contacts for dynamic testing, the tool will notify you of how many emails will be sent to the selected Stakeholders, Test accounts and yourself.
8. OPTIONAL: Viewing the Results of your Tests
Using your data to provide Dynamic Content
How to Use Fields for Dynamic Content
Dynamic variables are a great way to personalize your message with information you've collected in your DataMart about the user (Name, Address, Recent Purchases, etc.).
This will help you engage your customers on a much more personal level.
1. The ## Tag
- To pull information from the DataMart into your message, it is as easy as placing the "Field Name" in where you would like the information to appear in your template.
- Adding ## in front of and after the Field name to label it as a Dynamic Variable (see example).
- This will work in the subject line as well.
2. Field Names
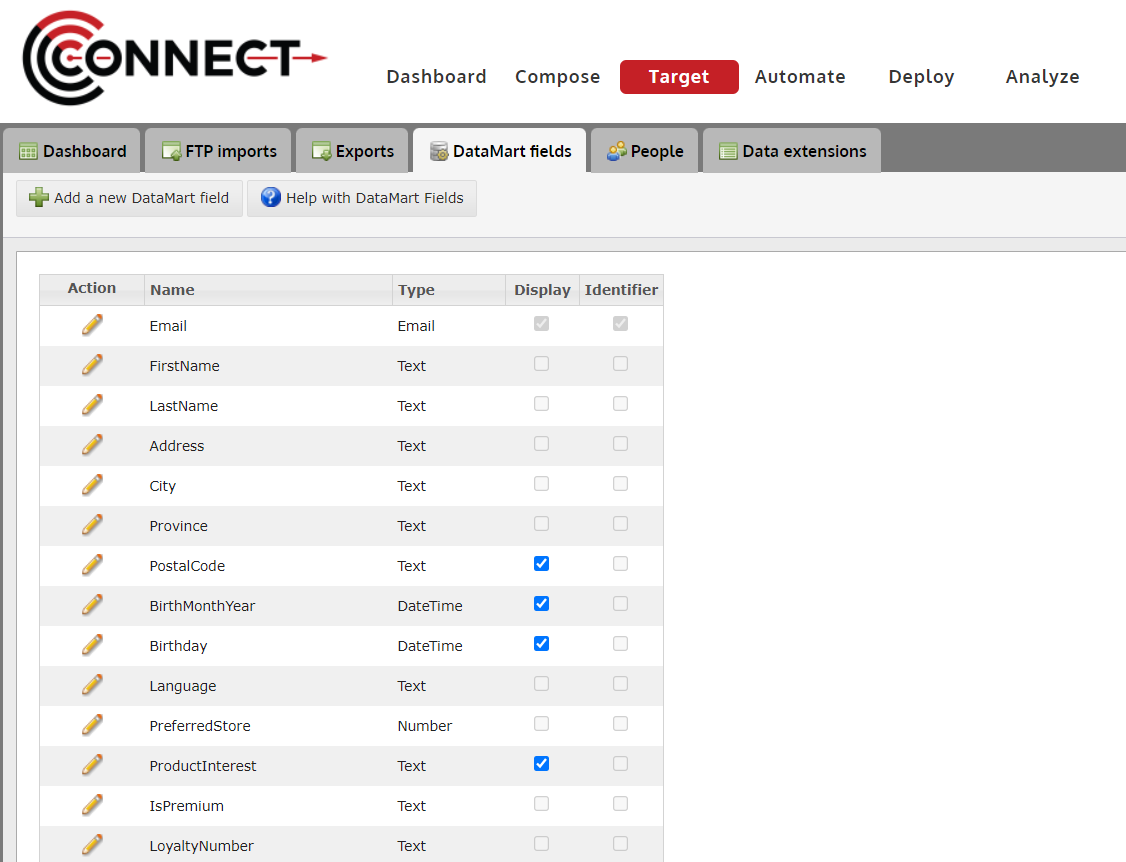
To view the available fields in your DataMart and the Field Name that needs to be referenced in your message, follow these steps:
- Click on the Target Tab
- Click on the Datamart Fields Button
- The fields names are located under the Name header.
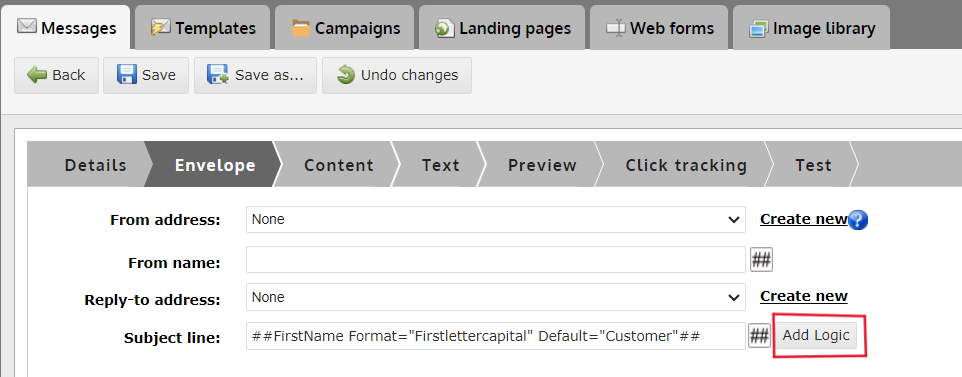
How to Create a Dynamic Subject Line
This feature offers the possibility to create Dynamic Subject Line based on the data that was collected from your customers or users, You can either use a dynamic variable or add a logic.
1. Click ## "Insert a Dynamic Variable" button
Go to Compose > Envelope

- In the envelope tab:
- Click on the ## button
2. Select your Fields
In the popup window, different options are available
- Select a field : You can choose which DataMart field you would like to pull and display dynamically.
- Select a format : This allows you to reformat the data (eg. Switching All caps into lower case)
- Default value : If the data field was not provided or collected, we can choose to display a default value eg. "Customer"
- Click Insert
3. Click on Add Logic
4. Add Logic Explained
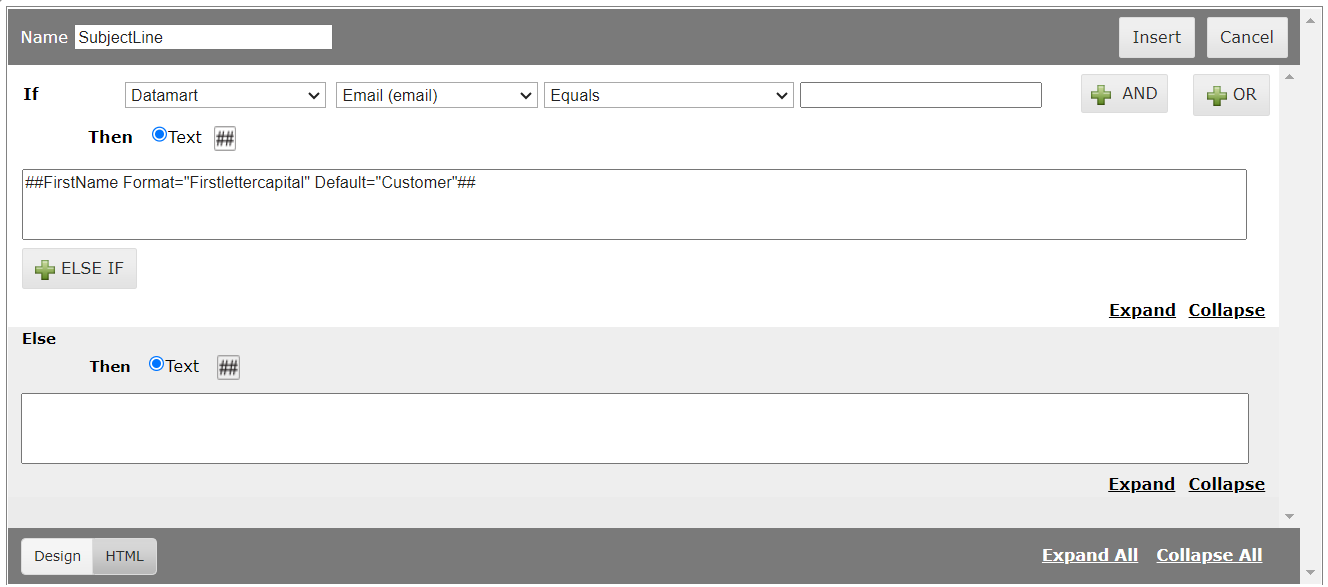
In the popup window, different options are available
- The IF statement is the first condition based on the DataMart fields.
- The ELSE/IF statement is the following condition based on the DataMart fields.
- The ELSE statement will display the value added in the text box if the above conditions are false
- Click Insert
5. Logic Example
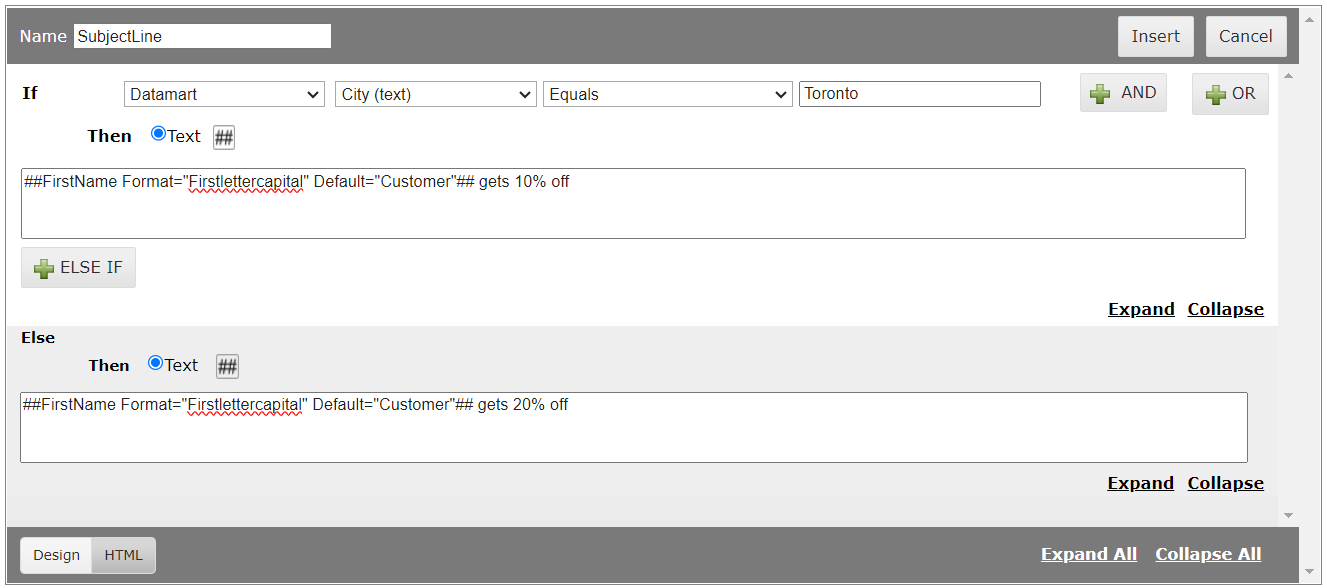
- In this logic , we would like to display the recipient firstname in the subject line as well as giving 10% OFF to anyone from Toronto If they are not form Toronto, they would get 20% OFF.
- You are able to add an endless number of layers to your logic in order to create a highly personalized email.
How to Provide Targeted Information using Dynamic Content
When building a message or template, you might come across a situation where you want to display an offer or image to the recipient based on their preferences or the demographic information you have collected on them.
Dynamic Content allows you to create IF/ELSE statements to help dictate which recipients will receive which pieces of content in the message.
1. Place the cursor where you'd like the dynamic content to appear OR select the content you'd like to replace with Dynamic Content statement.
2. Click the "Dynamic Content" button in the Editor Bar
3. Name the Dynamic Content section
- This will be used to show where it is in the template and for reporting later on.
4. Define the "IF" statement or copy logic from an existing Dynamic Content piece
- Select a field first, then an operator and then finally a value.
- You can also add in an AND statement or Create an OR group to help further target.
- For more information on targeting, visit the Segmentation article.
- Alert: If you copy from an existing Dynamic Content piece, it will overwrite any work you have done already in the Dynamic Content piece, so make sure to do this first.
5. Select the Content Type
The different content types are:
- Text - Text only, no formatting or styling can be defined. It will use the default styling of the section it is placed in.
- Image - Image only, no formatting or styling can be defined. It will use the default styling of the section it is placed in.
- Block - This allows you to place an entire block of HTML code where the variable is placed.
- This allows for endless possibilities and you are able to use a Visual editor to make changes.
6. OPTIONAL: Define additional "ELSE IF" statements
- This will provide a new section with the same options as the IF statement.
- You will need to identify how to target contacts and provide content as well.
- You can add as many ELSE IF's as you like.
7. If required, define content for the "ELSE" statement
- The ELSE statement is the default option if the recipient of the message does not meet any of the IF or ELSE IF statements identified in the Dynamic Content.
- There is a 4th content type you can use for this statement.
- If you do not want anything shown when they do not meeting the IF/ELSE IF criteria, then keep the default option "Blank".
- Otherwise, you can select a content type and follow the same procedure.
8. Finally, click "Insert" to place the variable in the message or template
9. The Dynamic Content variable will appear in the template highlighted green
- By clicking on the variable, you can make edits to the Dynamic Content and update the variable with those edits.
Leveraging Data Extensions in your email content
Personalize your emails even further by inserting the information in your Data extension. This can be used for displaying preferred location information or the customer's assigned customer rep. This can create a more one-to-one experience - the type that converts.
Tutorial
Please note: To try out the feature, click the full screen icon in the tutorial.
Dynamic Content Syntax
PREREQUISITE : Dynamic Content
Allows the user to create dynamic content statements without needing to know the syntax.
A new syntax has been created in the system which allows developers to keep all content and logic within one document.
Syntax
- ##FirstName##
- ##FirstName Format="Firstlettercapital"##
- ##FirstName Default="Customer"##
- ##FirstName Format="Firstlettercapital" Default="Customer"##
Data Types for Format
- Email : No formatting options
- Text : ALLCAPS, lowercase, Firstlettercapital, EachWordFirstLetterCapital
- Number : WholeNumber, OneDecimal, TwoDecimal
- Date : MM/dd/yyyy, MM-dd-yyyy, MMMM dd, yyyy, MMM dd, yyyy
Dynamic Content Syntax.
###variablename###
 if (field[FieldName] operator "value" ) { "Content" }
else if (field[FieldName] operator "value" ) { "Content" }
 else { "Content" }
###/variablename###
Logic Breakdown (Part 1)
if (field[FieldName] operator "value" )
- FieldName has to match the one in CONNECT, Operators are different depending on the Field type (i.e. Email, Text, Date, Number)
- You can have as many else if’s as needed
Logic Breakdown (Part 2)
Email/Text Operators:
equals, is_not, begins_with, contains, not_contain, is_empty, not_empty
Number/Date Operators:
==, !=, greater, greater_or_equal, less, less_or_equal, is_empty, not_empty
AND/OR Statements:
if ((field[ ] ) && (field[ ] ))
if ((field[ ] ) || (field[ ] ))
if (((field[ ] ) && (field[ ] )) || (field[ ] ))
For Each Statements:
Use the for.each statement by itself:
for.each({"test data"})
for.each({block "<table><tr><td>Some text</td></tr></table>"})
for.each({image: "<img src="http://imagefile.jpg">"})
Or combined with an IF statement:
if(condition) {block "for.each({"test data"})"}
if(condition) {block "for.each({block "<table><tr><td>Some text</td></tr></table>"})"}
if(condition) {block "for.each({image: "<img src="http://imagefile.jpg">"})"}
Content Types
Text: Should only contain text, no HTML.
Example:
{ "Here is some text" }Image: Should only contain an image tag.
Example:
{ image"<img src="http://imagefile.jpg">" }Block: Can contain anything including code.
Example :
{ block"<table><tr><td>Some text</td></tr></table>" }Web and Text Versions
Web versions
- Continue to use the ##webversionurl## tag and Connect will handle the rest.
- If the client would like different content on their web version vs email message, you can use the following:
if (content[type] == "email" ) or if (content[type] == "webversion")
Text Versions
- Use the "Auto Generate Text Version" option in CONNECT or leave it to the AM.
- No separate text version logic required.
System Variables
These variables provide data from the system for various use cases. They all begin with "system" and are proceeded by the variable name.
Eg. ##system:deploymentid##
| Variable | Description |
| deploymentid | Provides the ID of the deployment at the time of send and is great for adding context to other tracking code. |
Tips And Tricks
How to Disable/Enable a Message
The Enabled/Disabled status allows you to place messages that you are no longer using in the background (Disabled) or return them to normal view (Enabled).
1. Disable/Enable a Message
- Click on this icon to INSTANTLY change the status of a message to Enabled/Disabled.
2. OPTIONAL: Change the Enabled status in the Message Details

How to use the Template Editor
The template editor provides an array of tools to help edit your template right in Connect. The template editor also provides all the necessary functions to create an email template from scratch although this requires a bit more expertise on your part.
Editing Text

Editing text with the template editor is easy and provides a lot of the same functionality as any word processor software. Here are the functions you can perform when editing your template copy.
1. Paragraph Editing - Change the paragraph style, font or font size
2. Text Decoration - Highlight text and choose bold, italic, underline, or strike-through
3. Alignment - Align the text left, center or right
4. Colour - Change the colour of your font or the background colour
5. Lists - Create a bullet or numbered list
Link Management

The template editor makes link management simple. You can apply a link in seconds by highlighting the text or clicking the image you wish to link, clicking the Insert Link button and pasting in the URL. (UMPIRE will automatically track clicks on your links.)
1.Link Insertion/Removal - Buttons for inserting/removing a link into the text/image you have selected
2.URL - Text box where you will paste the URL you wish to link to
3.Target - Choose from the drop-down list where the link will point to. For email, choose "New Window" to ensure the link operates properly within the Webmail client or desktop email client.
4.All Properties - Provides extra functions such as anchor links and email address links.
Image Management

The image management system that CONNECT provides, allows the user to not only host their images within the tool, but place them in any template they see fit.
- Image Insertion - The Insert Image button allows you to insert an image where you have placed the cursor in the template editor or change an image you already have selected.
- Image Selection - The pop up that appears when you have decided to insert an image, will display all of the available images you have stored in your Image Library.
- Insert Image - Once you have made the selection of which image you would like to insert, you simply click the Insert Image button and the image you selected will appear in your template.
How to Upload and Insert an Image
If you are looking to use images in your templates and messages, the image library provides a place to host your images and the Template editor allows you to easily access and insert them.
1. First the image must be uploaded to the system. To do this, click “Upload Image� in the Image library
2. Fill out the Name and Alternative Text and Select the image file you wish to upload.
- Tip:
- The alternative text will be the text that appears when images are disabled in email clients.
- Be sure to be descriptive or use the text within the image if it applies.
- Click “Upload Image� once you are finished.
3. The next step requires you to be in the template or message you wish to place the image within.
4. Select the Area you wish to Place the Image In
- Tip: If you're having trouble finding the “cell� in which to place the images, make sure the “Show Borders� setting is enabled.
5. Select the Image you wish to Place in the Selected Area
- Click on the small icon with "landscape" image on it. (See image below)

- This will open a small toolbar of images that could be potentially inserted in the selected area.

- Click the desired image (it will be highlighted), this enables the insert image button.
- Click on the insert image button and the new image will be inserted in the selected area of message.
- Tip hover over the small icons above the editing canvas area, a small hover drop down will display the name of the editing tool.
- Tip: If you're having trouble finding the “cell� in which to place the images, make sure the “Show Borders� setting is enabled.
How to Duplicate a Message/Template
Duplicating a message or template is a great way to save time and effort in CONNECT. This tutorial will show you the simple steps in doing this.
1. Navigate to the Message/Template you would like to Duplicate
2. Click the “Save As� button located above the Template Editor
3. Provide a new message/template name and click “Save As�.
How to Change Background Colors of a Message or Template
Whether you're looking to add some fresh color to your template or wish to change colors of the default templates to match your brand, this tutorial will help you change both the background color of specific areas of your message or the entire message.
- Alert: This tutorial only applies to emails built using tables (For an example, take a look at one of the default templates located in the Email Templates section of your CONNECT community.)
1. Place your cursor or click anywhere in the area you wish to change. Click on "Cell Properties" which should appear at the bottom of the editor.
- Note: If the "Cell Properties" option does not appear, try clicking in another section of the area until it does.
2. Click on the Table Properties tab
3. Click on the Background Color option and select a color. Click OK when finished.
- Tip: If you have a custom color you would like to use, make sure to have the "Hex" color code (ie. #FFFFFF = White).
- Then in the color selector, choose "Add Custom Color" and enter the code.
4. Changing the Background Color of the Entire Message
- This requires you to switch to the HTML mode in the Template editor.
- Locate the tag within your message. To set the background color add in bgcolor="COLOR" inside the tag, so that it looks like this: <body bgcolor="black"> or <body bgcolor="#FFFFFF">
How to Insert an Anchor Tag on IE8
Currently, the insertion of Anchor Tags in email templates using IE8 requires a few extra steps due to comparability issues.
Provided, are steps to help guide you through this process.
1. In the message you wish to insert the Anchor Tag, highlight the text at the point at which you would like the Anchor to scroll to

2. Click the Insert Link button

3. In the popup, ignore all fields and simply click "OK"

4. Place the cursor within the linked area and click on the "Hyperlink Manager" button in the bottom right corner.

- Alert: Do not highlight the text
5. Click the "Anchor" Tab

6. Type in a name for the Anchor Point. Click "OK"

- Alert: Do not use spaces in the name. You may use underscores ( _ ) to replace spaces.
7. Highlight the text that will be the link triggers the scroll to the Anchor Point

8. Click the Insert Link button

9. In the popup, ignore all fields and simply click "OK"

10. Put the text cursor within the linked area and click on the "Hyperlink Manager" button in the bottom right corner

- You will see the text you highlighted become a link.
11. Select the Anchor Point Name that you created earlier

- In the pop up, click the "Existing Anchor" drop down.
12. The URL will change to the Anchor Point name with a # in front of it. Click OK once finished.

13. Click Save once all editing has been completed

Automatic Web Versions
One of the most common items in an HTML email message is the "Online" or web version.
This version is generally a copy of your HTML email, hosted online so that if a customer has trouble viewing your email, they can click on the web version link and view the email in their browser instead.
It is best practice to place this link at the top of your email so it's easy to access.
CONNECT has a feature that by placing a specific tag as the URL of your web version link, you can trigger CONNECT to automatically create a web version and place a URL back into your email at the time of deployment.
1. The URL tag

- To have CONNECT automatically create web versions for you at the time of deployment, you must use the special variable ##webversionurl## as the URL (see example on left).
- If you are coding the message yourself, you can use this variable as the "href" as seen in the example to the left.
2. Removing the web version link from the web version

- A common request for web versions is to remove the web version link, from the web version.
- CONNECT has a specific HTML tag that it uses to detect what HTML code to remove when creating the web version.
- Any code placed between the tag will be completely removed from the web version (see example on left).
- This step requires some HTML knowledge and if you are having any trouble with this part, please contact CONNECT Support for aid.
Templates
How to build a Drag & Drop template
Personalize your emails even further by inserting the information in your Data extension. This can be used for displaying preferred location information or the customer's assigned customer rep. This can create a more one-to-one experience - the type that converts.
Tutorial
Please note: To try out the feature, click the full screen icon  in the tutorial.
Landing Pages and Web Forms
How to Create an Unsubscribe Page (Update: add customised unsubscribe button text and post confirmation text)
Update: add customised unsubscribe button text and post confirmation text
In the landing page feature, you are able to set up an unsubscribe page to include in your email campaigns and manage your opt-outs.
This tutorial covers the process of setting up an unsubscribe page in CONNECT.
1. Begin by creating a new Landing Page
2. Enter a Title for the Landing Page
3. Select the domain you would like the unsubscribe page hosted on
4. Select "This landing page is an Unsubscribe page"
5. Paste in the landing page HTML code, click "View HTML"
- If there is already landing page code in the editor, move on to the "Variables" step.
6. Paste in the HTML code and click "Update"
7. Variables
The following variables are required in the landing page for the Unsubscribe page to be valid:
- ##email##
- This will display the email address that will be unsubscribed.
- ##subscription##
- This will display the subscription the email address will be unsubscribe from.
- This is determined by the subscription chosen when the email was deployed.
- ##forms:unsubscribe##
- This will display a button for the visitor to click and unsubscribe the ##email## from the ##subscription##
UPDATE:
CONNECT also allows users to add custom text to the unsubscribe button and post-unsubscribe text confirmation.
- ##forms:unsubscribe Value="Se désabonner" Confirmation="désabonnement réussi"##
- Value - this parameter allows user to add custom text for unsubscribe button.
- Confirmation - Once, the user has clicked on the unsubscribe button, a confirmation appears. CONNECT allows user to customise the text that appears to confirm if they unsubscribed successfully.
An additional variable is available and is optional for communities that are not sending to Canadian contacts.
If a community is sending to Canadian contacts, under CASL, the user must offer the user a way to unsubscribe from all of their email communications.
- ##forms:unsubscribe-all##
- This will display a button for the visitor to click and unsubscribe the ##email## from ALL subscriptions they are currently subscribed to.
How to Create a Web Form
Web Forms are a great way to collect new subscribers for each subscription you have in your DataMart or just collecting customer data for later use.
This tutorial goes over the standard method for creating a web form.
1. To begin, navigate to the Compose tab and click on the Web Forms tab
2. Click "Create new Web Form"
3. Type in the Web Form Name
4. The Form will Automatically collect the UniqueID field Assigned to your DataMart
- The field type will also be automatically assigned to be "Simpletext" and the field will be required when a subscriber fills out your form.
5. Add any additional fields you would like your form to Collect
- Indicate the type of field and if it is required.
6. Select the Submit Action you would like the form to use when new contacts Submit their information through your Form.
- "Always add to this subscription"
- This submit action will add new contacts, with the permission level chosen, to the subscription you choose when subscribers simply fill out the form and clicking the submit button.
- "Include opt-in checkbox"
- This submit action will place a checkbox on your web form above the submit button that, when the submit button is clicked, will submit the contact into your DataMart with an explicit permission level (if checked).
- Note: Make sure to fill out the "Opt-in text displayed" field with a line of copy that indicates what the user is opt-ing into by checking the box displayed. (ie. To subscribe to our Monthly Newsletter.)
7. Select the Permission level for records added by the form to that subscription
- If the web form indicates that the user submitting the form will be "signed up" or "opted in" to a specific publication, then select explicit.
- If the web form is to collect user information but not subscribe the user to a specific publication, select implied.
8. OPTIONAL: Select the landing page you would like the form to redirect to after a user has successfully submitted data
- The page you select here will appear once the user has finished the web form and clicked the submit button.
9. Type in the text you would like placed in the "Submit" button
10. Click "Save Web Form"
- This completes the steps required to create the form.
- In order to have the form appear on a landing page, you will need to complete the next steps.
11. Navigate to "Landing Pages'
12. Select the landing page you would like to insert in the Web Form
13. Place the cursor in your landing page where you would like the web form to appear
14. Click the "Insert Web Form" option in the editor
15. Select the name of the web form you set up earlier and click "Insert"
16. This will insert the web form tag into your landing page
17. Click "Save" and then click "Preview" to open the landing page in your browser
18. The Result
Using your web form
- Now that you've built a great looking landing page and web form, you can begin to use the URL provided through your email messages or your website.
- A common use for the landing page tool is to display the page on your website using an iFrame.