The Target Screen
- The DataMart
- Target Dashboard
- How to Manage your DataMart Fields
- How to View if a Contact is a Hard Bounce
- How to Unsubscribe One Contact from a Subscription(s)
- Importing data
- List Upload Error Messages
- How to Add an Additional Person
- How to Upload Records as Stakeholders, Test Accounts and Seeds
- How to set up a FTP Import
- How to edit a FTP Import task
- Segmentation
- How to Create a Segment with one Field
- How to Create a Segment with Multiple Fields
- How to Segment by Contact Source
- How to Target Contacts Based on their Permission Level
- How to Target Contacts using Email Behaviour Segmentation
- How to Use Segments for Exporting Records
- How to export a segment
- Segmentation Operators by Field type
- Data Extensions
The DataMart
Target Dashboard
The Target Dashboard is divided into 3 sections:

- Subscriptions
- Segments
- Uploaded Files
1. Subscriptions
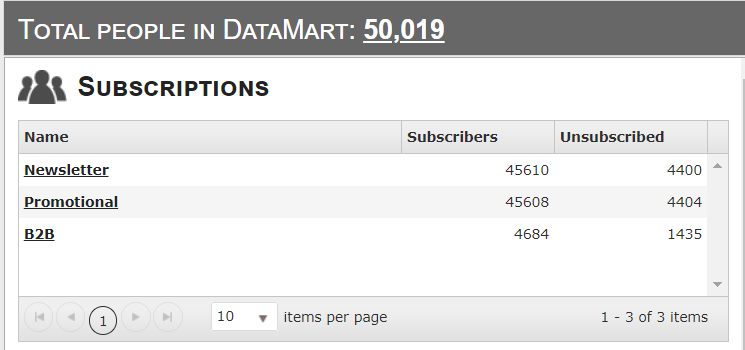
- Total People in DataMart This count provides the total number of unique contacts in your DataMart regardless of subscription or other statuses.
- If you click on the total number, you will be taken to
 to view all of your DataMart contacts in a convenient grid.
 - The total of records in your database are displayed on the screen to inform you on the potential recipients ( the total number will not be equals to the total of subscribers)
- The total of subscribed and unsubscribed for each subscriptions are displayed.
2. Segments
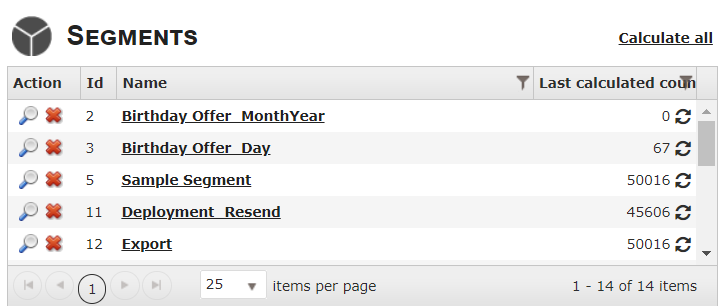
- This section lists all of the segments you have created in Connect.
- If you click on a segment, you are taken into the Segment Builder interface where you can edit that segment as well as other options.
- If you click on
 under Action, a window will pop up showing a preview of the segment, with shown and not shown DataMart fields
 - If you click on
 under Action, you can delete the segment


3. Segment Calculation
- The number of recipients for each segment will appear after calculation, under Last Calculated Count. Click on
 to refresh.

4. How to Filter Segment
- You are able to filter segment by Name or Size by clicking on the funnel icon located next to the respective fields.
- Name Filter
- Count Filer
5. Uploaded Files
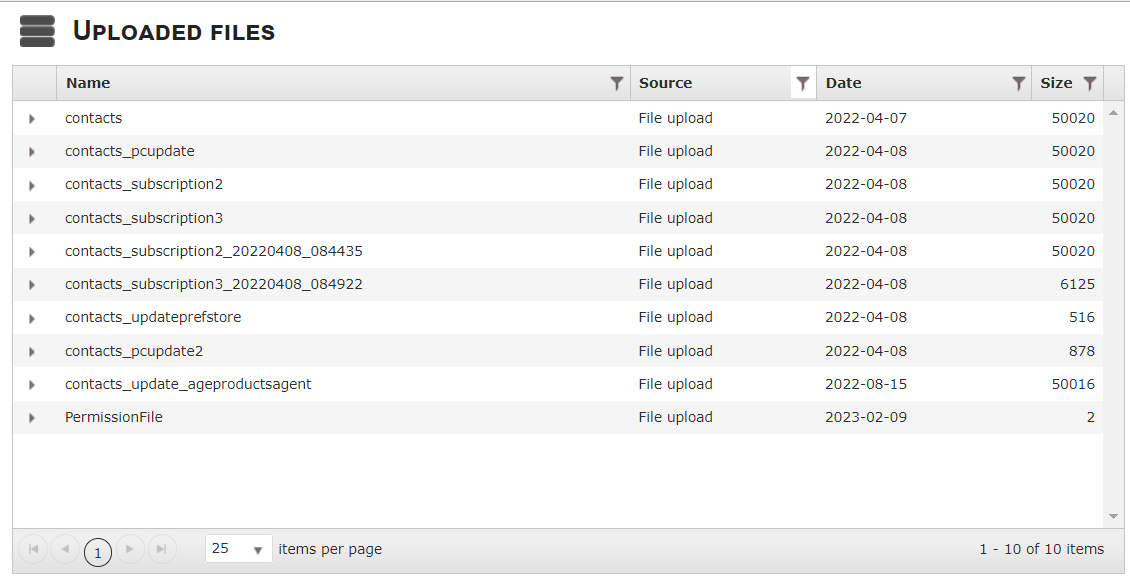
- This section will display all of the individual files that have been imported into Connect through 3 different sources:-
- Manual List upload
- FTP Import
- Restful API list upload.
- By default, the grid will only show Manual list uploads but you can change that by clicking the filter symbol on the Source column header and selecting which sources you want to be able to view.
- If you click on one of the file names, it will give you a snapshot of what occurred when the file was uploaded.
- One important thing to note here, if there were any rejected records in the file, the number will be clickable and you will be able to download the rejected records for review.
- Filters: We are able to filter
 by source or size.

- Name The filename
- Source Contains the different types of list uploads:
- Manual List upload
- FTP Import
- API list upload
- Size Represents the number of records that were in the list.
6. List Details
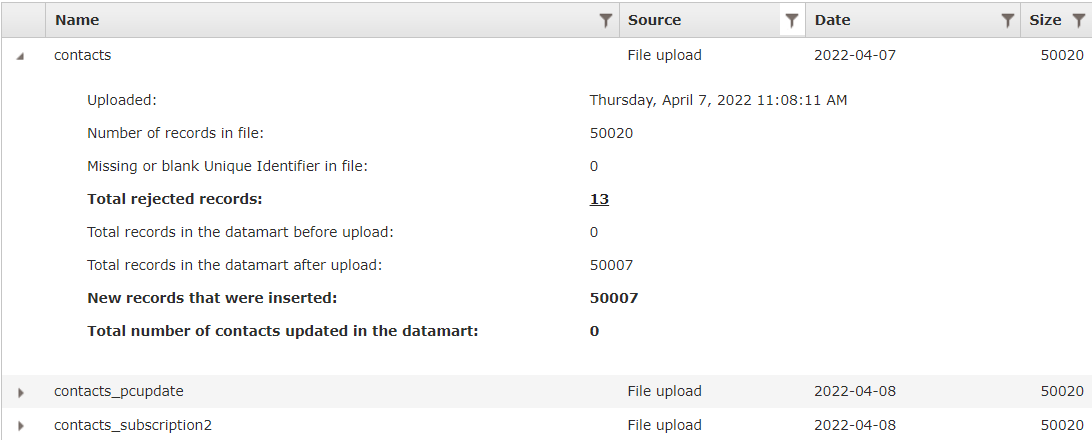
- By clicking the arrow , the list details will expand and will reveal important info regarding the list that was uploaded as shown above.
- When records are rejected, the number of rejected records will be clickable and will download automatically the list of rejected records with the error that occurred.
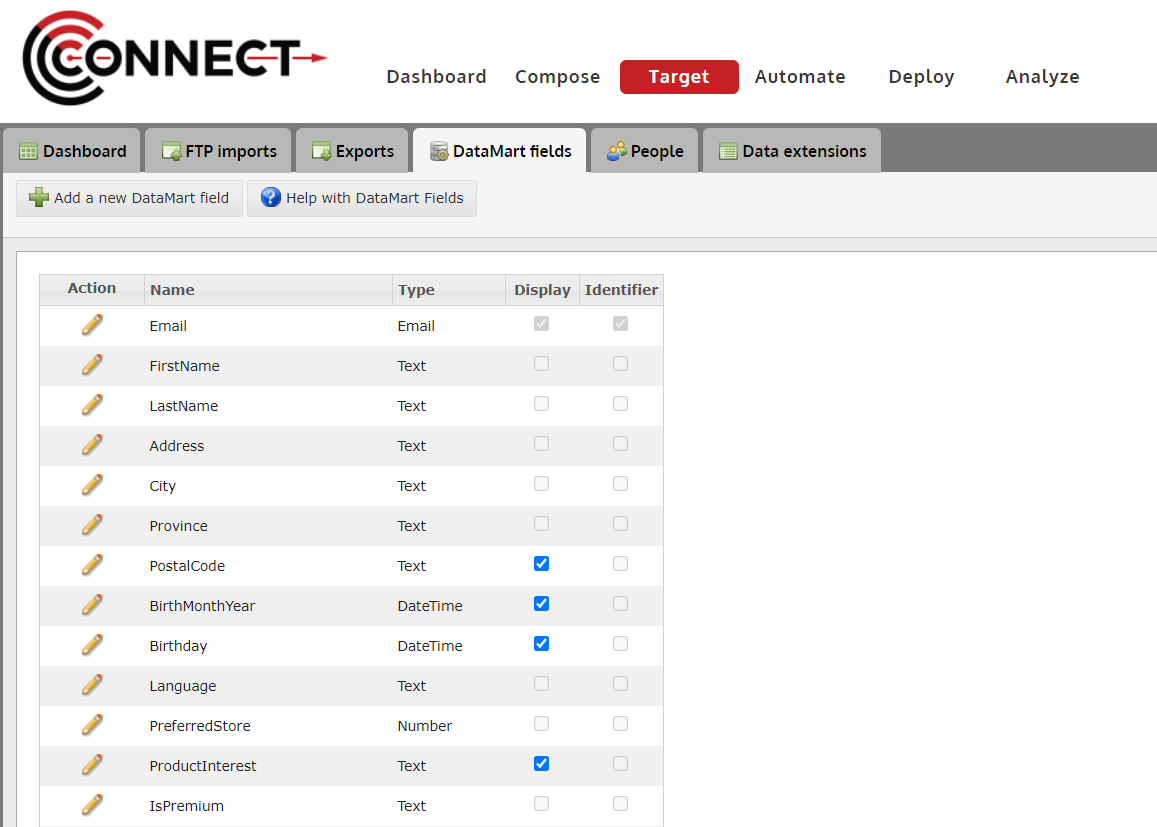
How to Manage your DataMart Fields
The fields of your DataMart help organize your entire DataMart. This is one of the first things you will want to setup before using CONNECT. Follow these steps to manage your fields.
1. Click on the "Manage Fields" button
Alert: The fields created/edited in this screen, organize your entire DataMart.
Please read these tips carefully before using this screen.
Tips:
- When selecting the "Identifier, you will want to choose either the email address field or a unique number that you are creating outside the system (ie. Member number or Account number).
- Currently, CONNECT supports only 1 email field in your database. If you have any other email address fields, they will need to be entered as text fields and cannot be used for deployment.
- Once a field is created and data is uploaded to the field, it cannot be removed from your DataMart.
- If you have created a field you no longer need and have not uploaded data to it, please contact CONNECT Support to have it removed.
2. Adding a New Field
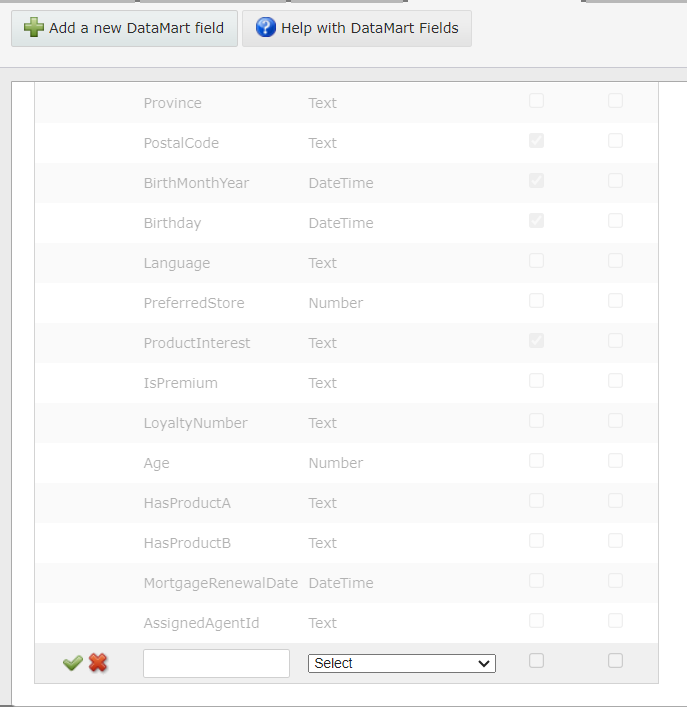
Steps:
- Click on the "Add a new DataMart Field" button
- Type in the field name you wish to add
- Select the data type that will be collected in this field.
- Click the checkmark to finish
OPTIONAL: Check off "Display" if you would like this field to appear in "Manage People".
3. Editing an Existing Field

- Click on the
 icon located next to the Field Name you would like to edit. Currently, you can only edit the name of a field.

How to View if a Contact is a Hard Bounce
If a specific contact is complaining that they are not receiving their email, they might have been flagged as a hard bounce.
To view if a contact has been flagged as a hard bounce by UMPIRE, follow these instructions:
1. Navigate to the People tab in the Target screen
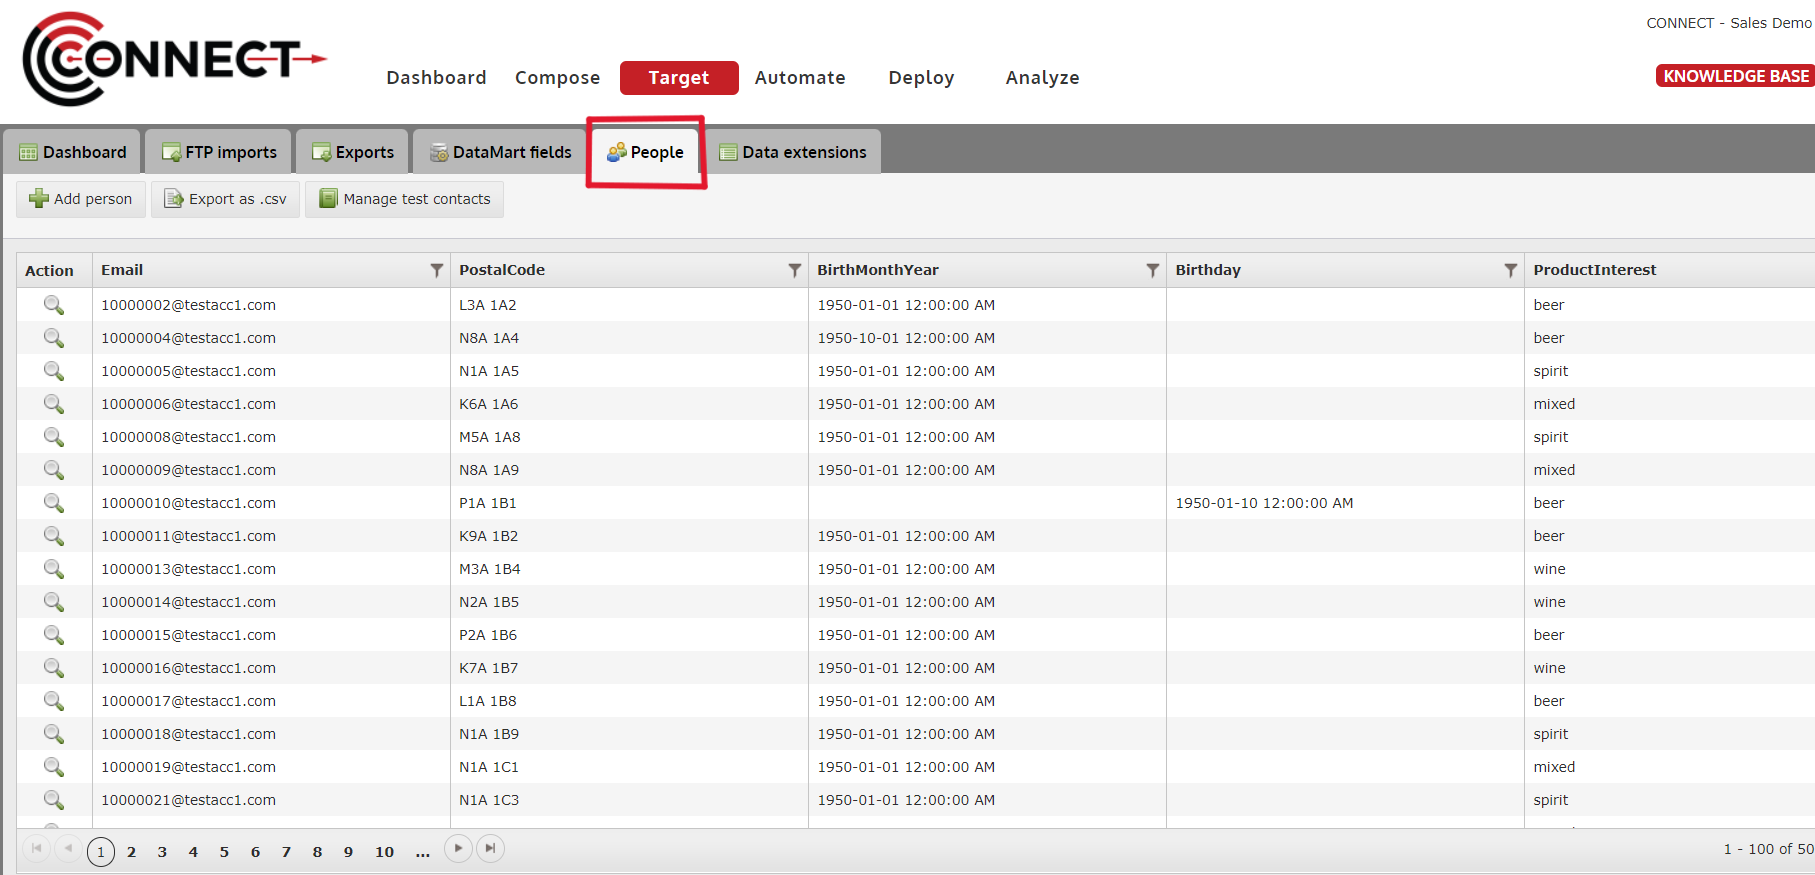
2. Using the filter options for the fields, Enter in Criteria so that you can locate the contact you wish to view
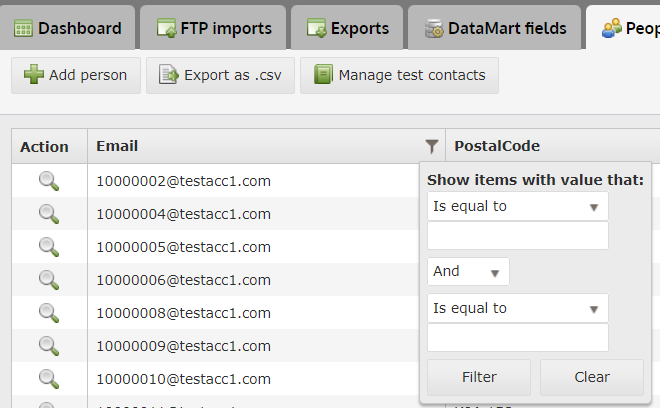
- Tip: The most common way to locate a contact is email address. Just click the filter option on your email field and type/paste in the email address of the contact you are trying to view.
3. Click on the "View" icon next to the Contact

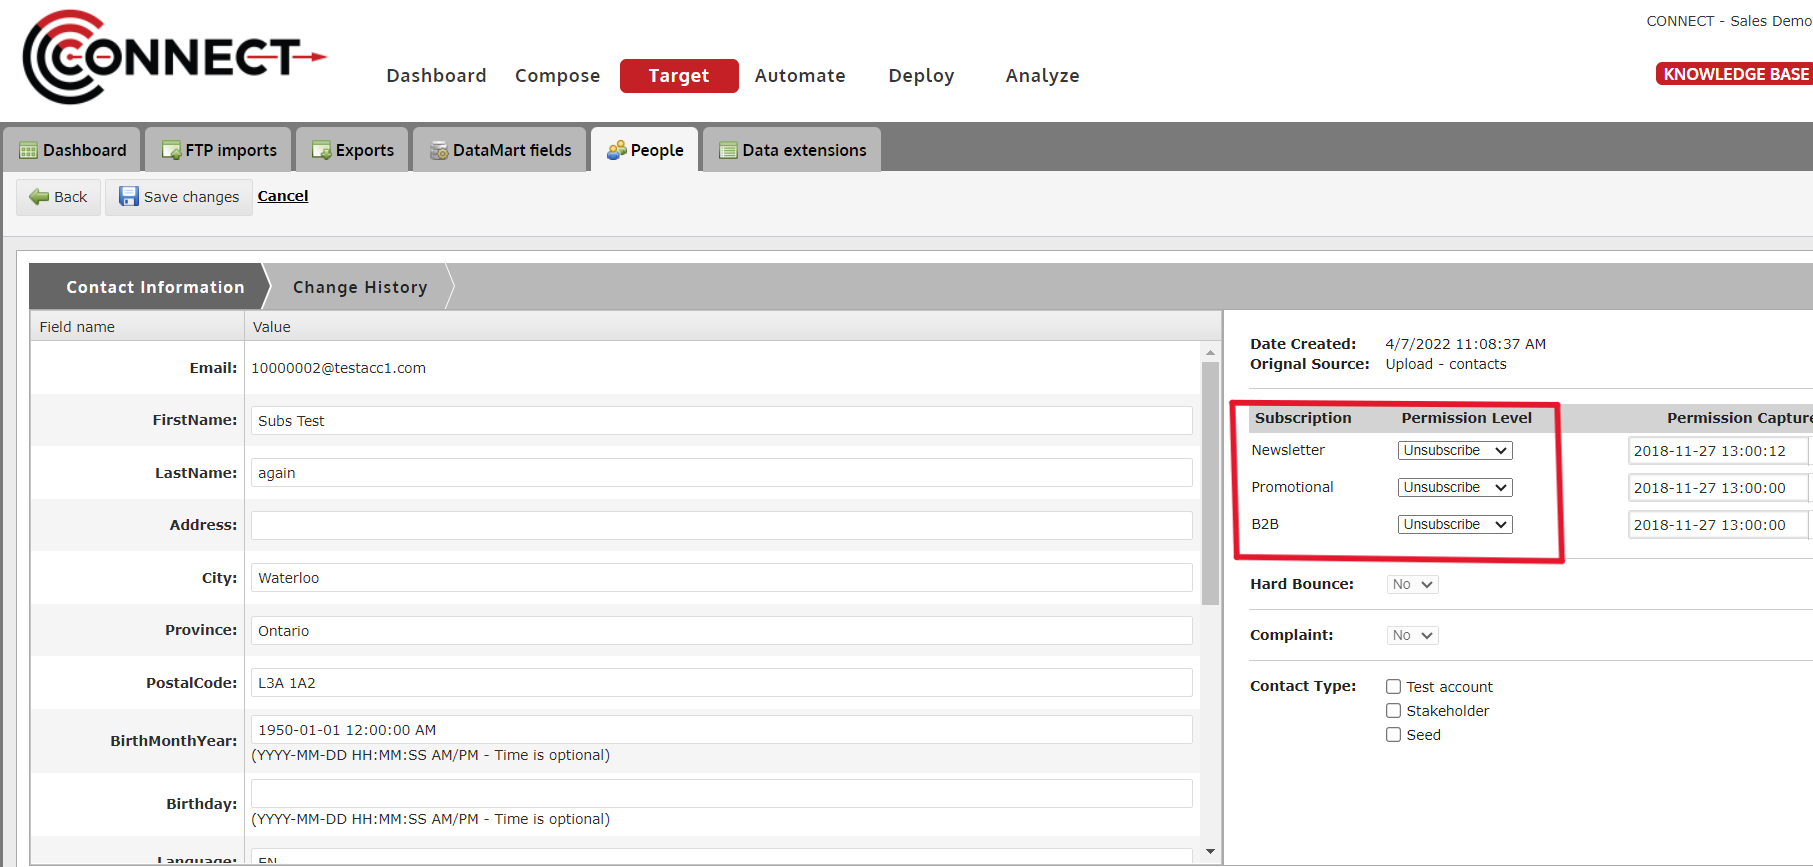
4. On the Right Panel, you can view if a contact is a Hard Bounce

How to Unsubscribe One Contact from a Subscription(s)
If you come across an individual who wishes to be removed from one or multiple subscriptions you are currently deploying to, you can use this method to unsubscribe them from those subscriptions.
1. Navigate to the People tab in the Target page
2. Locate the contact you would like to unsubscribe and click the "View" icon
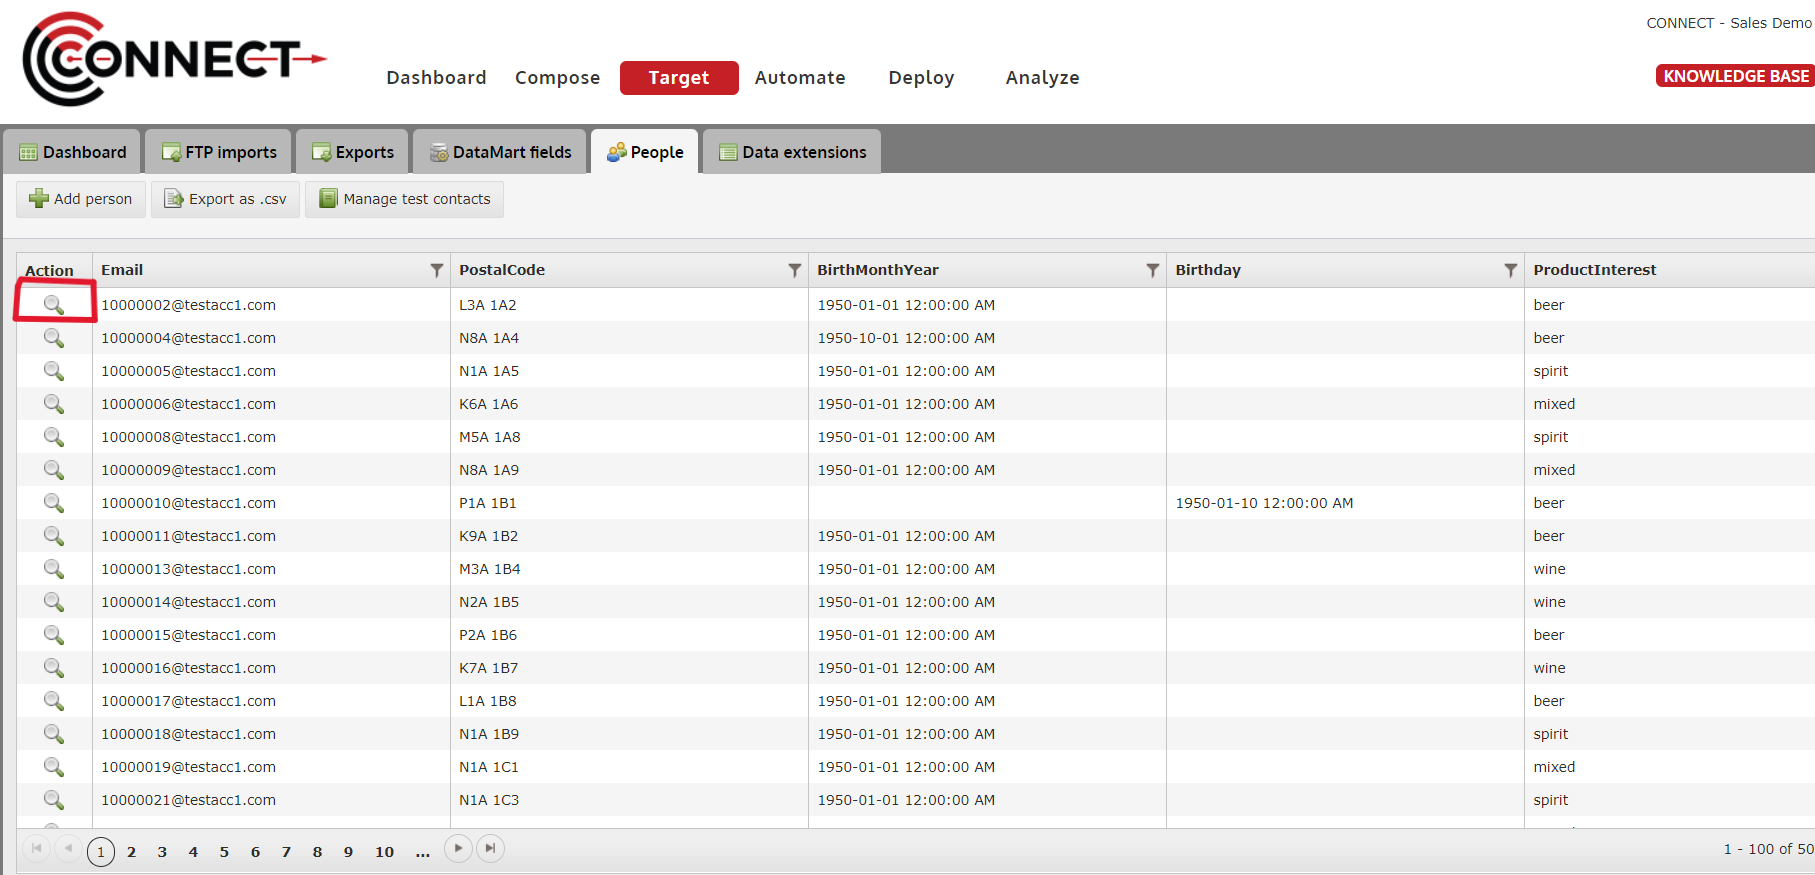
- Tip: Use the "filter" option on your "Email" column to quickly find a contact by their email address.
3. Click the "Edit record" button at the top

4. Change the permission level of the subscription(s) you want to unsubscribe them from, to "Unsubscribe"
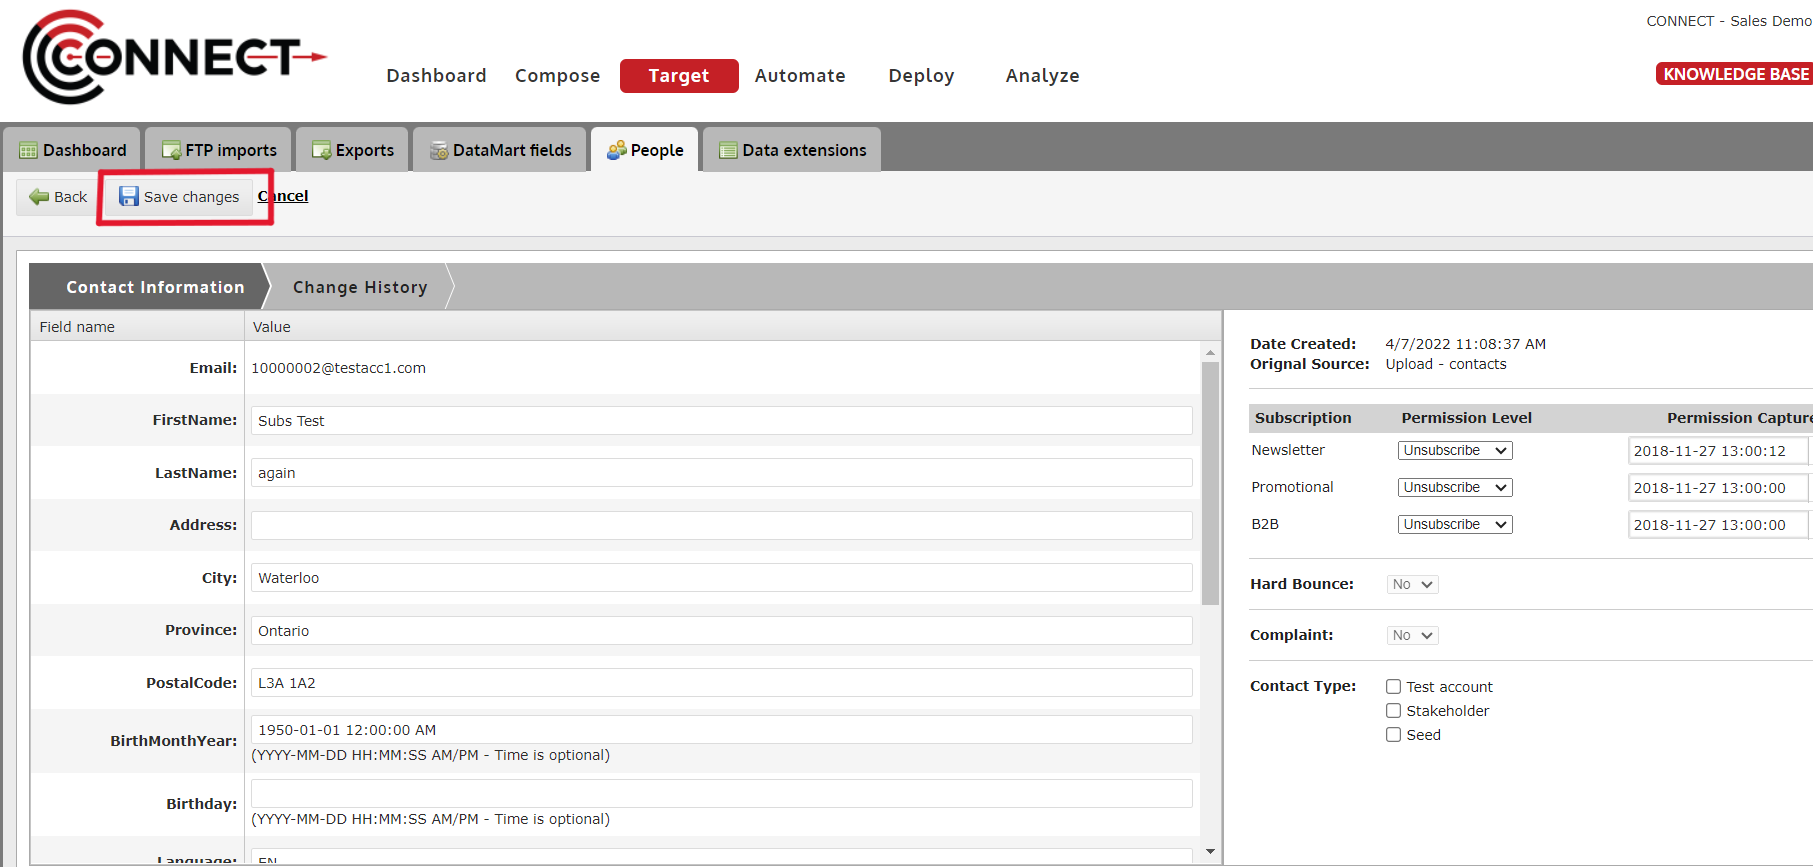
5. Click "Save changes" once finished
Importing data
List Upload Error Messages
If you encounter any of the following error messages while trying to upload a list into CONNECT, follow the instructions below.
1. "The file you have selected has duplicate header names. Please correct this issue and try again."
- This error message indicates that you are trying to upload a file that has more then one header with the same name.
- To fix this, open your file in Microsoft Excel and change one of the header names so that they no longer match.
2. "The file you have selected has columns without headers. Please correct this issue and try again."
This error message indicates that you have selected a file that has columns with blank headers. This can happen in two situations (or a combination of both).
- The file you are trying to upload has columns with data but at least one of the columns is missing a header (see example on left).
- The file you are trying to upload has "ghost" columns. These are columns that have no values in any of the rows (including the header) but are represented in the file by commas.
- Follow the instructions below to fix this issue.
2.1. Identifying files with "Ghost" columns
- If you think your file has "ghost" columns, there is an easy way to tell. Simply open your file in Notepad (TextEdit on Mac) and you will generally see an abundance of commas at the end of each row.
- In a CSV (Comma Delimited Values) file, each comma indicates to Excel or CONNECT that there is another column,
- Hence when there is an abundance of extra commas on the end of each row, that is indicating to the program that there are extra columns.
2.2. Fixing files with "Ghost" columns
To fix the issue of "ghost" columns, you first want to open your file in Microsoft Excel. In Excel, you will not be able to see the columns.
The best way to get rid of them is to highlight a lot of extra columns to the right of your data.
- Highlight the columns by clicking one of the letter headers at the top, holding down your click and dragging across until you've highlighted enough columns. The more you highlight, you the more likely you are to catch all of the ghost columns.
- Right click on any of column letters as the top and select "Delete". Save your file and exit Excel.
- To confirm you have successfully deleted the "ghost" columns, re-open your file in notepad and the extra commas should be gone.
How to Add an Additional Person
There are situations where you might need to add one more person to your DataMart, either a customer or maybe you have a new team member you would like to add as a stakeholder. Here's how.
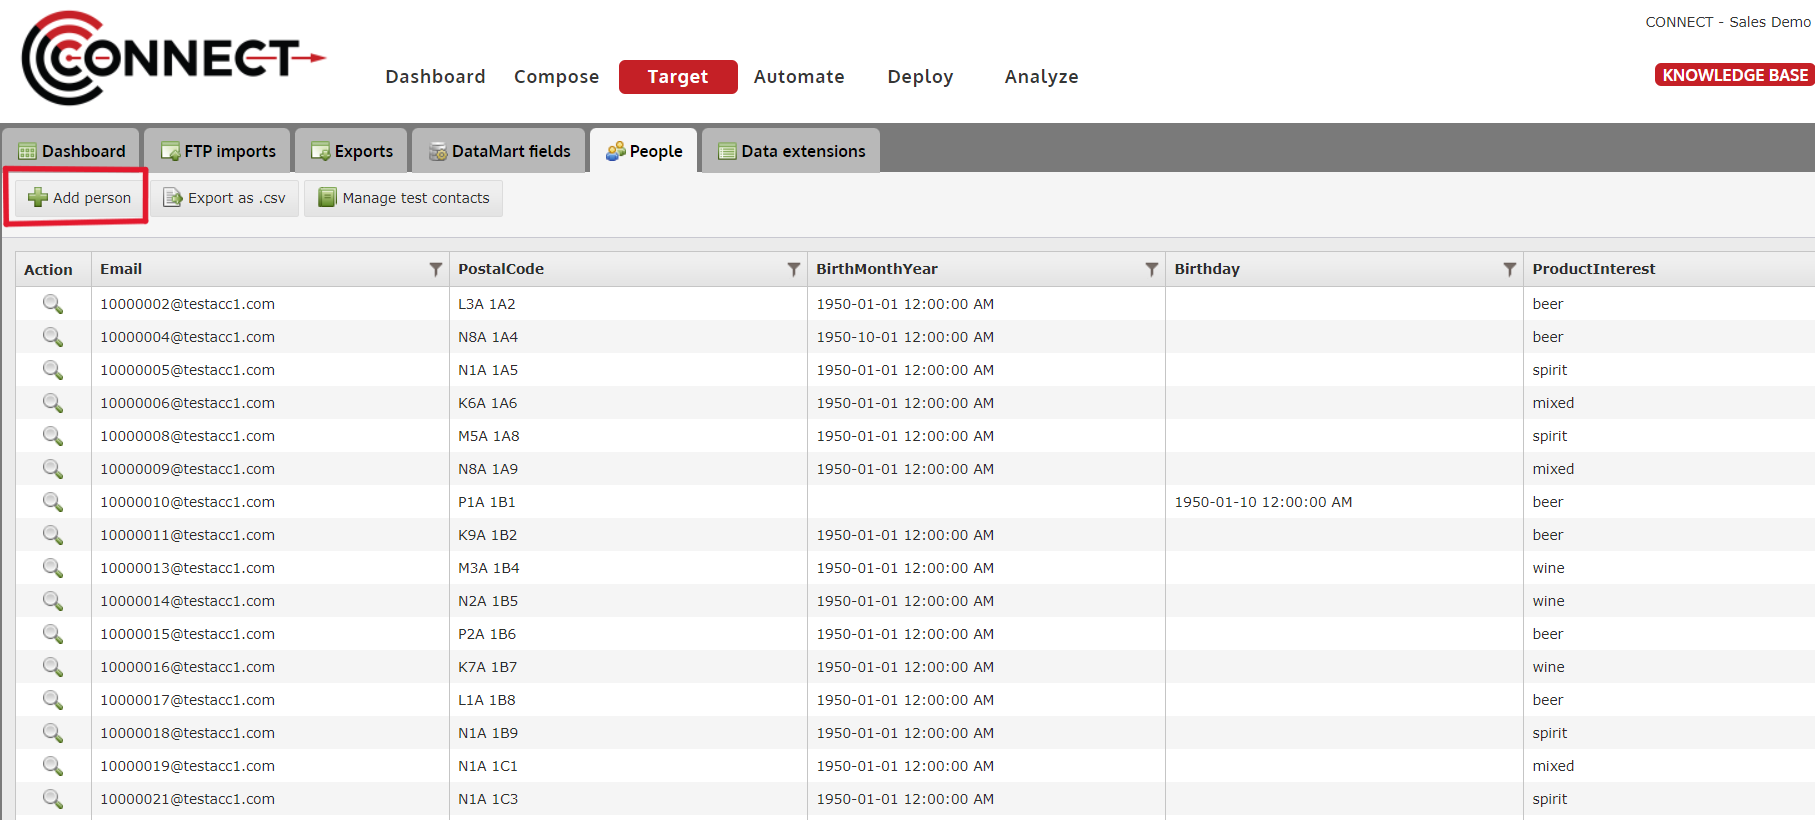
1. To begin, click on the People tab located in the Target screen
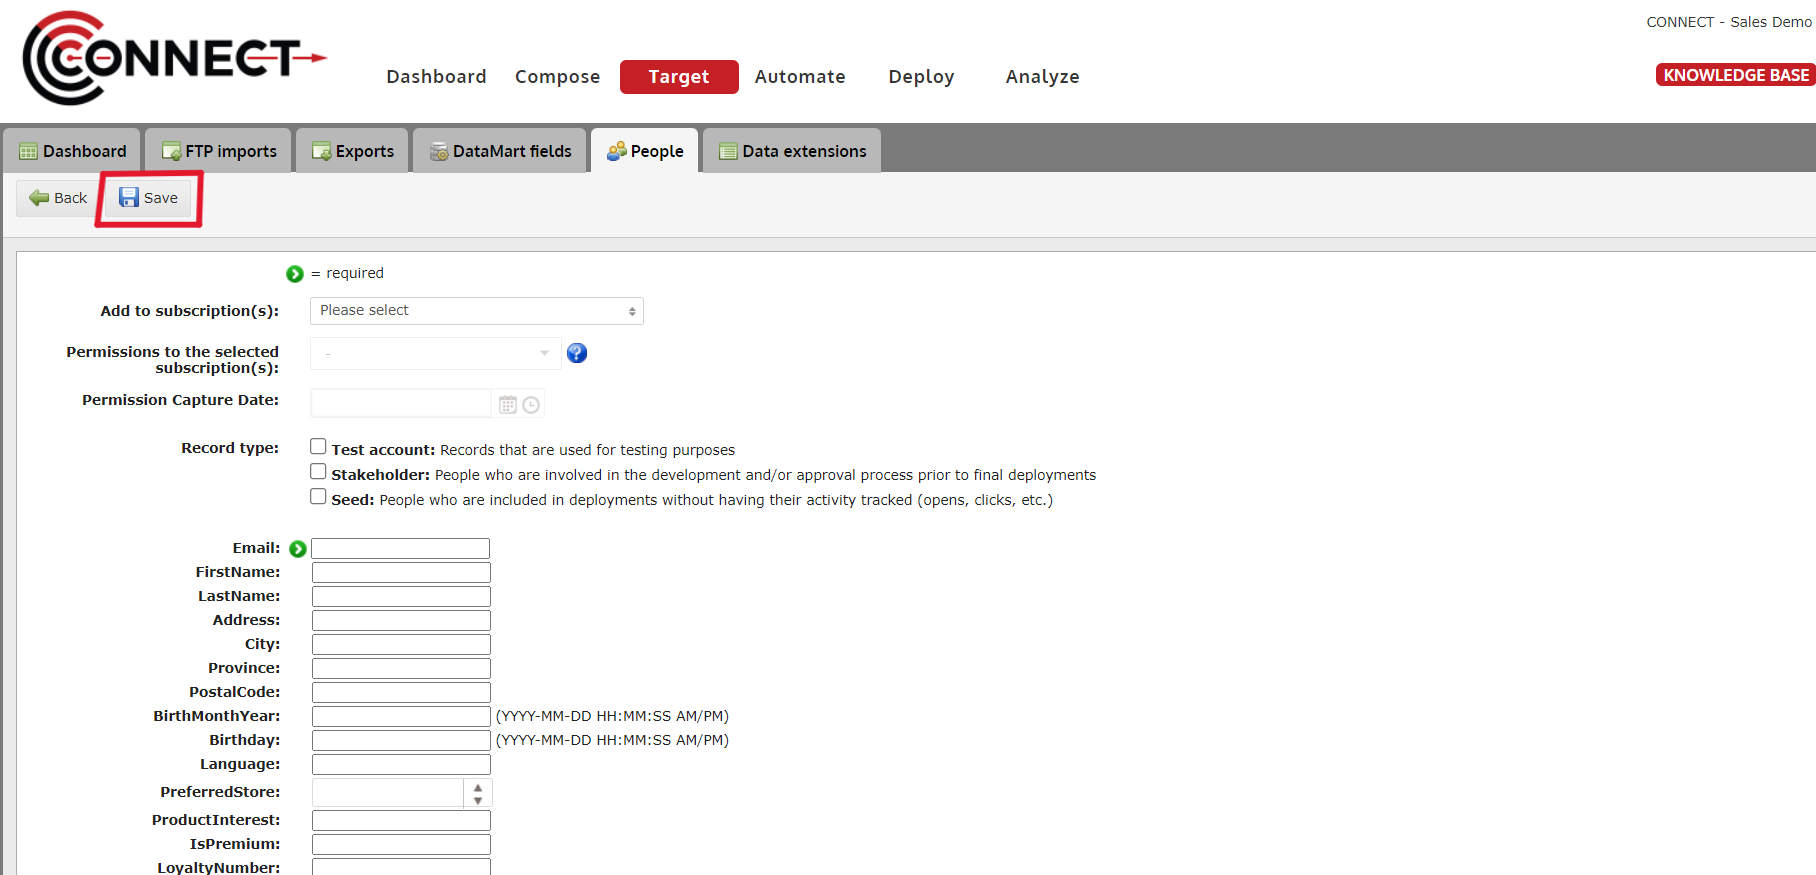
2. Next, click on the "Add Person" button
3. Select the Subscription(s) you would like to add the record to

4. Select the permission level of the record you are adding

5. OPTIONAL: Select the record type of the record you are adding
For a definition on Record Types, click here.

6. Fill out the Field Information of the Record you are Adding
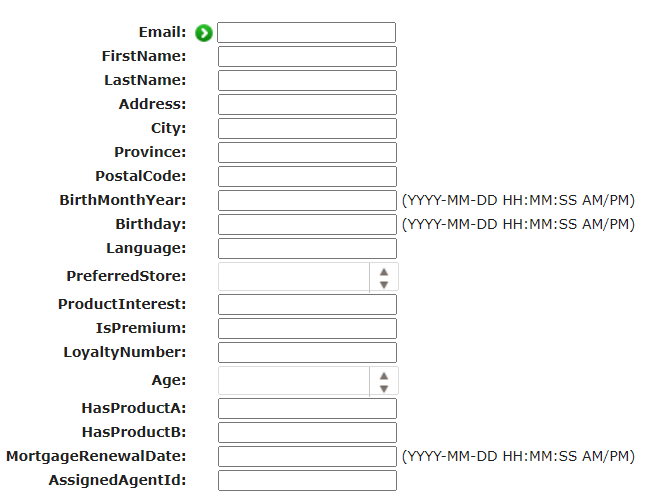
Note: Only the Identifier field is mandatory in this process. It will be flagged with a green indicator.
7. Click the "Save" button, once finished
How to Upload Records as Stakeholders, Test Accounts and Seeds
Throughout CONNECT, you will see references to three different records types: Stakeholders, Test Accounts and Seeds.
In this article, the process for uploading these records and the recommended uses for each are discussed.
1. Begin uploading the list of records you would like to assign as one of the record types
- If you need instructions on how to upload a list file, click here.
2. During the list upload process, click on "Additional options" to reveal the record type options

3. Test Accounts
- Test Accounts are defined in CONNECT as email addresses used solely for testing purposes.
- The might be Gmail or Hotmail accounts that would be used to see how a campaign is rending in different email clients.
- They can also be individuals who want be included in all testing deployments such as the Campaign Manager.
4. Stakeholders
- Stakeholders are defined in CONNECT as individuals who follow a campaign from start to finish and wish to be included in the process.
- You can add stakeholders to any testing that is being performed on a campaign and you can include them in the final deployment
- For a company, Stakeholders might be department leaders or managers. For an agency, Stakeholders might be account managers or key client contacts.
- You may include Stakeholders at any time, so it is important to only choose to add them to a deployment/test when you are ready for them to see the campaign
5. Seed Lists
- Seed lists are similar to stakeholders, however this separation is provided as Seed lists can only be used in final deployment and are added in with the regular customers.
- Seed lists tend to include executives and other individuals who wish to see final deployment as the customer sees it.
- Note: Records flagged as a Seed List will not be included in the final metrics.
How to set up a FTP Import
FTP Imports provide a simple solution to automating your data imports. This can be effective for pushing data from your CRM system or another tool that collects contacts into CONNECT. Follow the tutorial below to set-up your first FTP Import.
Note: In order to access the FTP Import's sub folder and begin dropping files, you will need your CONNECT FTP credentials which were provided when you were on boarded. If you need help retrieving these credentials, please submit a support ticket or email support.
Tutorial
Please note: To better view the tutorial, click the full screen icon  .
.
How to edit a FTP Import task
Using segments is not only a great way to target specific groups of contacts but it's also a great way to retrieve data from CONNECT for use outside of the application. This tutorial will help walk you through how to export a segment using our Exports feature.
Tutorial
Please note: To try out the feature, click the full screen icon in the tutorial.
Segmentation
How to Create a Segment with one Field
Segmenting allows you to target a specific group in your database and send relevant content to them. This tutorial will demonstrate how to segment your database with one value.
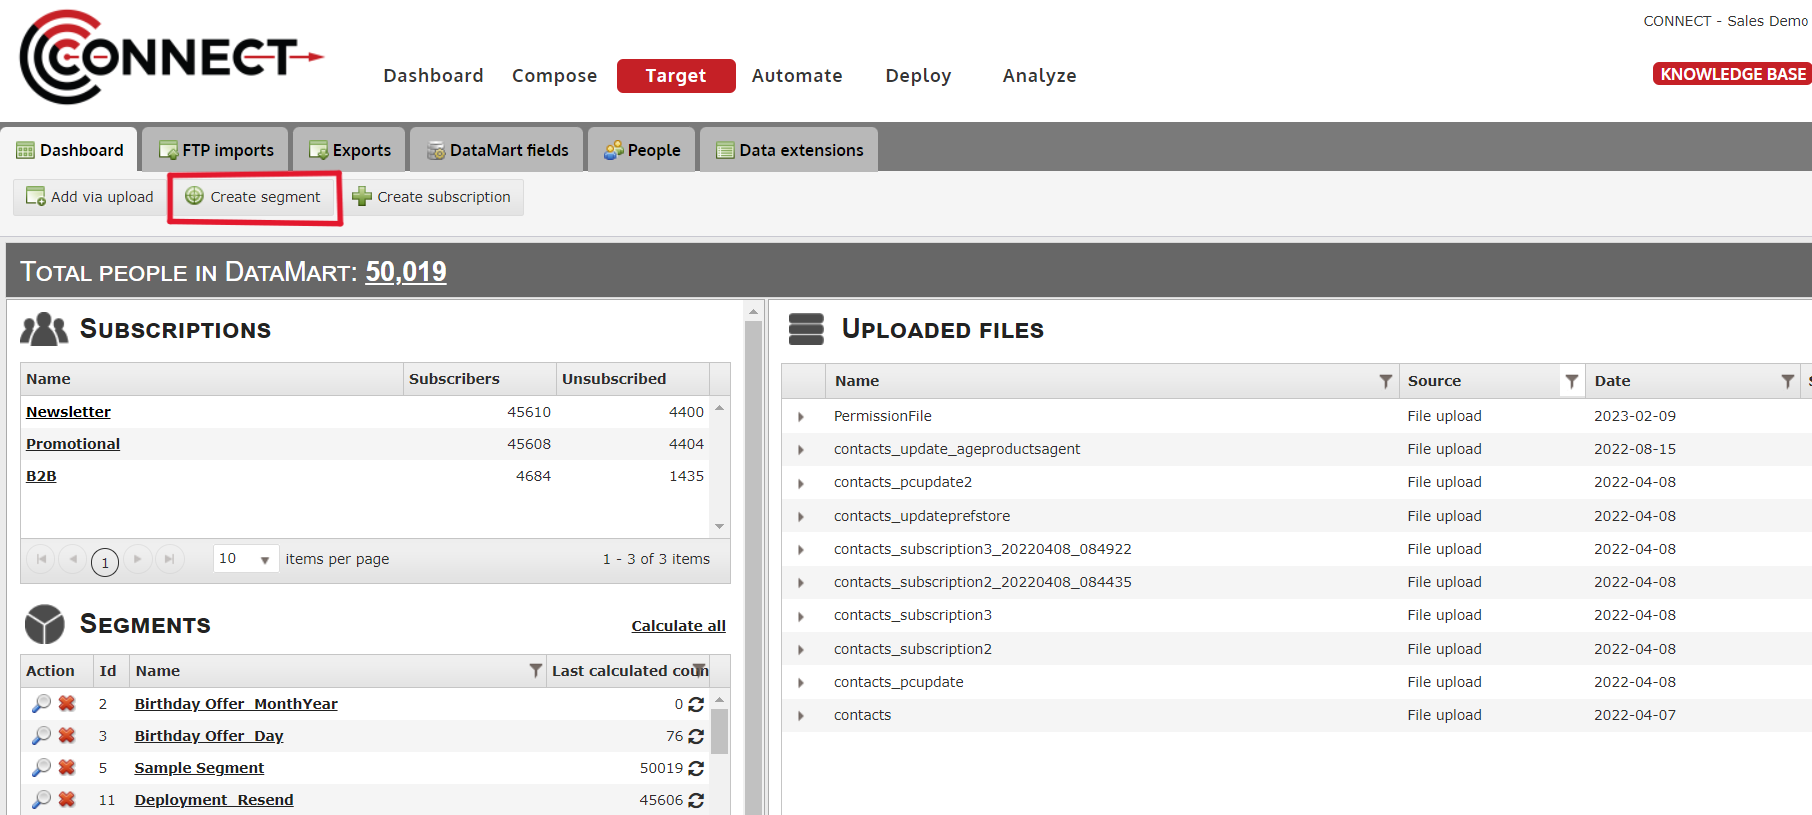
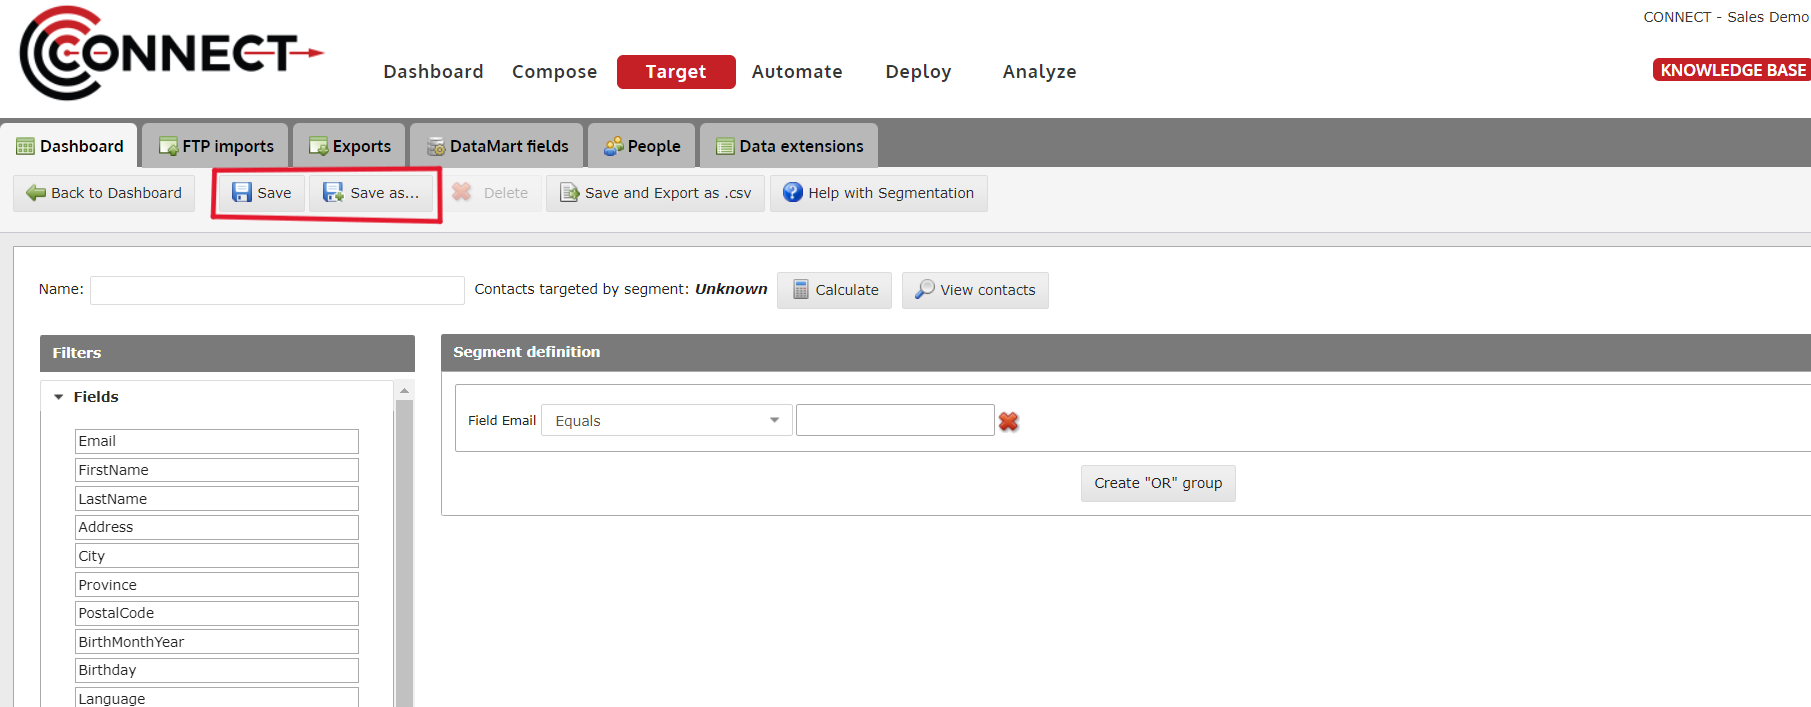
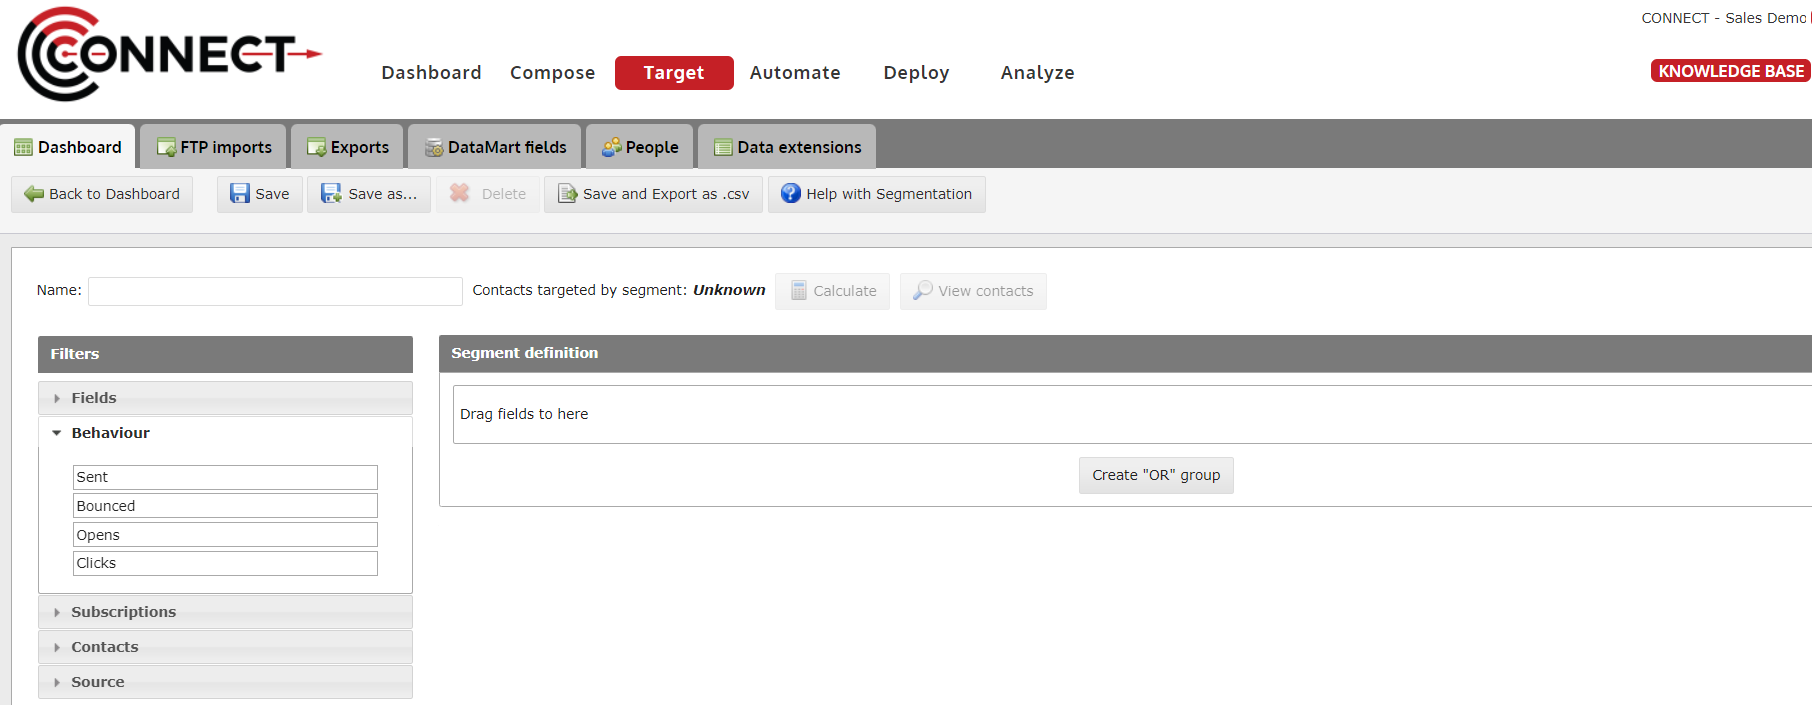
1. Click the Create Segment button
2. Type in a Segment Name
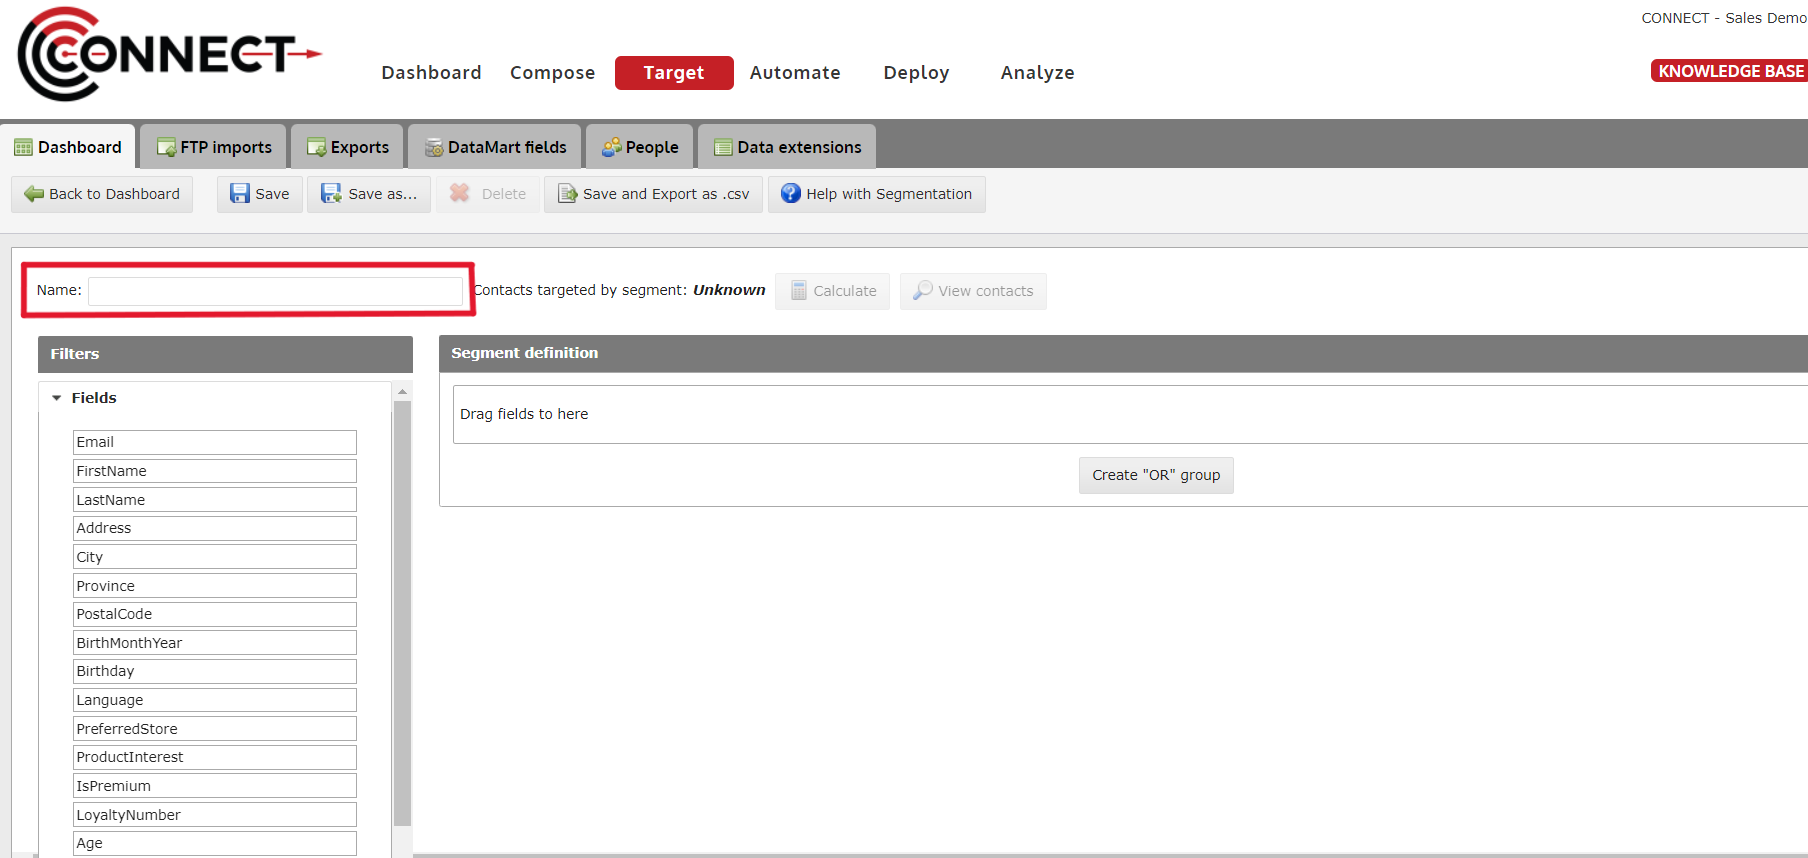
- TIP: Use a name that helps describe the segment (ie. Toronto Residents Over 50) OR a name that matches the message you will be using it with (ie. Newsletter_Jan 2012).
3. Drag the first Field into the Segment Definition Pane
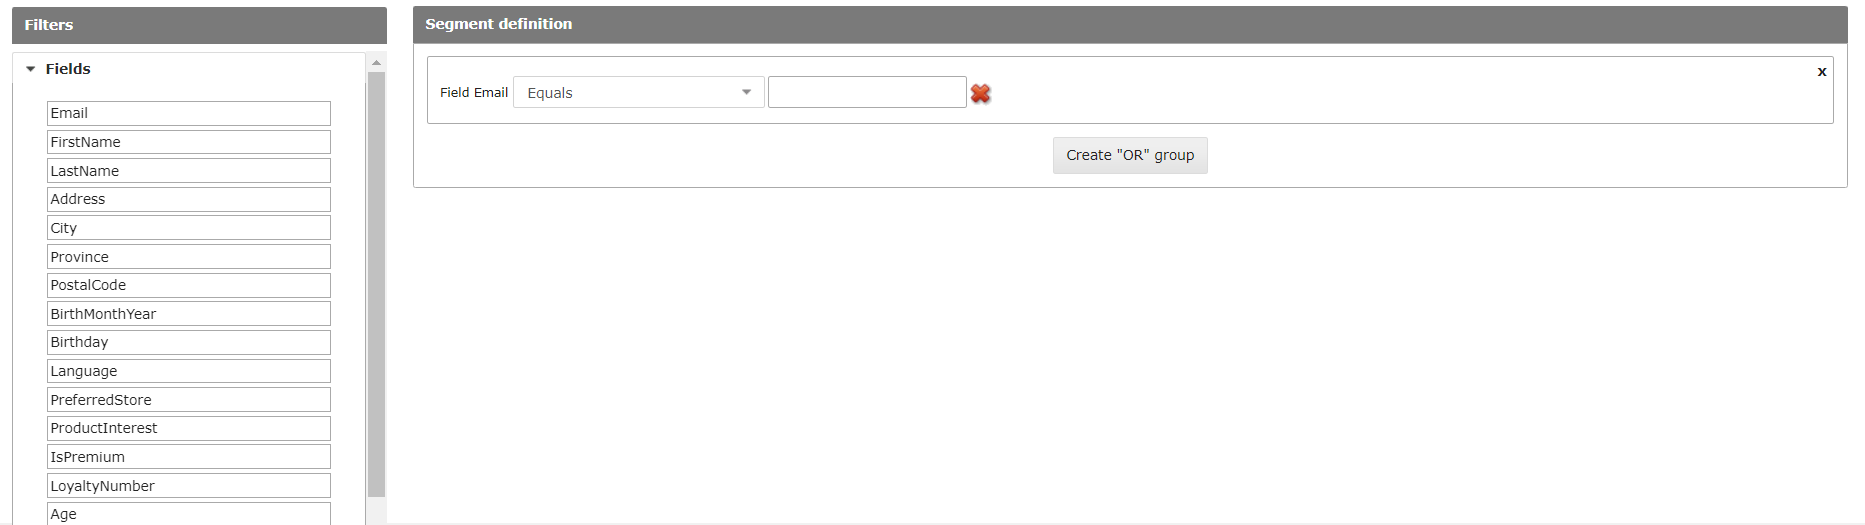
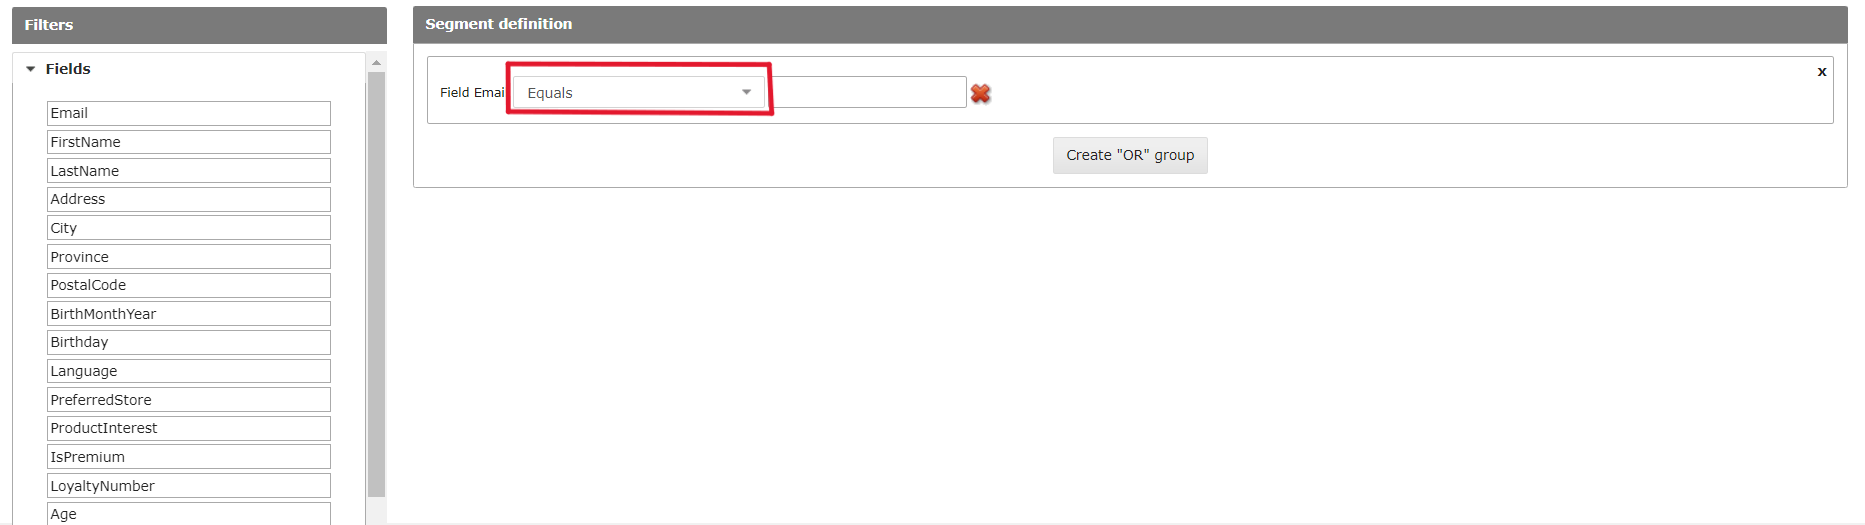
4. Select the Operator for the Field
5. Type in the Value you wish to Segment on
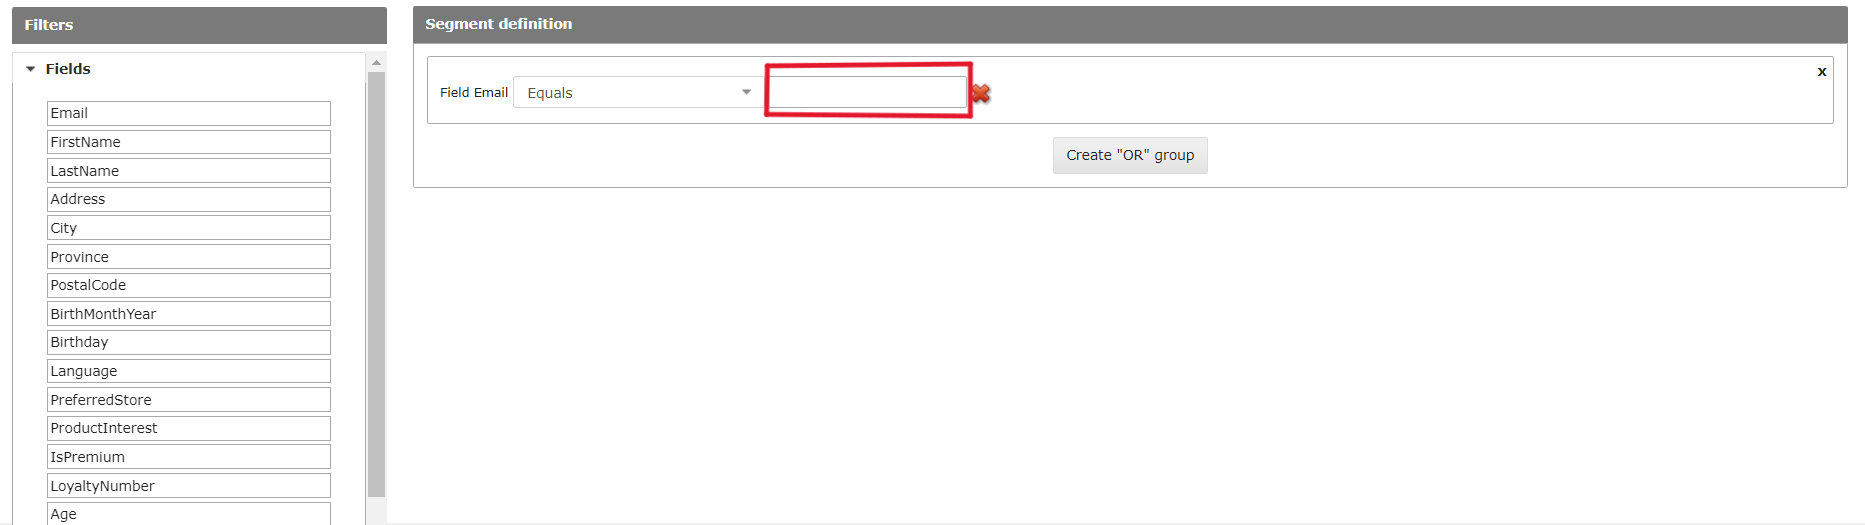
6. OPTIONAL: Verify the Record Count by clicking Calculate
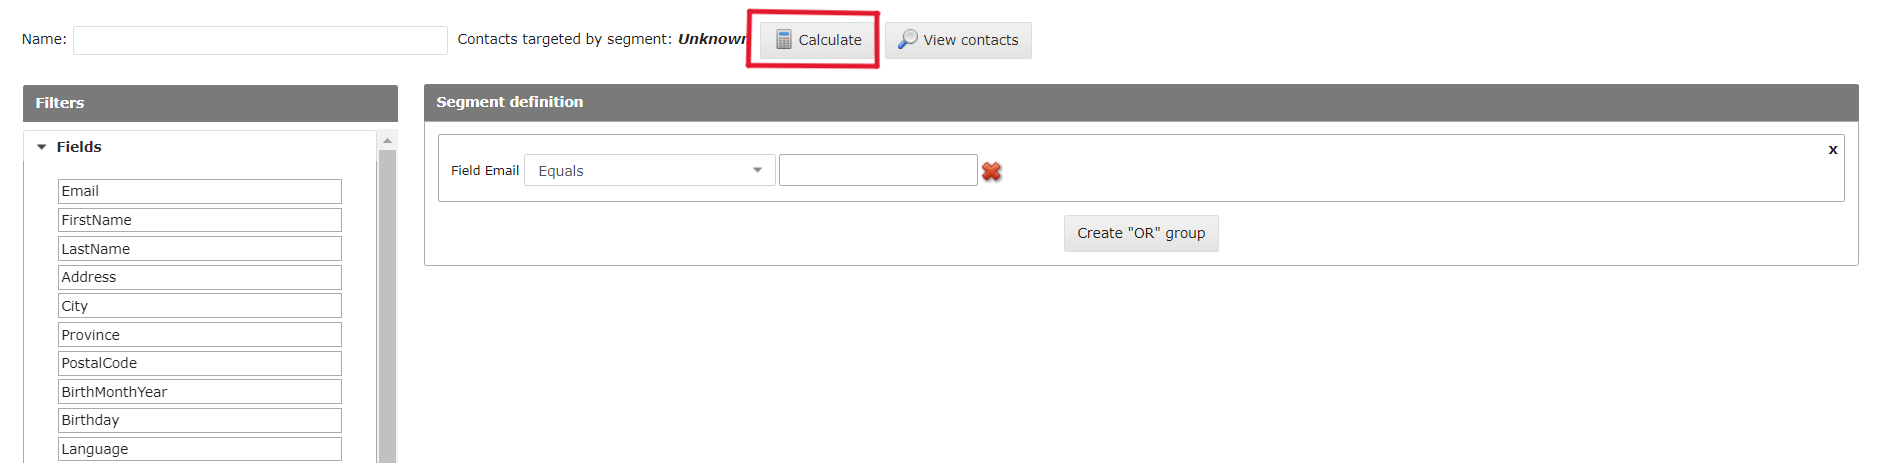
- NOTE: If you find the Record Count to be too high or too low, double check that the value being used matches the data in your DataMart.
7. Click Save Segment to Finish
How to Create a Segment with Multiple Fields
Learn how to create multiple AND/OR statements in a segment and hone in on those specific customers you wish to target.
1. Follow Steps 1 - 5 in "How to Create a Segment with one Field"
How to Create a Segment with one Field
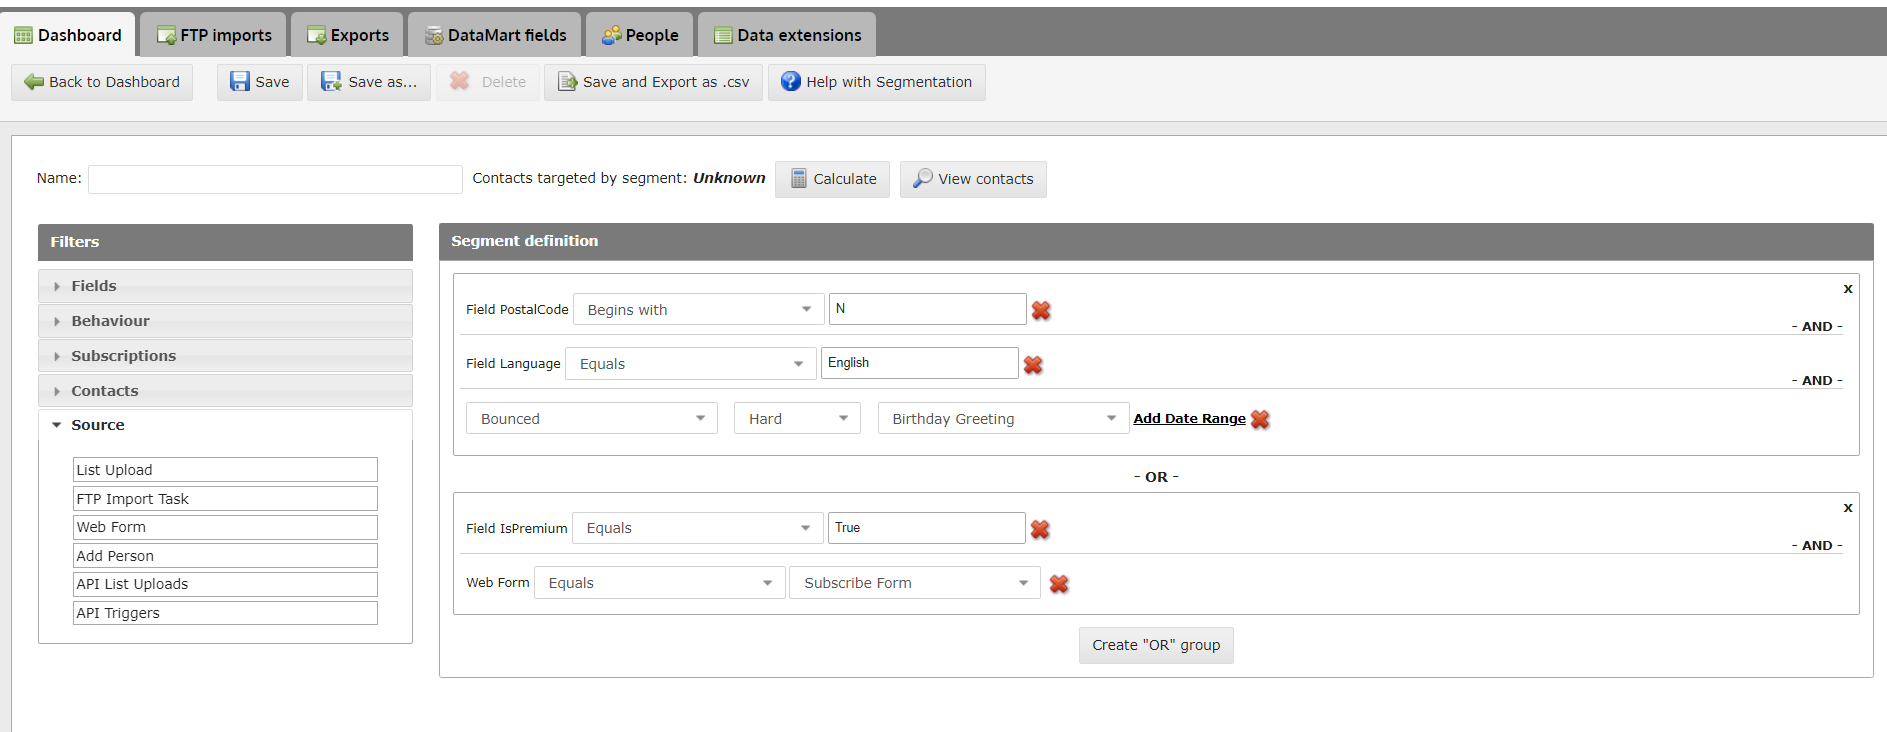
2. Creating an "AND" group

1. Drag the additional field(s) you wish to add into the group, on top of the existing fields. This will create an AND group.
2.1. Creating an "AND" group

2. Type in the Value you wish to Segment on. Click Save Segment to finish.
3. Creating an "OR" Statement

1. Click on the "Create OR Group" button.
3.1. Creating an "OR" Statement
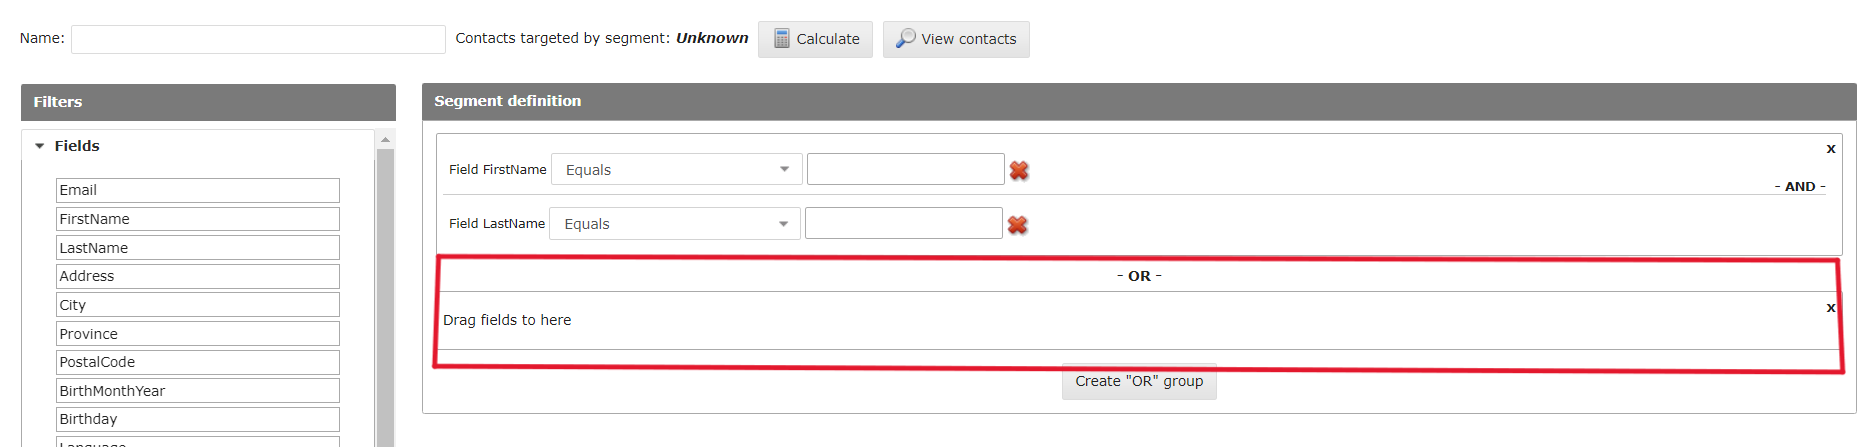
2. Drag a field into the new area to create the "OR" statement.
3.2. Creating an "OR" Statement

3. Type in the Value you wish to Segment on. Click Save Segment to finish
How to Segment by Contact Source
Segmentation now offers you the ability to target your contacts based on sources they may have entered your DataMart through.
These include - List Upload - FTP Import Task - Webform - Adding a single contact - API List Upload

Simply drag and drop the source type to your segment logic, select the operators "equal" or " does not equal" and the select the source name.
1. Source Definitions
- List Upload Contacts that were included Min a manual CSV upload through the target dashboard.
- FTP Import Task Files Contacts that were uploaded automatically via ftp FTP import task or a specific file picked up by a FTP import task.
- Webform Contacts that were captured by a specific web form built in Connect.
- Add person Contacts that were uploaded into the DataMart by using the Add a person button on the People tab on the Target screen or through the Contacts endpoint on the Restful API.
- API List Upload Contacts that were uploaded using the Connect Restful API List endpoint.
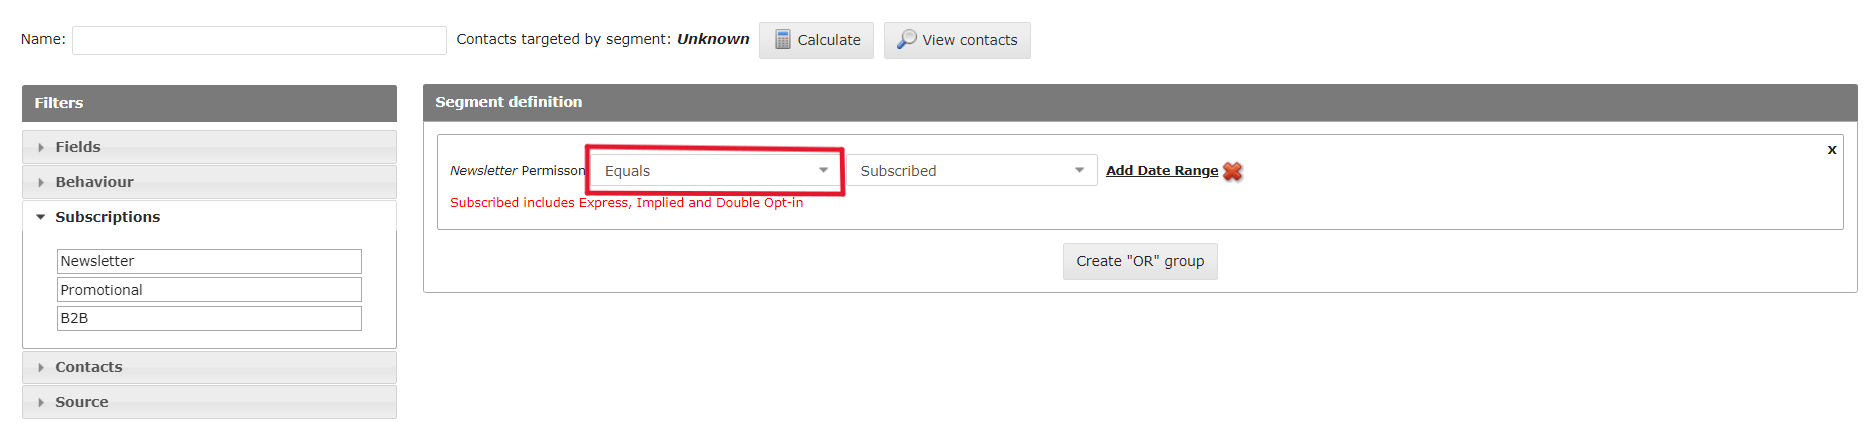
How to Target Contacts Based on their Permission Level
This feature allows you to target contacts based on their permission level for a specific subscription.
1. Name your Segment
- In "Create new segment ", you can now target recipients from a specific subscription based on their permission level
2. Click on Subscriptions
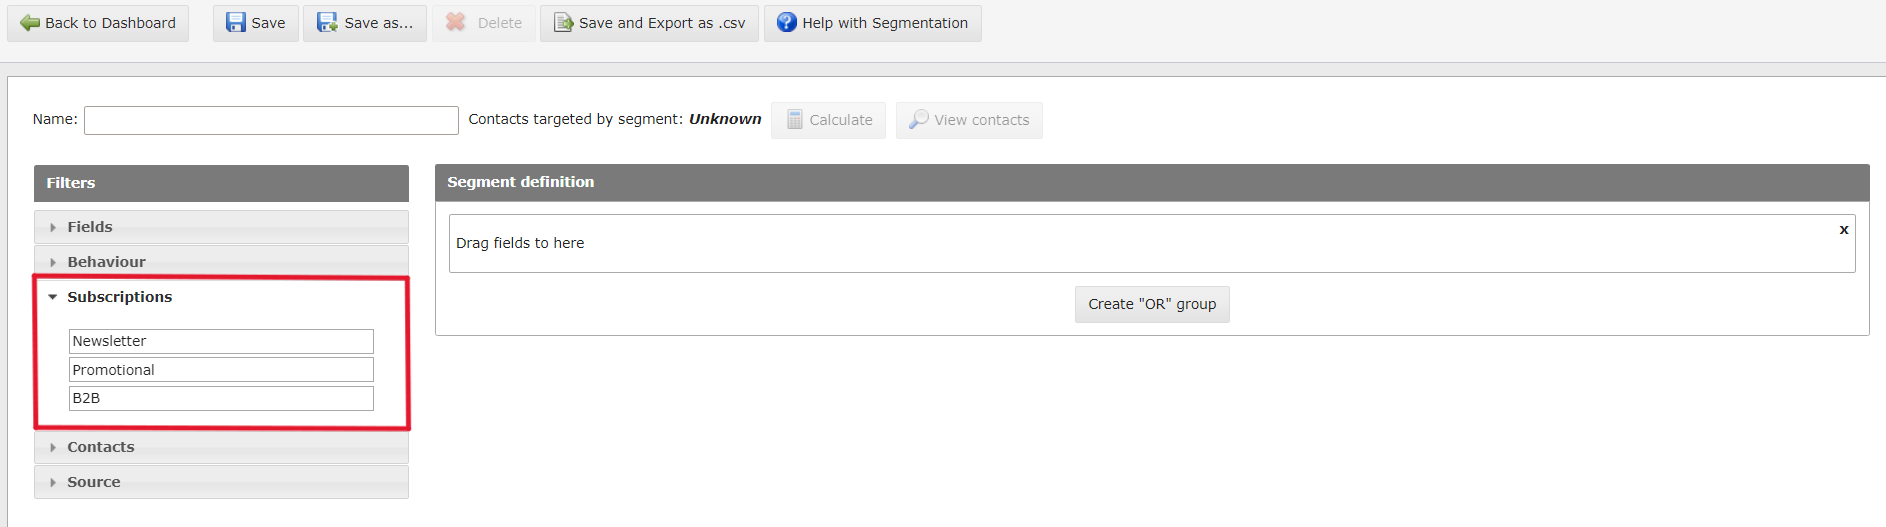
3. Drag and drop it in the Segment
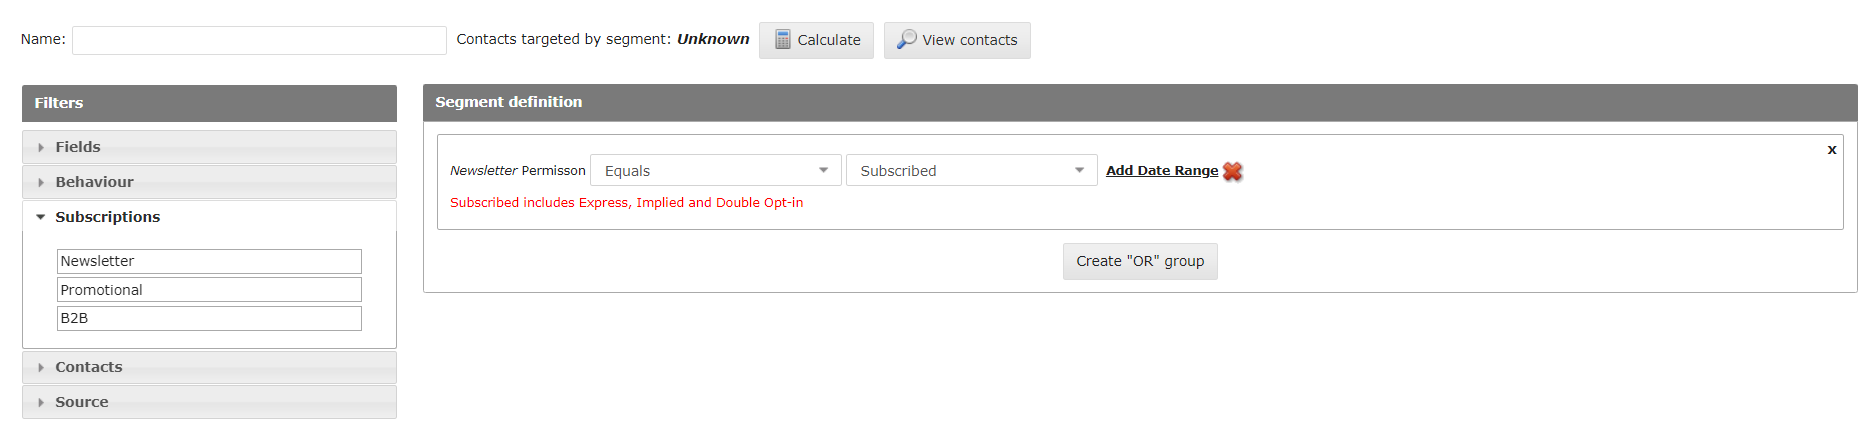
4. Select the Operator
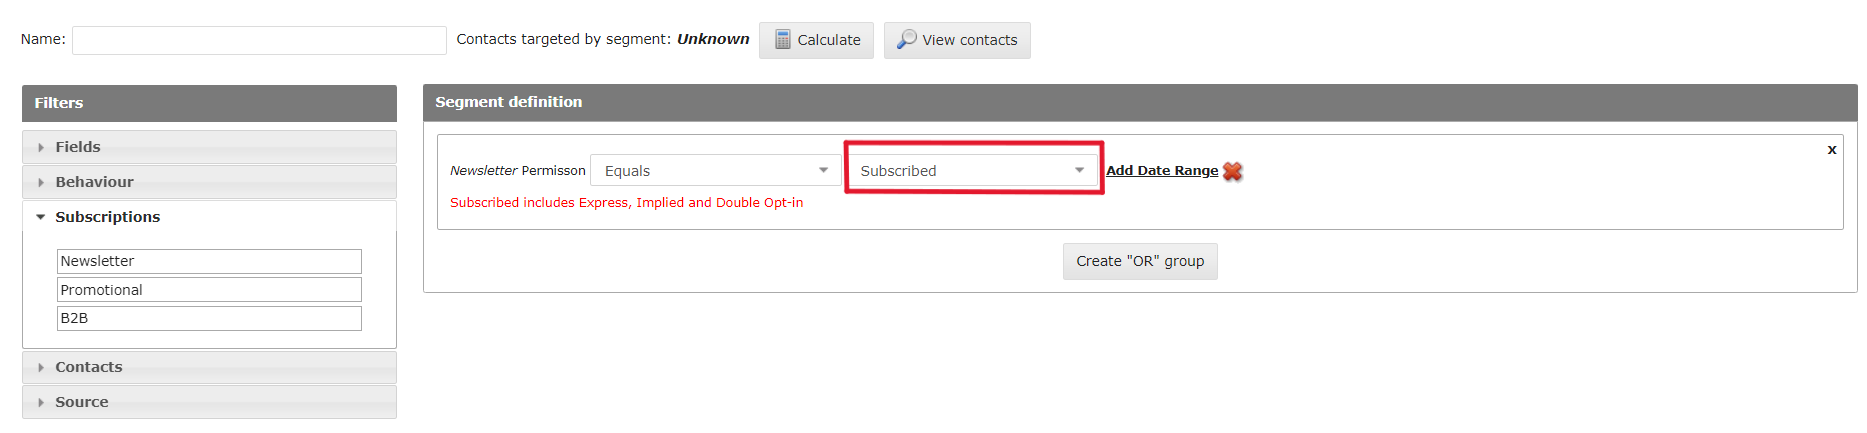
5. Select the Permission Level
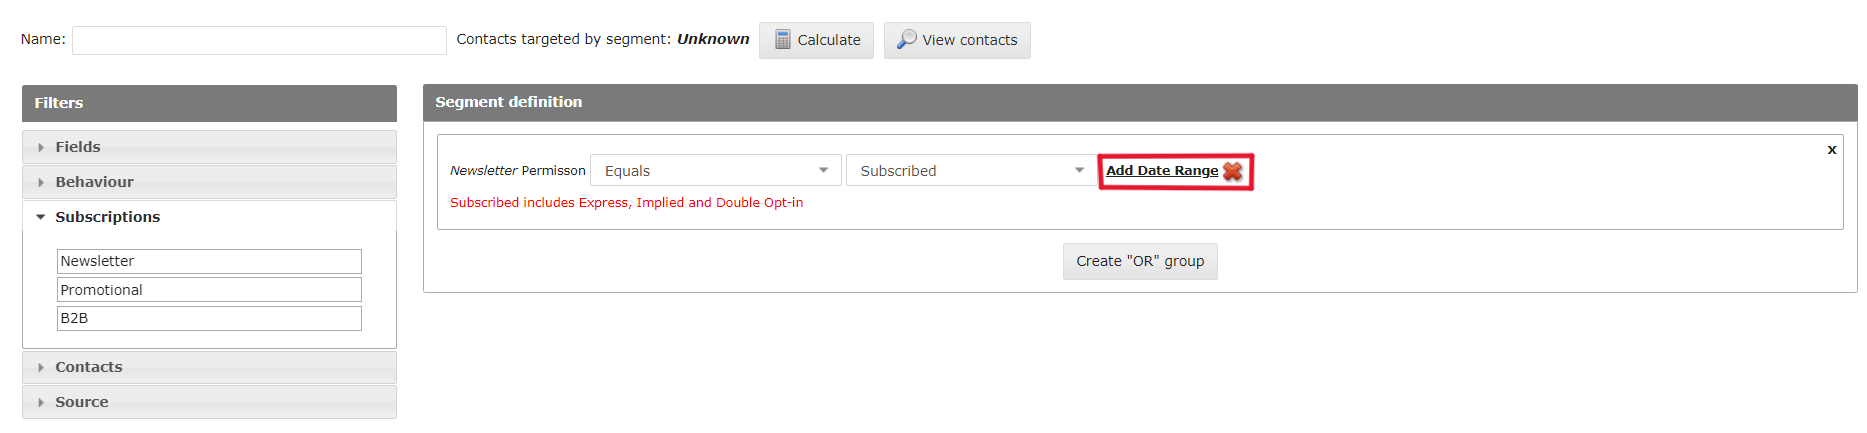
6. Click on Add a Date Range
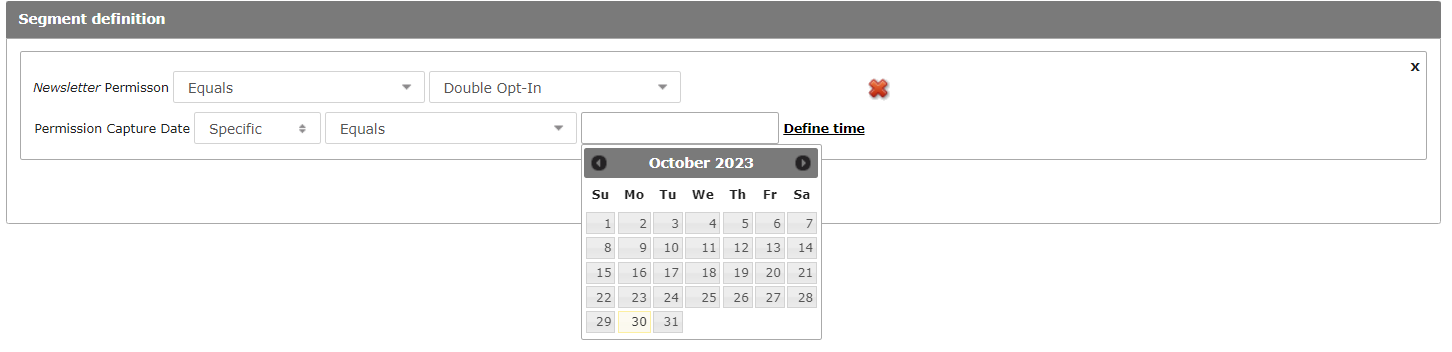
7. Select when it was Last Updated

8. Date Picker
9. "Relative" Date Option
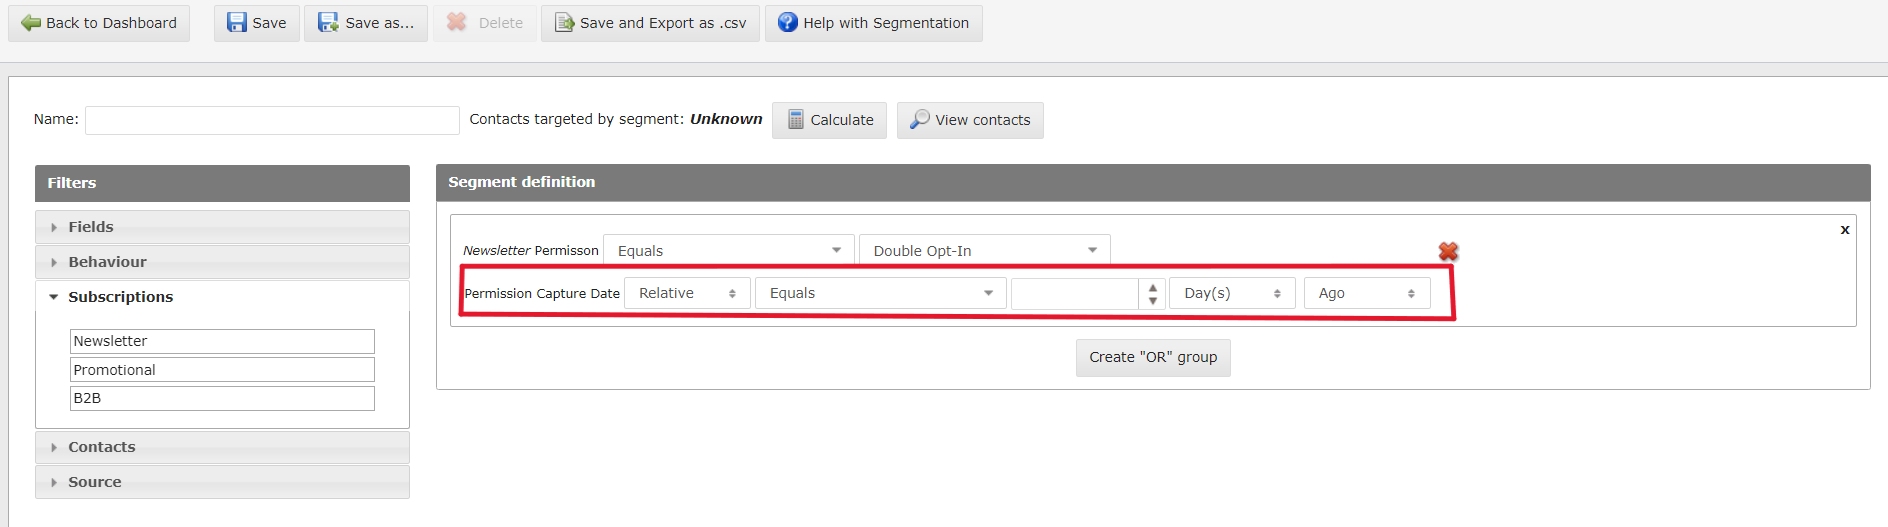
- Relative date option can be selected allowing the user to set a relative date instead of a specific one
10. Exporting Recipient from a Subscription List
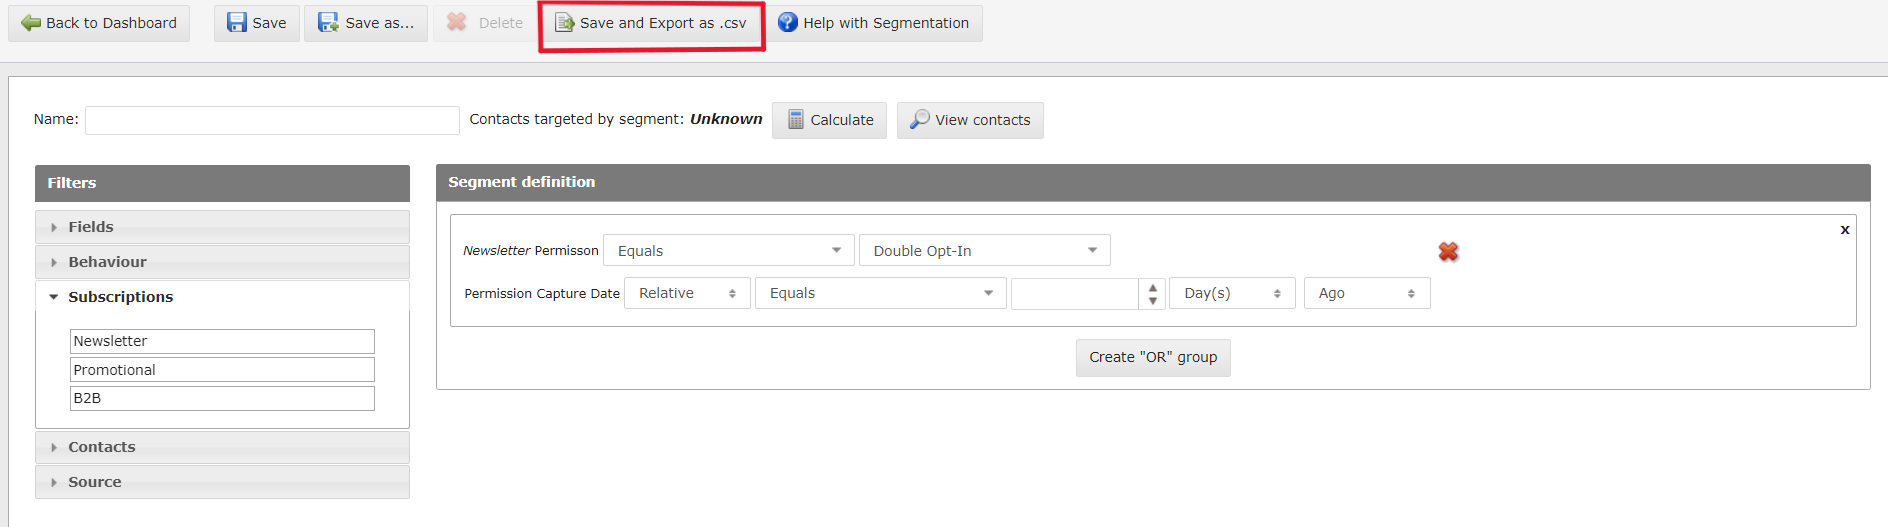
You are able to export the list of users that have a specific permission level within a date range.
- Select the desired option
- Click on " Save and export as .csv"
You can now pick which fields you want included in the file and can also add permission data for specific subscriptions.
11. Select the Fields for Export
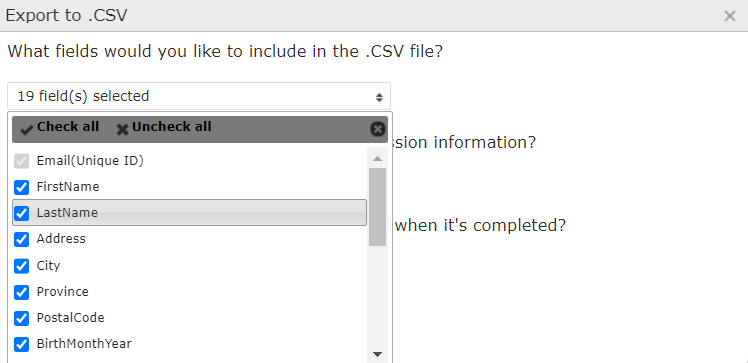
- You can select any field you would like to have included in your export by checking or unchecking the field list.
12. Include permission level in the Export
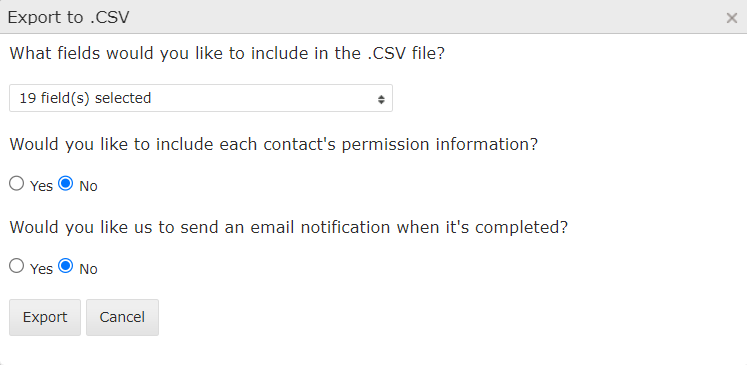
In order to include , the permission information in your export , please follow the below steps :
- Check the "yes" radio button
- Make sure the desired subscription is selected.
- Finally, click on Export.
How to Target Contacts using Email Behaviour Segmentation
Target inactive contacts to send a reactivation campaign and increase email program participation or target contacts who did or did not perform the required action in an email communication.
Email behaviour segmentation allows you to use your incoming email metrics to target your contacts based on their engagement with your email program.
1. To Begin
To begin creating a segment with Email behaviour criteria, follow these steps:
- Target screen
- Create segment
- Behaviour
2. Campaign and Deployment Selection
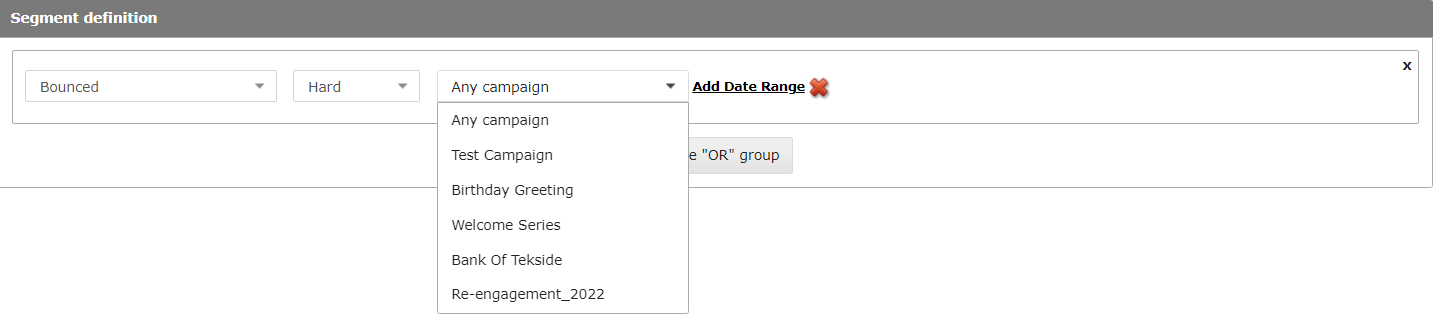
On all of the behaviour segmentation selectors, you will be able to target based on the following:
- Any
- Any campaign/deployment - This will target contacts that have performed the selected behaviour across any campaign or deployment that has been deployed.
- Campaigns
- Selecting a campaign will allow you to target a specific deployment or any deployment. When you select a campaign, you are only shown deployments that are assigned to that campaign.
3. Applying a Date Range

Adding a date range to your behaviour criteria will allow you to reduce the scope of your segment so that the data you are using to target your contacts is more relevant. The "Add Date Range" option is available for all behaviour selectors.
Options
- Today - This is a dynamic selection that will target contacts that performed the selected behaviour between 12:00:00AM and 11:59:59PM of the current day. This means that everyday, a different group of contacts will be targeted. This is calculated when the segment is used in a deployment or automated program.
- Not Today - This is a dynamic selection that will target contacts that performed the selected behaviour outside of 12:00:00AM and 11:59:59PM of the current day. This means that everyday, a different group of contacts will be targeted. This is calculated when the segment is used in a deployment or automated program.
- In the past - This is a dynamic selection that will target contacts that performed the selected behaviour between the current day and X days before the current day. If 5 days is selected and the current day is the 25th, all contacts that performed the selected behaviour between 21st-25th will be targeted. This means that everyday, a different group of contacts will be targeted. This is calculated when the segment is used in a deployment or automated program.
- After - The user will provide a specific date and time and the segment will target all contacts that performed the selected behaviour after that specific date/time. Contacts that performed the selected behaviour on the exact selected date/time will be omitted.
- After or equal to - The user will provide a specific date and time and the segment will target all contacts that performed the selected behaviour after that specific date/time or on the exacted selected date/time.
- Before - The user will provide a specific date and time and the segment will target all contacts that performed the selected behaviour before that specific date/time. Contacts that performed the selected behaviour on the exact selected date/time will be omitted.
- Before or equal to - The user will provide a specific date and time and the segment will target all contacts that performed the selected behaviour before that specific date/time or on the exacted selected date/time.
- Between - The user will provide two specific dates and times and the segment will target all contacts that performed the selected behaviour in between those date/times. Contacts that performed the selected behaviour on the exact selected date/time will be omitted.
- Not between - The user will provide two specific dates and times and the segment will target all contacts that performed the selected behaviour outside of those date/times. Contacts that performed the selected behaviour on the exact selected date/time will be omitted.
4. Sent
- Sent
- This lets you target contacts that the system attempted to send to.
- You can target anyone that's been sent any campaign, a specific campaign or a specific deployment.
- Not Sent
- This lets you target contacts that the system did not attempted to send to.
- You can target anyone that hasn't been sent any campaign, a specific campaign or a specific deployment
5. Bounced
- Bounced - This lets you target contacts that the system received a bounce message for the selected reason.
- Did not bounce - This lets you target contacts that the system did not receive a bounce message for.
- Reasons
- Hard - Any contacts that receive this bounce message will be suppressed from further mailing.
- Soft - Any contacts that receive this bounce message most likely had a full inbox or were out-of-office when sending to them. They will not be suppressed from future deployment but they did not receive the deployment where the bounce message was collected.
- Technical - Any contacts that receive this bounce message is usually due to a technical issue like server downtime.
- Complaint - This bounce is generated by the contact when they flag the message they received as "Spam" or they click "Complain". Contacts with this bounce message will be suppressed from all future deployment.
6. Opens
- Opened - This lets you target contacts that have opened any campaign, a specific campaign or a specific deployment.
- Did not open - This lets you target contacts that have not opened any campaign, a specific campaign or a specific deployment.
- Open Rate - This lets you target contacts that have opened during a campaign a percentage or number of times within a data range
7. Clicks
- Clicked - This lets you target contacts that have clicked any campaign, a specific campaign, a specific deployment or a specific link within a deployment.
- Did not click - This lets you target contacts that have not clicked any campaign, a specific campaign, a specific deployment or a specific link within a deployment.
- Open Rate - This lets you target contacts that have clicked a campaign a percentage or number of times within a data range.
How to Use Segments for Exporting Records
Segmentation in CONNECT provides the ability to create any slice of data you wish using the data you have provided.
Sometimes you might want to export this data for external reasons or to manipulate the data and re upload that group of people back into the tool. Below are instructions on how to do this.
1. Set up your Segment with the Criteria you need to Export Records
- If you are unsure on how to use segmentation, click here.
- Tip: You can use segmentation to export a specific list you have already uploaded, by dragging over "List Upload" under the "Source" drop down on the left.
2. Once you have the segment you wish to export, click "Save and Export as .csv" at the top
How to export a segment
Using segments is not only a great way to target specific groups of contacts but it's also a great way to retrieve data from CONNECT for use outside of the application. This tutorial will help walk you through how to export a segment using our Exports feature.
Tutorial
Please note: To try out the feature, click the full screen icon in the tutorial.
Segmentation Operators by Field type
When creating segments in UMPIRE, different operators will appear and will allow you to manipulate the different kinds of data differently.
These operators are pre-determined by the field type of the field you are about to segment on.
Below are descriptions of each operator for each field type. For help with creating a segment, click here.
1. Text Fields
-
Equals/Does not equal
-
The "Equals" operator allows you to target a specific value in that field. In this example, you would want to use the entire Email address EXACTLY as it appears in the DataMart (eg. Email Equals support@inboxmarketer.com).
-
The "Does not equal" operator will ignore anyone with the value you've indicated (eg. Email Does not equal support@inboxmarketer.com, will return everyone except individuals with the email address "support@inboxmarketer.com").
-
-
Begins with
-
This operator allows you to target records with values that begin with the value you've entered.
-
For example, if you wanted to target any email address that starts with the word "support", you would select "Begins with" as your operator and type in "support" in the text box.
-
-
Contains/Does Not Contain
-
The "Contains" operator allows you to search the field's data for a value and return records that have that value somewhere in the whole value.
-
For example, if you wanted to target any individuals with a Gmail address, you would select the "Contains" operator and type in "@gmail.com" in the text box.
-
-
If you selected "Does not contain" in this example, you would be targeting all email address except ones that are @gmail.com
-
-
Is empty/Is not empty
-
The "Is Empty" operator is slightly different from the rest. This operator targets records that do or do not have a value for the chosen field.
-
For example, if I wanted to target individuals who I do not have an email address for, I would select "Is empty" for my operator.
-
-
In reverse, if i wanted to target records that I do have an email address for, then I would choose "Is not empty".
-
Number Fields
-
Equals/Does not equal
-
The "Equals" operator allows you to target a specific value in that field. In this example, you would want to type in the Account Balance EXACTLY as it appears in the DataMart
-
(eg. Account Balance Equals 991234).
-
-
The "Does not equal" operator will ignore anyone with the value you've indicated
-
(eg. Account Balance Does not equal 991234, will return everyone except individuals with the Account Balance "991,234").
-
-
-
Is greater than/Is greater than or equal to
-
The "Is greater than" operator allows you to target records with number values that are greater than (or exactly) the value you have provided.
-
The operator "Is greater than" excludes the exact value you've entered in the text box.
-
For example, if I typed in the value 900,000, "Is greater than" will not target records who have an account balance of exactly 900,000. This includes decimal places (ie. Records with an Account Balance of 900,000.00005 would be targeted).
-
-
However, if I choose "Is greater than or equal to", it WILL target the records that have the exact value 900,000.
-
-
Is less than/Is less than or equal to
-
The "Is less than" operator allows you to target records with number values that are less than (or exactly) the value you have provided.
-
The operator "Is less than" excludes the exact value you've entered in the text box.
-
For example, if I typed in the value 900,000, "Is less than" will not target records who have an account balance of exactly 900,000.
-
-
-
However, if I choose "Is less than or equal to", it WILL target the records that have the exact value 900,000.
-
-
Is empty/Is not empty
-
The "Is Empty" operator is slightly different from the rest. This operator targets records that do or do not have a value for the chosen field.
-
For example, if I wanted to target individuals who I do not have an email address for, I would select "Is empty" for my operator.
-
-
In reverse, if i wanted to target records that I do have an email address for, then I would choose "Is not empty".
-
Date Fields
-
Equals/Does not equal
-
The "Equals" operator allows you to target a specific value in that field.
-
In this example, you would want to type in the Sign Up Date EXACTLY as it appears in the DataMart
-
(eg. Sign Up Date Equals 01/01/2013).
-
-
The "Does not equal" operator will ignore anyone with the value you've indicated
-
(eg. Sign Up Date Does not equal 01/01/2013 will return everyone except individuals with the Sign Up Date "01/01/2013").
-
-
-
Is after/Is after or equal to
-
The "Is after" operator allows you to target records with date values that are after (or exactly) the date you have provided.
-
The operator "Is after" excludes the exact date you've entered in the text box.
-
For example, if I typed in the date 01/01/2013, "Is after" will not target records who have their sign up date as exactly 01/01/2013.
-
-
-
However, if I choose "Is after or equal to", it WILL target the records that have the exact date 01/01/2013 in addition to the records that have a sign up date that falls after the given date.
-
-
Is before/Is before or equal to
-
The "Is before" operator allows you to target records with date values that are before (or exactly) the date you have provided.
-
The operator "Is before" excludes the exact date you've entered in the text box.
-
For example, if I typed in the date 01/01/2013, "Is before" will not target records who have their sign up date as exactly 01/01/2013.
-
-
However, if I choose "Is before or equal to", it WILL target the records that have the exact date 01/01/2013 in addition to the records that have a sign up date that falls before the given date.
-
-
Is today
-
This operator allows you to target records who have a date value that equals the current date.
-
Keep in mind, that each day, this operator and the next 4 (Is before/after this many days ago, Is before/after this many days from now) will cause the segment to change each day as the current date changes.
-
-
Is before this many days ago
-
This operator allows you to target records who have a date value that is before the current date minus the number of days given.
-
For example, if I wanted to target records who's Sign Up Date was before 3 days ago (today being 01/15/2013), I would select "Is before this many days ago" as my operator and type the value 3 in the text box.
-
This would give me all records who's sign up date is before 01/12/2013.
-
-
Is after this many days ago
-
This operator allows you to target records who have a date value that is after the current date minus the number of days given.
-
For example, if I wanted to target records who's Sign Up Date was after 3 days ago (In this example, today is 01/15/2013), I would select "Is after this many days ago" as my operator and type the value 3 in the text box.
-
This would give me all records who's sign up date was after 01/12/2013.
-
-
Is before this many days from now
-
This operator allows you to target records who have a date value that is before the current date plus the number of days given.
-
For example, if I wanted to target records who's Sign Up Date was before 3 days from now (In this example, today is 01/15/2013), I would select "Is before this many days from now" as my operator and type the value 3 in the text box.
-
This would give me all records who's sign up date was before 01/18/2013.
-
-
Is after this many days from now
-
This operator allows you to target records who have a date value that is after the current date plus the number of days given.
-
For example, if I wanted to target records who's Sign Up Date was after 3 days from now (In this example, today is 01/15/2013), I would select "Is after this many days from now" as my operator and type the value 3 in the text box.
-
This would give me all records who's sign up date was after 01/18/2013.
-
-
Is empty/Is not empty
-
The "Is Empty" operator is slightly different from the rest. This operator targets records that do or do not have a value for the chosen field.
-
For example, if I wanted to target individuals who I do not have an email address for, I would select "Is empty" for my operator.
-
-
In reverse, if i wanted to target records that I do have an email address for, then I would choose "Is not empty".
-
Data Extensions
Create a Data Extension
Data Extensions are a great way to expand on your customer profiles by adding in additional data that links to one of the datamart fields. This can be used to link a preferred store ID to a list of stores and their locations or an assigned customer representative email address to a list of representatives and their contact information.
Tutorial
Please note: To try out the feature, click the full screen icon in the tutorial.
Managing your Data Extensions
The Data Extension tab in the Target screen provides multiple options for managing your Data Extensions including options to add/update more records or delete records.
Tutorial
Please note: To try out the feature, click the full screen icon in the tutorial.